AdminsForum

Paste the error. Find the fix.

Step-by-step guides and community answers for Linux servers, VPS and hosting control panels.

New threads

The latest guides and questions from every forum.

aaPanel Backups & Migration Guides

Verify a Full WordPress Backup Restore in aaPanel

Quick answer
A full WordPress recovery needs both website files and the database. Test the backup in an isolated location before replacing a live site. Our aaPanel backup rehearsal restored 3,935 files with matching hashes, imported 12 database tables and loaded the restored WordPress installation successfully.
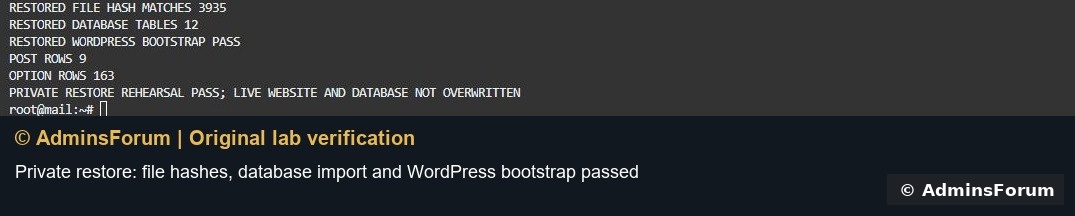
   
This was a private staging rehearsal, not an overwrite of the live WordPress website. It proves the tested archive's file restoration, SQL import and WordPress bootstrap; browser pages, login, email, payment integrations and a production cutover require their own checks.

1. Choose the correct backup set
In the WordPress backup area, identify the site, backup time and archive. Keep the matching database and files together. Download an independent copy and record the intended recovery point so you know which newer changes would be lost in a live rollback.
Our tested archive was wp.adminslab.com_20261012_163830.zip. Its outer ZIP contained meta.json, database.sql.gz and files.zip. That format is specific to this lab backup; inspect your own archive rather than assuming every aaPanel backup has the same layout.
A website ZIP containing uploads and PHP files is not automatically a database backup. A database dump does not contain all your themes, plugins or uploaded images.

2. Keep the rehearsal outside the public website
Use a new private working directory outside /www/wwwroot, with restrictive permissions. Do not extract wp-config.php or SQL dumps into a public URL just for convenience. Confirm the target directory is empty before extraction so an older test is not silently overwritten.
Our working copy was under a root-owned private directory with mode 0700. Credential files used mode 0600. No new public website or hostname was created for this rehearsal.
Do not use your live document root or live database name as a staging destination.

3. Check both archive layers
Validate the outer ZIP, then the nested files.zip and the compressed SQL member. Our outer archive had three members, and the nested file archive had 4,423 entries including directories. Both ZIP integrity checks passed.
You can inspect an archive with Python's built-in ZIP tools:
Code:
python3 -m zipfile -l /path/to/your-backup.zip python3 -m zipfile -t /path/to/your-backup.zip
Do not treat a valid ZIP checksum as proof that WordPress can be restored. It only verifies that the stored archive entries are readable without that integrity error.
Our extraction also checked that every destination stayed inside the private staging folder and rejected symlink entries needing review. Inspect the archive paths before extracting an unfamiliar backup.

4. Restore the website files into staging
Extract the outer package into the private work area. Extract files.zip into a separate empty staging directory. Check that the expected WordPress structure is present: wp-admin, wp-includes, wp-content, wp-load.php and wp-config.php.
Keep the archive unchanged. We compared each extracted regular file against its archive member using SHA-256 before editing staging configuration; 3,935 file hashes matched. Directories are not counted as regular files in that result.
For a smaller manual spot check, compare several important files and an uploaded image, but label that as a sample. It is not the same as the full file comparison used in this rehearsal.

5. Create a separate restore database
Use a new clearly named temporary database. Our database was af_restore_verify_20261013, separate from the active WordPress database. Confirm it does not already exist before creating it.
Use existing authorized database-administration access for the import, and keep credentials out of command-line arguments, screenshots and forum posts. A private MySQL client option file is one approach:
Code:
[client] user=YOUR_AUTHORIZED_DATABASE_ADMIN password="YOUR_EXISTING_PRIVATE_PASSWORD" host=localhost
Store it in a private administration directory with permissions 0600. Do not paste real credentials into this article's examples.
Before importing, inspect the dump for database-switching statements such as USE, CREATE DATABASE or DROP DATABASE. Our dump had none; the importer explicitly targeted the temporary database. Stop and review a dump that would redirect the import to another database.
A representative import uses the private option file and the chosen staging database:
Code:
set -o pipefail gunzip -c /private/work/database.sql.gz | mysql --defaults-extra-file=/root/wp-restore-auth.cnf YOUR_STAGING_DATABASE
Replace every example path and name with your verified staging values. Check both decompression and import exit status. Do not run this against the live database while rehearsing.
Our import succeeded and the staging database contained 12 tables.

6. Point only the staging configuration to that database
Edit the staging copy of wp-config.php so DB_NAME, DB_USER, DB_PASSWORD and DB_HOST refer to the intended private restore database and authorized identity. Verify the file you are editing is the copy, not the live configuration.
Preserve the table prefix from the backup. A correct database name with the wrong prefix can make a restored site appear uninstalled or empty.
Use a restricted application database identity before exposing a restored site publicly. The lab's temporary administration identity was used only inside an inaccessible private rehearsal; it is not a recommendation to put a database root account into a public website.
Check PHP syntax with the interpreter appropriate for the restored site. Resolve any configuration error before loading WordPress.

7. Load WordPress without scheduling or shared-cache side effects
Our test runner disabled traffic-triggered cron, persistent Redis access and early page-cache loading for the private copy before loading its wp-load.php. It then confirmed the configured database was the staging database and queried the restored posts and options tables.
The bootstrap passed. The snapshot contained 9 post-table rows and 163 option-table rows. These counts are evidence from that backup, not numbers every WordPress installation should have.
Keep scheduled jobs and external integrations isolated while rehearsing. A restored copy should not take over the live site's cache namespace or run duplicate live schedules.

8. Add browser and application checks before cutover
If you later make a private browser-accessible staging site, verify its URL settings, HTTPS, login, images, permalinks, forms, plugins and essential application functions. Moving to a different domain may require a WordPress-aware URL migration; a blind SQL text replacement can damage serialized values.
Before a live restore, take a fresh rollback copy of the current files and database, plan a maintenance window and document the expected data-loss interval. The rehearsal did not perform that cutover.

Do not rely on a success notification alone
An earlier lab check of the native WP Toolkit Restore action reported success, but test changes remained. That native behavior has not been repaired or revalidated by this manual rehearsal. The independently tested archive restore is the verified result here.
After any actual restore, confirm a known file and database value match the selected backup point. Checking only that the home page loads can miss a partial restore.

Final lab result
  • Outer and nested archives were readable and passed integrity checks.
  • 3,935 extracted regular files matched their archive hashes before configuration changes.
  • The SQL imported into a separate private database with 12 tables.
  • The restored WordPress copy loaded and its data tables were readable.
  • The current public website and its active database were not overwritten.
The private rehearsal copy remains available for review. Keep backup and credential material private throughout cleanup and recovery.

Reference: WordPress backup documentation. © AdminsForum.
DEV 10-13-2026, 03:52 AM Read thread
aaPanel WordPress Guides

Run WordPress Scheduled Tasks with aaPanel Cron

Quick answer
Create one aaPanel task that runs your site's wp-cron.php using the correct PHP interpreter and website user. Verify a due event actually runs, then keep traffic-triggered WP-Cron disabled for that site. Our lab now has one five-minute task for wp.adminslab.com; its native log and a due WordPress test event both passed.

Why use a server schedule?
WordPress normally checks scheduled events during website traffic. A low-traffic site can therefore run due work late. A server scheduler gives WordPress regular opportunities to process its due queue, even when nobody visits the site. It does not make every plugin task safe, repair broken callbacks or force future events to run early.

1. Check the actual website and PHP
Record the exact document root and active PHP version. Our website root is /www/wwwroot/wp.adminslab.com and its active PHP-FPM runtime is PHP 8.5.11. The matching CLI interpreter is /www/server/php/85/bin/php. Verify those paths on your own server instead of copying 85 for a website using another version.
WordPress Site Health reports the web runtime. The server's generic php command may point to another interpreter with different extensions and limits. Test the executable you will schedule.
Also identify the website's OS user. Our site files use www. Running the PHP workload as the website user helps avoid root-owned generated files.

2. Create one task
In aaPanel, open Cron and keep Task type set to Shell Script. Give it a specific name such as “WordPress scheduled tasks — wp.adminslab.com”. Choose N Minutes and set the interval to 5. Check that the description says it executes every five minutes, rather than a daily time or a five-hour interval.
   
Our panel stores the scheduler wrapper as root, and the command explicitly runs PHP as www. If your panel supports selecting the correct website user directly, use that with the corresponding plain PHP command instead. Do not substitute another OS account without checking its access.

3. Use a command with visible exit status
The exact tested lab wrapper is:
Code:
/usr/sbin/runuser -u www -- /www/server/php/85/bin/php -q /www/wwwroot/wp.adminslab.com/wp-cron.php af_status=$? echo "WordPress scheduler finished; exit code: $af_status" exit "$af_status"
Change the website path, PHP interpreter and website user to match your setup. The wrapper's scheduler account must be allowed to use runuser; a non-root task cannot generally switch to arbitrary accounts.
Keep the exit status: it makes a failed PHP invocation visible. Do not suppress every error and then print a misleading success message. Our first silent version gave an unhelpful empty log, so the tested final version reports the interpreter's result.
Save the task once. Check the task list for an existing equivalent job before adding another.

4. Verify the native task
Use Execute for this specific task, confirm the named task and inspect its Log. An empty output is not by itself proof that a due WordPress callback ran.
   
Our final native log reported exit code 0 and Successful. A subsequent automatic five-minute run also logged success. The existing certificate-renewal task stayed running, and the earlier website/database backup demo tasks stayed stopped.

5. Verify an actual due WordPress event
For the lab, we registered a temporary, uniquely named test hook, scheduled it as due and had its callback write a timestamp. The native task processed it. A separate check read the recorded execution time and confirmed DISABLE_WP_CRON was true. The test hook and marker were then cleaned up.
   
This is stronger evidence than the task's Running label. For your real site, inspect a known due event or a scheduled post after its due time, and review any plugin-specific errors. Do not change every plugin schedule just to create a test.

6. Replace traffic-triggered WP-Cron
Back up wp-config.php privately. Once the server task is ready and its operation is verified, add the following before WordPress loads wp-settings.php:
Code:
define('DISABLE_WP_CRON', true);
Check first whether that constant is already defined. Do not create duplicate definitions. Lint the configuration and confirm the site still loads.
If the new task fails, restore the previous scheduling behavior while you fix the task. Leaving both traffic-triggered and external scheduling disabled can prevent due work from running. The lab's final state keeps the verified five-minute task running and traffic-triggered execution disabled for this site.

Troubleshooting
  • PHP executable not found: use the full installed interpreter path for the website's intended PHP version.
  • Permission denied: check the website user, directory permissions and command wrapper. Avoid making the entire website world-writable.
  • Task exits successfully but an event remains overdue: inspect that event's callback, application logs and any cron lock; scheduler invocation alone cannot repair plugin logic.
  • Task runs twice: check for duplicate native jobs, external schedulers and the site's DISABLE_WP_CRON configuration.
  • Wrong timestamps: distinguish server/log timezone from WordPress display timezone. The lab verification timestamp was recorded in UTC.

Rollback
Restore traffic-triggered scheduling if needed, then stop the equivalent aaPanel task so you do not leave redundant schedulers. Verify a due event again. Do not disable unrelated SSL renewal, mail or backup tasks.

References: WordPress system-scheduler documentation and aaPanel Cron documentation. © AdminsForum.
DEV 10-13-2026, 03:42 AM Read thread
aaPanel WordPress Guides

Enable Redis Object Cache for WordPress in aaPanel

Quick answer
Install the official Redis Object Cache plugin, configure its connection before enabling it and verify the cache really persists. Our lab uses Redis 7.4.11 on localhost, database 15 and the prefix af_wp_lab:. The plugin connects through Predis; a PhpRedis extension was not required for this tested free-plugin setup.

What this cache does
A persistent object cache stores WordPress objects between requests and can reduce repeated database work. It differs from HTML page caching and PHP OPcache. Enabling Redis does not by itself configure a CDN, LiteSpeed page cache or every website on the server.

1. Check Redis before changing WordPress
In aaPanel App Store, locate Redis. Install the official package if absent; if installed, open its settings and check its service and configuration. Our lab already had Redis because the mail stack uses it. We did not reinstall it or change the mail service's database.
   
Our checks found bind 127.0.0.1, protected-mode yes, port 6379 and an existing authentication requirement. The active listener was localhost only. No public Redis firewall port was added.
Do not remove authentication to solve a WordPress connection error. Read the existing configuration privately and give the intended client the correct authorized configuration.

2. Choose an isolated cache namespace
Pick an unused Redis database and a unique prefix for the WordPress site. The lab had 16 logical databases, and database 15 was empty before use. We selected it without clearing anything. Do not assume database 15 is free on your server; check first.
A database number and prefix prevent accidental key collisions, but they are not a security boundary between mutually untrusted users. On a production server shared with mail or other applications, plan an appropriately restricted Redis identity or separate instance. Do not share an unrestricted administrator credential between unrelated users.
Avoid global cache flushes. Clearing all Redis data can remove mail filtering or other application state.

3. Install the correct WordPress plugin
In WordPress, open Plugins → Add Plugin and search for Redis Object Cache. Verify the author is Till Krüss, use Install Now and then Activate. Our installed version was 3.0.0. A similarly named cache plugin may have a different configuration or backend.
Activation alone does not mean persistence is enabled. Initially our plugin reported Redis unreachable because the server requires authentication; after the proper configuration and reload, it reported Reachable.

4. Configure wp-config.php privately
Back up wp-config.php outside the publicly served website before editing. Add the connection constants before the line that loads wp-settings.php. Our tested configuration was:
Code:
define('WP_REDIS_HOST', '127.0.0.1'); define('WP_REDIS_PORT', 6379); define('WP_REDIS_DATABASE', 15); define('WP_REDIS_PREFIX', 'af_wp_lab:'); define('WP_REDIS_CLIENT', 'predis'); define('WP_REDIS_PASSWORD', 'YOUR_EXISTING_AUTHORIZED_REDIS_PASSWORD');
Replace the password placeholder privately and choose your own unused database/prefix. Do not paste the real secret into a public support request. The screenshot masks it.
Check PHP syntax before reloading the website. Our PHP 8.5 configuration lint passed. A typo in wp-config.php can break the whole site, so keep the backup ready.

5. Enable Object Cache
Open Settings → Redis. Confirm Redis says Reachable, then select Enable Object Cache. The plugin installs its object-cache drop-in and should report Connected.
   
Our page showed Connected, a writable filesystem, host 127.0.0.1, port 6379, database 15, the separate prefix and Predis 2.4.1. The free plugin was connected even though the separate Pro promotion noted that PhpRedis was absent; that promotion is not the same as the free plugin's connection status.
If another plugin already manages an object-cache.php drop-in, resolve ownership before replacing it. Do not enable two competing persistent object-cache implementations at once.

6. Verify persistence, not just the status label
We loaded the same WordPress installation in two separate PHP processes. The first stored a temporary value through wp_cache_set. The second retrieved it through wp_cache_get and checked the content, then removed only that test key.
   
Both checks passed. Without persistence, a value stored only in the first process's memory would not survive into the second. We also reloaded the administration page successfully after enabling the cache.
This proves the tested connection and persistence. It is not a benchmark or a claim that every site will load a particular percentage faster. Measure your own workload after configuration.

Troubleshooting
  • NOAUTH: check the intended Redis credential in private configuration. Do not make the service unauthenticated.
  • Connection refused: confirm Redis is running and the configured address/port match its listener. Keep a local-only setup local.
  • Not enabled but Reachable: the connection works, but the persistent drop-in still needs enabling.
  • Drop-in conflict: identify which cache plugin owns object-cache.php before modifying it.
  • Unexpected cached data: confirm each site has a unique database/prefix and review the application's cache policy. Do not use FLUSHALL as a first response.

Rollback
Use Disable Object Cache in the plugin before deactivating it, then check the site still loads. Keep the private wp-config.php backup. If WordPress cannot load at all, use your established file-management/recovery route to inspect the drop-in and restore the correct configuration. Do not stop a shared Redis server used by mail merely to disable one WordPress cache.
The tested lab cache remains enabled on its separate database/prefix. No other Redis database was flushed.

References: Redis Object Cache plugin and aaPanel Redis documentation. © AdminsForum.
DEV 10-13-2026, 03:37 AM Read thread
aaPanel Domains, DNS & SSL Guides

Install a Trusted SSL Certificate for the aaPanel Login

Quick answer
Use Settings → Panel SSL → Modify → Lets Encrypt to request a certificate for your panel hostname, then sign in through that same hostname. A website's SSL certificate does not automatically secure the separate aaPanel listener.

Lab result
On aaPanel 8.0.6, the native panel-certificate workflow deployed a trusted certificate for cp.adminslab.com. The panel keeps its existing port 18443. The certificate expires on 11 January 2027, and a client using its normal trusted CA store verified the hostname and negotiated TLS 1.3. The domain login succeeded.
   

1. Prepare DNS and recovery
Create a dedicated DNS-only A record pointing to the VPS before requesting the certificate. Use the existing panel port and keep its security entrance private. Our record is cp.adminslab.com → 217.217.235.82; substitute your own hostname and IP.
Keep an independent SSH or provider-console recovery route. Back up panel configuration and certificate files privately before replacing them. Do not put certificate private keys in a public web folder or attach them to a support thread.
If you use a CDN, redirection or validation rules, ensure they will not intercept the certificate challenge. This walkthrough used native File Verification and a DNS-only hostname.

2. Open the panel certificate editor
Open Settings and find Panel SSL. Select Modify next to SSL Certificate. This is the panel's certificate setting, separate from the SSL tab on an individual website.
Our panel already had HTTPS enabled with an IP certificate. We kept HTTPS enabled while replacing it with a hostname certificate; disabling encryption was unnecessary.

3. Select the native Let's Encrypt workflow
In Custom Panel Certificate choose Lets Encrypt. The native dialog offers File Verification and DNS Verification. We selected File Verification and entered cp.adminslab.com in Panel Domain, then used Install Certificate Now.
The request progressed through Panel SSL Initialize and deployed the certificate. Wait for the result instead of submitting repeated applications. A failed request needs its validation error checked first; repeated requests can encounter CA limits.
DNS Verification is an alternative when appropriate, but this article does not claim that its provider/API flow was tested.

4. Reconnect using the correct hostname
The panel may restart or refresh after certificate deployment. Use your domain, existing port and existing security entrance:
Code:
https://cp.example.com:YOUR_PANEL_PORT/YOUR_SECURITY_ENTRANCE
We opened the login page and signed in through the domain. The previous IP URL produced a certificate-name mismatch because the replacement certificate covers the domain. That is a hostname issue, not a reason to bypass a browser warning or disable HTTPS.
Domain binding remains a separate restriction. We left it empty; setting it is not required simply to install a domain certificate.

5. Verify the certificate
In Settings, check Certificate Status, Domain, Issuer and Expiration Date. The domain must match the address you actually use. Also test with normal certificate validation; a green status in the panel alone is not the entire check.
   
Our independent check resolved the domain to the correct VPS, validated the chain and hostname, and negotiated TLS 1.3 on port 18443. It did not disable certificate validation.

6. Check renewal arrangements
The native workflow describes automatic renewal through the domain-management system. Our existing Domain SSL Renew task remains Running. Keep the hostname resolving to the correct server and keep the selected validation route working so future renewal can complete.
The present certificate was verified after deployment. Its future renewal has not yet occurred, so this guide does not claim a completed renewal test. Check the next renewal log and certificate expiry rather than assuming the task's existence guarantees success.
A manually copied Custom SSL certificate needs its own deployment and renewal process. A renewed website certificate does not necessarily replace a separately copied panel certificate.

Troubleshooting
  • Validation fails: check A/AAAA records, DNS propagation, challenge reachability and CDN/redirect rules. Read the actual validation result.
  • Browser reports a different name: use the certificate hostname or install the right certificate; do not accept an unrelated certificate as the permanent solution.
  • Domain works on 443 but panel does not: verify the panel's actual port. Website HTTPS and panel HTTPS are separate listeners.
  • Panel restarts during deployment: reconnect to the correct hostname and existing entrance. Preserve your SSH/provider-console route.
  • Renewal task fails later: check its log, DNS and validation path before expiry. Do not wait until the certificate is already invalid.

Related: Set up aaPanel domain access.
Reference: aaPanel domain and panel-SSL documentation. © AdminsForum.
DEV 10-13-2026, 03:33 AM Read thread
aaPanel Domains, DNS & SSL Guides

Access aaPanel Through a Domain Name with Cloudflare DNS

Quick answer
Create a DNS-only A record for a dedicated panel hostname, keep the existing aaPanel port and security entrance, and install a trusted certificate covering that hostname. In our lab, cp.adminslab.com points to 217.217.235.82 and the panel still uses port 18443. We left the Domain binding field empty.

Before you start
Have a working panel login and an independent SSH/provider-console recovery route. Record the current port and security entrance privately. These are your existing values, not a reason to reset them. Back up panel configuration before replacing a certificate. Use a subdomain dedicated to administration, such as cp.example.com, rather than reusing a public website hostname.

1. Add the DNS record
In Cloudflare, select the correct domain → DNS → Records → Add record. Choose A, enter cp as the name and your VPS IPv4 address as the content. Turn Proxy status off so it says DNS only, leave TTL at Auto and save.
   
Our saved record resolves cp.adminslab.com to the lab VPS. Replace that domain and address with your own values. Do not change your main website or mail records while adding the panel record.
The lab's port 18443 is outside Cloudflare's ordinary supported proxy ports. Orange-cloud proxying would not make this direct panel URL work. DNS only sends the browser directly to the origin; retain your server firewall and panel authentication.

2. Understand the complete URL
The login address contains three parts:
Code:
https://cp.example.com:YOUR_PANEL_PORT/YOUR_SECURITY_ENTRANCE
The domain replaces the IP address. The port and security entrance remain the ones already configured in aaPanel. Our port is 18443, but your installation may use another number. Keep the real entrance private; this guide deliberately does not publish it.
A DNS record does not move the panel onto port 443 or change its login path. Typing only the hostname may reach a website or a default web-server page instead of aaPanel.

3. Install HTTPS before signing in through the hostname
A certificate issued for the server IP will not automatically cover the new domain. In Settings → Panel SSL → Modify, use the certificate workflow for the panel hostname. Our native Let's Encrypt workflow applied and deployed a certificate for cp.adminslab.com.
   
We verified its chain and hostname with normal certificate checks, negotiated TLS 1.3 and then signed in through the domain. Its displayed expiry is 11 January 2027. This is evidence from the lab, not a promise that your application will complete without DNS or validation fixes.

4. Keep Domain binding separate
Settings → Domain is a restriction, not the DNS record editor. The panel warns that setting it limits access to that domain. We kept it empty while testing, so changing the hostname did not also add an access restriction.
There is still a certificate consequence: after installing a domain-only certificate, visiting the raw IP through HTTPS produces a name mismatch. Empty binding does not make that certificate valid for the IP. Use the proper domain URL and retain SSH/provider-console access for recovery; do not bypass certificate warnings.

5. Verify the new route
Check the DNS answer is your VPS, confirm the URL contains the actual port and entrance, inspect the certificate domain and expiry, and sign in using the existing account. Open a normal panel page after login to confirm the session works. Our domain login and settings page passed these checks.
Do not change the panel port, enable a reverse proxy or restrict authorized IPs during the same first test. Each adds a separate failure point and deserves its own verified step.

Troubleshooting
  • DNS points elsewhere: correct the A record and wait for the relevant DNS cache to refresh. Check for an unintended AAAA record if IPv6 takes a different route.
  • Timeout: check the exact panel port, server firewall, provider firewall and DNS-only status.
  • 404 at the hostname: confirm the security entrance and port. aaPanel may intentionally return 404 for the wrong entrance.
  • Certificate mismatch: use the hostname covered by the certificate or deploy the correct certificate. A website certificate on 443 does not automatically configure the panel listener.
  • IP URL stopped validating: expected if the replacement certificate covers only the domain. Recover through the correct hostname or your independent administration route.

References: aaPanel domain-access documentation and Cloudflare supported ports. © AdminsForum.
DEV 10-13-2026, 02:58 AM Read thread
aaPanel FTP, SFTP & File Transfer Guides

Connect FileZilla to aaPanel with Secure FTPS

Quick answer
Use FileZilla Site Manager with protocol FTP, port 21 and “Require explicit FTP over TLS”. Enter the hostname covered by your server certificate and a separate restricted FTP account. SFTP is an SSH connection and uses different server credentials; it is not a Pure-FTPd account.

Before connecting
Complete the FTPS server setup first. Confirm the service is running, the certificate is valid and your FTP account points to the correct directory. Install FileZilla Client from its official website. You need the Client application, not FileZilla Server.

1. Create a saved site
Open File → Site Manager, or press Ctrl+S. Choose New Site and give it a recognizable label such as “AdminsForum lab — FTPS”. Select the General tab and enter your own server details. The following reference shows our lab settings, not a screenshot of a running FileZilla session.
   
  • Host: mail.adminslab.com in our lab. Enter your certificate hostname without https:// or a folder path.
  • Port: 21 for this explicit FTPS setup.
  • Protocol: FTP — File Transfer Protocol.
  • Encryption: Require explicit FTP over TLS. Avoid an option that falls back to unencrypted FTP.
  • Logon type: Ask for password, so the saved site does not need to store it permanently.
  • User: your separate restricted FTP username; af_ftp_lab in our test.
In Transfer Settings, use Passive mode. Save the site and select Connect. Enter your own existing FTP password when prompted; do not put it in guide screenshots.

2. Check the certificate
The server identity must match the hostname you entered. If the certificate is expired, belongs to a different name or has an incomplete chain, stop and correct the server configuration. Do not routinely accept an unrelated certificate just to make the connection work.
Our backend test accepted the normal certificate chain and mail.adminslab.com hostname, negotiated TLS 1.3 and used encrypted data connections. That server test used a Python FTPS client; this article does not claim that FileZilla desktop screenshots or transfers were captured.

3. Understand the two file panes
The local pane displays files on your computer. The remote pane displays files the FTP account is allowed to access on the server. A restricted account's remote / means its assigned folder, not the Linux server's real root directory.
Our account is restricted to /www/wwwroot/adminslab.com/ftp-lab. Do not try to enter another website path as a workaround. If you need another folder, have the administrator assign the correct scope rather than using a root login.

4. Upload a harmless test file
Create a small text file on your computer named ftp-check.txt with a unique sentence. In the remote pane, confirm you are in the intended test folder. Drag the file from the local pane into that folder, or use the file's Upload action.
Check the transfer queue. The transfer should complete and appear in the successful list. Refresh the remote directory and confirm the filename and size. Do not test by overwriting a live index.php, wp-config.php or another production file.

5. Download and compare
Download the uploaded file into a different local folder. Open it and compare the sentence with the original, or compare its SHA-256 hash. A successful login alone does not prove that the data connection works; an upload and matching download provide a stronger check.
   
The lab's certificate-verifying FTPS test confirmed matching uploaded/downloaded contents and hash. It also refused access outside the assigned root.

6. Disconnect and keep credentials private
Disconnect when finished. Keep the test file only if it is useful for the lab; do not remove other server files. Never share an exported Site Manager configuration without checking whether it contains saved passwords or private server information.

Common connection problems
  • Connection refused or timeout before login: check that Pure-FTPd is running, DNS points to the server and the configured control port is reachable.
  • Login rejected: verify the username, password and enabled account. An FTP account is not automatically an SSH user.
  • Login works but directory listing hangs: check Passive mode, the server's actual passive port range and both server/provider firewalls. Our lab range is 39000–40000; use your configured range.
  • Plaintext connection rejected: expected with TLS 3. Select explicit FTPS and require encryption.
  • Certificate name mismatch: use the certificate hostname, not an unrelated domain or raw IP.
  • Permission denied on upload: confirm the assigned directory and filesystem ownership. Do not solve it by applying world-writable permissions across the server.

FTP, FTPS or SFTP?
FTP without TLS exposes login and file traffic. FTPS adds TLS to FTP and uses separate control/data connections. SFTP transfers files through SSH, normally over the server's SSH port. Select the protocol that matches the service you configured; changing a dropdown does not create that service or account.

Reference: FileZilla Site Manager documentation. © AdminsForum.
DEV 10-13-2026, 02:38 AM Read thread
aaPanel FTP, SFTP & File Transfer Guides

Enable FTPS Encryption and SSL for Pure-FTPd in aaPanel

FTPS protects FTP logins and file transfers with TLS. This guide uses Pure-FTPd on aaPanel with explicit FTPS on port 21. SFTP is a different protocol that uses SSH; selecting SFTP in a client will not connect to Pure-FTPd.

Before you start
  • Pure-FTPd is installed and running.
  • You have a separate FTP user restricted to the intended website folder.
  • A DNS-only hostname points to the server. Our lab uses mail.adminslab.com because its existing trusted certificate covers that name.
  • You have the matching private key and full certificate chain, and a backup of the current FTP configuration and certificate.
Do not use a certificate for a different hostname. Ordinary Cloudflare proxying does not proxy FTP, so keep the FTP hostname DNS only.

1. Check the existing service
In aaPanel, open App Store → Installed → Pure-FTPd → Setting. Confirm that the service is running. Keep your working panel and SSH sessions open while making configuration changes.

2. Back up the configuration
Our lab configuration is /www/server/pure-ftpd/etc/pure-ftpd.conf. Before editing, save a private copy of this file and the current /etc/ssl/private/pure-ftpd.pem certificate bundle. Paths can differ between installations; verify the file your service actually loads.

3. Prepare a trusted certificate bundle
Pure-FTPd can load a PEM bundle containing the private key and full certificate chain. In our lab, the existing Let's Encrypt certificate and matching key were verified before creating /etc/ssl/private/pure-ftpd.pem. The bundle is owned by root with permissions 0600. Never post or upload its private key to a forum.
The name entered in your FTP client must match the certificate. Our certificate is valid for mail.adminslab.com, not the server IP.

   
The lab certificate bundle and strict TLS configuration were verified before restarting the service.

4. Require encryption for both connections
Set the following directives in the active Pure-FTPd configuration:
Code:
TLS 3 CertFile /etc/ssl/private/pure-ftpd.pem ChrootEveryone yes NoAnonymous yes PassivePortRange 39000 40000
TLS 3 requires TLS for both the login/control connection and the file-transfer/data connection. TLS 1 permits plaintext FTP, and TLS 2 only requires encryption on the control connection. Save the configuration and restart Pure-FTPd. If the service fails, check its log and restore the backed-up configuration instead of repeatedly changing unrelated settings.

5. Check passive ports
Explicit FTPS uses port 21 for the control connection. Passive transfers also need the configured data-port range permitted by the server and provider firewalls. The lab already allowed TCP 39000–40000; this test did not open additional public ports. Use your actual configured range. Do not open Redis, database or panel backend ports to solve an FTP error.

6. Connect securely
In your FTP client select FTP, explicit FTP over TLS, port 21, the certificate hostname and the restricted account. In FileZilla, choose “Require explicit FTP over TLS”. Keep certificate verification enabled. A name mismatch or expired certificate needs correction on the server or hostname; do not turn validation off.

7. Verify the result
Our lab tests confirmed:
  • The certificate chain and hostname were accepted by a client using its normal trusted CA store.
  • The control connection negotiated TLS 1.3.
  • A protected data connection uploaded and downloaded a test file with matching contents and SHA-256 hash.
  • The restricted account could not access another website folder.
  • A plaintext connection was rejected with “Please reconnect using TLS security mechanisms.”
The client test used Python's FTPS client. It proves the server transfer path; it does not claim a FileZilla desktop session was tested.

   
Plaintext FTP was refused; the certificate-verified connection negotiated TLS 1.3.

   
Protected upload/download and directory restriction passed.

Troubleshooting
Login works but listing or transfers hang: check passive ports, the provider firewall and the advertised server address.
Certificate error: verify the client hostname, certificate expiry, complete chain and matching private key.
Plain FTP no longer works: this is expected with TLS 3; configure explicit FTPS in the client.
Cannot leave the assigned folder: this is expected for the restricted account. Its FTP root is not the server filesystem root.

Certificate renewal
Copying a certificate into the FTP bundle does not automatically update that bundle after renewal. Renew the certificate, securely rebuild the bundle, restart Pure-FTPd and repeat certificate and transfer checks. Our lab certificate expires on 9 January 2027; no automatic FTP redeployment hook was added in this test.

Related guides
Install Pure-FTPd and check its service
Create a restricted FTP account

References
aaPanel FTP documentation
Pure-FTPd TLS documentation
Cloudflare supported proxy ports

Certificate renewal follow-up
The lab now uses a validated hourly synchronization helper to deploy the renewed aaPanel certificate into the separate Pure-FTPd bundle. Dry validation, deployment, trusted TLS and an unchanged second run passed. Future renewal has not yet occurred. Follow the complete automatic certificate-update guide.
DEV 10-13-2026, 02:35 AM Read thread
aaPanel FTP, SFTP & File Transfer Guides

Create a Restricted FTP Account in aaPanel

Quick answer
In aaPanel's FTP module, choose Add FTP, enter a separate username and unique password, and assign only the directory that user needs. Confirm the saved account/root, then test it over FTPS. Do not give a transfer user the server's root login or assign /www/wwwroot when they only need one folder.

We created af_ftp_lab on our aaPanel 8.0.6 Ubuntu lab and restricted it to /www/wwwroot/adminslab.com/ftp-lab. A verified encrypted upload/download test passed, and an attempt to access a different website path through FTP was refused.

1. Prepare the server and destination folder
Confirm Pure-FTPd is installed and started. Follow the installation/service guide first if necessary.

Decide exactly which directory the user needs. A website administrator may need that website's root; a narrow transfer task may need only a subfolder. Our test needed only a dedicated lab folder, so we did not grant access to the parent website directory or other sites.

Check the intended folder and its contents before creating the account. Avoid copying a path from an unrelated website. If you use a new folder, confirm the saved directory exists after account creation and has appropriate ownership for the intended workflow.

2. Open Add FTP and enter the fields
Open FTP → Add FTP. The dialog contains Username, Password and Document Root.
  • Username: choose a separate identifiable name. Our actual account was af_ftp_lab.
  • Password: use a long unique value; keep it private. The panel can generate a value. Do not reuse the panel/root password or publish it in a screenshot.
  • Document Root: assign the exact authorized directory. Our value was /www/wwwroot/adminslab.com/ftp-lab.

Review all three fields, then Confirm. Wait until the account appears in the table. If the dialog reports a validation error, correct the relevant field instead of repeatedly submitting it.

3. Verify the saved account
Our FTP table showed the account, a masked password, Running status and the exact restricted root. The screenshot includes the Add FTP action and the saved result; the password remains hidden.
   

Running here refers to the account's enabled state. Also check the Pure-FTPd service itself. A valid saved user cannot log in if the server is stopped.

Review the Quota field before assuming a storage cap is enforced. Our test displayed Not set. This walkthrough does not claim that an unspecified quota limits disk consumption; check your filesystem/panel support before using quotas as a control.

4. Connect with encrypted FTP
Use a certificate-matching hostname and require explicit FTP over TLS. A client profile for our test used:
Code:
Protocol: FTP Encryption: require explicit FTP over TLS Host: mail.adminslab.com Port: 21 User: af_ftp_lab Transfer mode: passive

The password is deliberately omitted. The hostname must match the server's FTPS certificate. The panel's displayed ftp:// IP address alone does not establish a secure client profile.

FTPS and SFTP are different protocols. This FTP account is not automatically an SSH/SFTP account. If your client is set to SFTP, it will contact the SSH service and use that service's authentication instead.

5. Test both directions and the root restriction
After login, a client may show / as its remote directory. That is the FTP account's logical root, not evidence that it can see the entire server filesystem.

Upload a small original file, refresh the remote listing, then download it again and compare its contents or checksum. We transferred adminsforum-ftps-proof.txt through protected data connections and verified identical bytes and SHA-256 after download.

Next, verify the account stays inside its assigned root. Our client was refused when it requested another website's absolute filesystem path. That checks FTP directory isolation; it is separate from application or operating-system isolation.
   

The certificate chain and hostname were verified, TLS 1.3 was negotiated, and the data connection was protected. We did not disable certificate verification to make the test pass.

6. Manage the account afterward
The saved row exposes Set Path, Password and Log actions. Review a path change carefully before applying it; broadening the root broadens the files the user can reach. If your panel offers migration while changing a root, understand its copy behavior before using it.

Change passwords privately, update the intended client profile and retest. Inspect the account's log when troubleshooting. Disable an account when it no longer needs access; deleting an account is a separate action and should not be treated as a routine cure for an authentication error.

Troubleshooting
  • Authentication fails: check enabled status and the exact username/password, without showing the password in logs or public support posts.
  • Login works but a listing stalls: check passive mode, its configured port range, and both server/provider firewalls.
  • File upload is denied: inspect the assigned root, ownership and available space rather than using world-writable permissions everywhere.
  • Certificate warning: correct the hostname/certificate/chain; do not send credentials until verification succeeds.

Verified result
The saved root matched the intended lab folder, an encrypted round-trip transfer passed and another website path was refused. Our test used a certificate-verifying FTPS client in the lab; the result is not based only on the account's Running label.

Reference: aaPanel FTP account management. © AdminsForum.
DEV 10-13-2026, 02:01 AM Read thread
aaPanel FTP, SFTP & File Transfer Guides

Install Pure-FTPd in aaPanel and Check the FTP Service

Quick answer
Use aaPanel App Store to install Pure-FTPd if it is missing. Then open its Setting → Service page, confirm the service is started and configure a separate restricted account plus FTPS before using it for website transfers. Installing an FTP server does not automatically prove that a client can log in or transfer files securely.

Our lab ran aaPanel 8.0.6 on Ubuntu 22.04 with Pure-FTPd 1.0.49. This walkthrough verifies the existing installation, native service start and subsequent encrypted connection checks. The download/reinstallation step was not repeated on the already installed service.

1. Decide whether you need FTP
Pure-FTPd supplies FTP and FTPS. FTPS adds TLS encryption to the FTP protocol. SFTP is a different protocol supplied through SSH; installing Pure-FTPd is not required for SFTP.

Use a dedicated FTP account when you want to limit a transfer user to an assigned directory without giving them the server's root SSH login. FTP credentials that can modify website files are still sensitive: those files can change the site's behavior.

Keep existing administrator access working while setting up a new transfer method. Record the current service configuration and firewall rules before changing them. We preserved private configuration copies on the disposable lab.

2. Find Pure-FTPd in the App Store
Open App Store → Official App. Search for Pure-FTPd or use the Deployment category. If it is not installed, use the official row's Install action, review the offered version/method and confirm the installation. Wait for the installation task to finish and inspect any error rather than repeatedly clicking Install.

If Installed already shows Pure-FTPd with Setting and Uninstall, open Setting. Do not uninstall a functioning transfer service merely to follow the fresh-install branch of a tutorial.
   

Our installed list showed Pure-FTPd 1.0.49. Versions and available packages depend on the operating system and current aaPanel catalog. Record the installed version rather than treating an example version number as a permanent recommendation.

3. Check and start the service
Open Pure-FTPd → Setting → Service. If it is stopped, click Start, review the service confirmation and Confirm. Wait for completion, then reopen or refresh the manager and verify Current state is Start and the action has changed to Stop.

The lab's native service view showed that started state. The same menu exposes configuration, user management, port settings and logs.
   

A started service is only the first check. If Start fails, inspect its error/configuration result and port conflicts. Do not disable the firewall or stop unrelated web/SSH services to get past an FTP error.

4. Understand control and passive data connections
The panel displayed a control address on TCP port 21. Our actual Pure-FTPd configuration used passive data ports 39000–40000. FTP uses a control connection for commands and separate data connections for listings and file transfers, so a successful login with a stalled listing often points to the data path.

Inspect the configured range before writing firewall rules. The system firewall and any provider firewall must allow the required control/data traffic for the intended clients. Our lab already had its FTP rules; no new public ports were opened during this test. Do not copy an arbitrary passive range that differs from the running service.

For a private workflow, restrict source addresses where practical. Do not expose database, Redis or internal web-server backend ports as part of FTP setup.

5. Create the account and secure the connection
Open the FTP module and use Add FTP. Assign a unique user to the exact required document root, not /www/wwwroot or a server-wide folder. Use a strong unique password and keep it out of screenshots and tutorial text.

We created af_ftp_lab only under /www/wwwroot/adminslab.com/ftp-lab. The later transfer test refused access to another website path. The FTP account does not become an SSH/SFTP account automatically.

Before sending credentials, configure a certificate matching the hostname you connect to and require FTPS. Our lab used a valid mail.adminslab.com certificate, strict TLS mode 3, and certificate-verified TLS 1.3. A plaintext connection was refused. The separate FTPS guide explains that configuration; the plain ftp:// address displayed by the panel is not an instruction to send a password without encryption.

6. Verify a real transfer
Test an encrypted login, a directory listing, a small original upload and a download of the same file. Compare the bytes or checksum, and confirm the account cannot leave its assigned root.

Our restricted test account uploaded and downloaded an original AdminsForum text file with matching SHA-256, using protected data connections. The test was performed with a certificate-verifying FTPS client in the lab; it is separate from the panel's service badge.

Common failures
  • Service will not start: inspect the configuration/error result and existing listeners on the control port.
  • Login fails: confirm the account is enabled, the username/password are correct and the client requires explicit FTP over TLS.
  • Listing stalls: check passive mode, the configured passive range, server/provider firewall and public address/NAT settings.
  • Certificate fails validation: fix the hostname/certificate/chain instead of permanently accepting an unrelated certificate.

Reference: aaPanel FTP documentation. © AdminsForum.
DEV 10-13-2026, 01:56 AM Read thread
aaPanel PHP & Extensions Guides

Increase WordPress PHP Upload Limits in aaPanel to 64 MB

Quick answer
Open the settings for the PHP version used by your website, change Limit of upload, then give post_max_size extra room for the whole request. Verify the limit in WordPress and test a fresh upload. Changing an unused PHP version or the CLI configuration does not fix the website's upload limit.

Our aaPanel 8.0.6 lab used Nginx 1.30.5, PHP-FPM 8.5.11 and WordPress 7.1.3. We raised the displayed WordPress limit from 50 MB to 64 MB, set the POST limit to 72M, corrected a PHP 8.5 memory-cap warning and completed a fresh branded JPEG upload. Screenshots are original AdminsForum lab captures.

1. Check which PHP handles the website
In aaPanel, find the website's selected PHP version. In WordPress, open Tools → Site Health → Info → Server. Record the PHP version and PHP SAPI. Our website reported fpm-fcgi, so we changed the regular PHP-8.5 manager.

OpenLiteSpeed's litespeed SAPI uses a separate lsphp installation. Its settings can differ even when the version number matches. Our earlier OpenLiteSpeed test had an 8M POST limit and therefore an 8 MB effective upload limit. Use the separate-runtime guide before changing that installation. The verified 64 MB screenshots in this post are from PHP-FPM; they are not proof that an unrelated lsphp installation changed automatically.

Back up the applicable PHP and web-server configuration before editing. Note that a version-wide PHP change can affect every website using that version.

2. Record the current upload limit
Open App Store → Installed → PHP-8.5 → Setting. Choose Limit of upload. The lab originally showed 50 MB. WordPress Media → Add Media File also reported 50 MB.
   

For your site, use its actual version rather than following the number in our example blindly. Choose a limit appropriate to the files and server resources you need.

3. Set the file limit and POST headroom
On Limit of upload, enter 64 and click Save. Wait for completion. Then open Configuration and review upload_max_filesize and post_max_size. Our panel's upload-limit action set both to 64M; we changed post_max_size to 72M and saved again.
   

The file limit applies to one uploaded file. POST size applies to the complete request, including form fields and upload overhead. Keep POST size above the intended file size. Our resulting settings were:
Code:
upload_max_filesize = 64M post_max_size = 72M memory_limit = 128M

These are tested example values, not a universal tuning preset. A large high-resolution image may require much more processing memory than its compressed file size suggests.

4. Handle the PHP 8.5 memory-cap warning if present
Our first upload attempt exposed a warning: WordPress tried to raise memory_limit to 256M for administration, but max_memory_limit capped it at 128M. PHP 8.5 introduced this startup-only ceiling, so changing an application-side memory preference alone may not solve it.

We preserved the original ini file, changed the active PHP-FPM ini directive to:
Code:
max_memory_limit = 256M

The normal frontend memory_limit remained 128M. This allowed WordPress's administration request to use 256M without setting unlimited memory. We also set display_errors = Off while keeping log_errors = On, so diagnostics are logged rather than inserted into public pages or upload responses. The configuration screenshot above was taken before that final error-display change.

In aaPanel, use the matching PHP manager's Configuration file editor for directives absent from its simple form. Make only the intended change and preserve the rest of the file. The lab's relevant ini path was /www/server/php/85/etc/php.ini; confirm your own loaded path first.

5. Validate and reload the correct PHP service
We checked the PHP-FPM configuration successfully, then reloaded PHP-FPM 8.5. The exact service-specific commands used in this lab were:
Code:
/www/server/php/85/sbin/php-fpm -t /etc/init.d/php-fpm-85 reload

Inspect the test result before reloading. If it fails, correct the syntax or restore the saved configuration. Do not reload a different PHP version and assume the website received the change. An lsphp website needs its own appropriate worker/service reload.

6. Verify an actual WordPress request
Refresh Tools → Site Health → Info → Server. Our website reported upload_max_filesize 64M, post_max_size 72M, frontend memory 128M and administration memory 256M.
   

Then reopen Media → Add Media File. WordPress showed Maximum upload file size: 64 MB. We uploaded a fresh original branded JPEG successfully; the upload finished and offered Edit and Copy URL actions without the earlier memory warning.
   

We verified the settings and a normal image upload. We did not test a file exactly at the 64 MB boundary, so this post does not claim a maximum-size stress test.

If uploads still fail
  • The old limit remains: confirm the actual PHP handler, loaded ini and fresh request after the relevant reload.
  • 413 Request Entity Too Large: inspect the applicable web-server/reverse-proxy request-body limit; changing PHP alone may not change every upstream layer.
  • POST data disappears or the upload is empty: check the whole-request POST limit and temporary upload directory.
  • Upload reaches the server but image processing fails: inspect logs, memory ceilings, image dimensions, filesystem permissions and the image library.

Keep the previous values and configuration backup for rollback. Check application behavior after reverting and reloading as carefully as after increasing the limit.

Reference: PHP resource and upload directives. © AdminsForum.
DEV 10-13-2026, 01:48 AM Read thread