
AdminsForum
Set Up 301 and 302 Redirects in aaPanel and Test the Result Posted by: DEV - 10-13-2026, 06:14 PM - Forum: aaPanel Websites & Web Servers Guides - No Replies

Create a redirect in aaPanel from Website → Conf → Redirect → Add redirect. Choose a source path or domain, set the destination and select 301 for a permanent move or 302 for a temporary one. Verify the HTTP response after saving: a rule appearing in the panel does not prove it sends visitors to the intended destination.

Tested setup
Ubuntu 22.04, aaPanel 8.0.7 Free Edition and Nginx 1.30.5. On our separate demo site we created /old-guide → the demo homepage, verified a 301 response, changed the same rule to 302 and verified it again. We then disabled the rule and confirmed that /old-guide returned 404. This guide tests a path rule; a whole-domain migration was not performed.

1. Decide whether the move is permanent
Use a permanent redirect when the old URL should permanently give way to its replacement. Use a temporary redirect when the change is temporary. Google treats permanent redirects as a canonicalization signal toward the destination; temporary redirects serve a different purpose. A redirect does not guarantee indexing or rankings.

Choose the relevant replacement page for a real moved guide. Our homepage destination is only a small lab demonstration. Record existing redirect settings before changing them, and check that the destination already works over HTTPS.

2. Open the site's redirect form
Open Website, find the correct site, click Conf, then choose Redirect. Click Add redirect. The initial form in our panel defaulted to Domain name, 301, Enable on and Keep URI param on.

For a single path, change Type to Path. Enter the source path with its leading slash. We entered /old-guide and the HTTPS demo homepage as Target URL. Keep Enable on, select 301, and turn Keep URI param off for this specific test.
   
A path-specific 301 rule before saving. Use your own hostname and the correct replacement page.

A domain rule can affect much more traffic. Do not select a whole-domain source when you only intend to move one path. Avoid redirecting a URL back to itself or creating conflicting rules that send visitors in a loop.

3. Save and check the rule
Click Confirm and wait for the save result. Our redirect table then showed /old-guide, Type Path, the intended destination and Running.
   
The saved test rule. Running is a configuration status; verify the actual response separately.

4. Verify the status and Location header
Use a fresh request to the old URL. An optional command for your own site is:

Code:
curl -I 'https://YOUR_DOMAIN/old-guide?lesson=redirect'
Replace YOUR_DOMAIN. Do not use -L for the first check because following the redirect immediately can obscure the first response. Inspect both the status code and Location. Our actual result was:
Code:
HTTP/1.1 301 Moved Permanently Location: https://demo.adminslab.com?lesson=redirect

Important tested detail: Keep URI param was off, but this Nginx-generated rule still retained the query string. The panel generated a rewrite matching /old-guide and following characters. With the option off, our path suffix was removed while query arguments remained. Do not assume that switching this option off strips sensitive query values. Inspect your generated rule and test your intended URL patterns before production use. We did not change the generated configuration manually.

5. Change the rule to a temporary redirect
In the redirect table choose Edit to reopen the form. In this version, Modify opened the raw generated configuration editor instead; it was not the normal form. We inspected that configuration without saving changes.

Set Mode to 302 in the form and confirm. Other values were unchanged in our test.
   
The same path rule configured as temporary, with Keep URI param still off.

A fresh request to /old-guide/chapter?lesson=temporary returned:
Code:
HTTP/1.1 302 Moved Temporarily Location: https://demo.adminslab.com?lesson=temporary
This proves that the mode changed and the tested subpath was matched. The /chapter suffix was not carried to the destination, but the query string remained. Test nearby paths as well if a rule must match only one exact URL.

6. Disable a test rule and verify cleanup
Choose Edit, turn Enable off and confirm. We used this reversible action rather than deleting the record. A new HTTP request to /old-guide then returned 404 Not Found, confirming that the tested redirect no longer handled the URL. The disabled record remains available for inspection; the demo homepage remains separate.

Browsers can cache redirects. If a browser still follows an old destination after disabling a rule, compare it with a fresh header request and clear the relevant cache before concluding the panel failed. Do not repeatedly create new rules to compensate for a cached response.

Troubleshooting and production checks
  • Redirect loop: compare the source and destination plus other domain, application and HTTPS rules. Keep a single clear route to the final destination.
  • Unexpected suffix or query: inspect Location and the generated rule. The option label alone is not sufficient evidence of the behaviour.
  • Wrong status: check the saved mode and test a fresh request. A cached permanent redirect may differ from the current server response.
  • 404 at the destination: verify that the replacement page exists and that the redirect points to its actual URL.
  • SEO migration: update internal links and the sitemap to use the intended final URLs. Avoid unnecessary redirect chains. This lab did not test search-engine indexing after a migration.

Final lab state
Both 301 and 302 responses verified; the temporary test rule disabled; source returns 404. No whole-domain redirect, wildcard migration or query-stripping guarantee is claimed.

Reference: Google Search Central: Redirects and Google Search.

Need help? Include the source pattern, expected destination, actual status/Location and aaPanel/web-server versions in Web Servers Support. Remove private query values before sharing URLs or logs.

Roll Back a Git Deployment in aaPanel and Verify Recovery Posted by: DEV - 10-13-2026, 05:44 PM - Forum: aaPanel Plugins & Integrations Guides - No Replies

To return an aaPanel Git-managed website to a recorded deployment, open Git Manager → Deployments, locate the target commit and choose Rollback. Back up first, complete the confirmation, then check the active commit and the actual website. A successful code rollback does not prove that an application's database or uploads were restored.

Tested environment and result
Ubuntu 22.04, aaPanel 8.0.7 Free Edition, Nginx and a dedicated static demo website using MDN's beginner HTML/CSS repository. We started at commit 6c7a360, deliberately deployed commit 16a0f38, then used the native deployment-history Rollback action to return to 6c7a360. The history recorded Success and Active for the restored commit. The sample page and its image loaded over HTTPS afterwards.

These commits change repository administration files, so the page looked the same before and after. This rehearsal verifies the commit transition and the native recovery controls; it does not demonstrate fixing a visibly broken page, recovering database migrations or restoring a dynamic application.

Before starting

  • Use a separate test site first. Complete the Git deployment guide if the repository is not connected yet.
  • Record the current commit, branch and intended recovery commit. Use the commit identifier rather than relying on a message or timestamp alone.
  • Back up the site files and any separate database. Our demo's file-only backup completed before the rehearsal; restoration of that ZIP was not tested here.
  • Review runtime uploads, configuration and dependencies that sit outside the repository. Keep automatic deployment off during the exercise so it cannot immediately replace your selected version.

1. Inspect the current deployment
Open Website, find the correct site, click Conf and select Git Manager. The Repository screen displays Deployed commit and the last deployment time. In our controlled test, the earlier sample commit 16a0f38 became the active version after we deployed it from Commit history.
   
The test site at commit 16a0f38 before returning to the original recorded deployment.

The Repository page's per-commit Deploy action deploys a selected remote commit. The Rollback action used below belongs to an existing deployment-history record. Do not confuse the two controls.

2. Choose the recorded recovery target
Select Deployments. Locate the record for the commit you want to restore. In our history, 16a0f38 was Current/Active, while the earlier successful deployment of 6c7a360 offered Log and Rollback.
   
Deployment history before recovery. The target is the existing 6c7a360 record.

If you need to investigate a deployment first, open its Log. Check the result and commit carefully; a successful task is not proof that the application itself was healthy.

3. Confirm the rollback
Click Rollback on the intended record. Our panel warned that it would return the deployment to an earlier commit state and asked us to back up site files first. It also displayed an arithmetic verification field. Complete the check shown in your own panel and confirm only after checking the destination and target.

Wait for the result. Do not repeatedly submit the action while it is running. If it fails, inspect the deployment log before making another change. The exact prompt can differ across panel versions.

4. Verify the active version
The history should now show a new successful record for the restored commit, marked Active and Current. In our lab that record was 6c7a360; the intermediate 16a0f38 record was no longer active. The operation took 1.05 seconds in this tiny sample; this is not a performance guarantee.
   
The completed native rollback records 6c7a360 as Success, Active and Current.

Reopen Repository and check the deployed commit if the history display is unclear. Then visit the website over HTTPS. Check the affected page and its assets, not just the homepage. For a dynamic application, also verify relevant login, read and write workflows without damaging production data.

5. Know what this test does not recover
Git deployment recovery is not a full server backup restore. A database schema change may be incompatible with older code. User-uploaded media, environment secrets, generated files and installed dependencies can need a separate recovery plan. Avoid assuming that every file on disk exactly matches the selected commit: the per-commit deployment warning in this installation said matching repository files would be overwritten and other site files retained. We did not independently test deletion or retention behaviour during rollback.

Our static example had no database migration, custom build script or external application state. Those workflows need their own rehearsal before production use.

History retention and troubleshooting
The installed Free panel displays a limit of 5 deployment records. Keep an independent recovery record and backups; a short history is not a long-term backup strategy. Pro availability and limits are outside this hands-on Free test.
  • Target missing: confirm the branch/filter and retained history. Do not assume every remote commit has a rollback record.
  • Task fails: read the record's log and check repository access and disk space. Preserve useful errors before retrying.
  • Correct commit but wrong page: check the document root, default document and application/CDN caches. Verify actual content before declaring recovery complete.
  • Application fails after rollback: investigate database compatibility, configuration and dependencies rather than repeatedly selecting older commits.

Our final lab state
Original commit 6c7a360 restored; history Success/Active; demo website and image accessible over HTTPS; automatic deployment still Off. Existing WordPress and mail sites were outside this exercise.

Need help? Include the aaPanel version, branch, current and target commit identifiers and the relevant deployment error in Plugins & Integrations Support. Remove credentials and webhook secrets.

Deploy a Website from GitHub in aaPanel: Step-by-Step Guide Posted by: DEV - 10-13-2026, 04:27 PM - Forum: aaPanel Plugins & Integrations Guides - No Replies

aaPanel's Git Manager can deploy a public repository to an existing website. Open the website settings, choose Git Manager, enter the repository URL, test access, select its branch and use Save & deploy. Saving immediately deploys files, so start with a separate test website and a backup.

Tested environment
Ubuntu 22.04, aaPanel 8.0.7 Free Edition and Nginx 1.30.5. We deployed MDN's public beginner HTML/CSS example to a dedicated demo website. Repository access succeeded, commit 6c7a360 was deployed and recorded as Success/Active. The website returned HTTP 200 over HTTPS with certificate verification passing. We did not test private repositories, webhooks, custom build scripts or rollback in this walkthrough.

1. Prepare a separate website
Create a test website through Website → Add site. Use a domain or subdomain you control. If there are existing files, back them up before deployment. Our demo site's native backup completed successfully and produced an 86.97 KB file-only ZIP. Its restore was not tested here. A file backup does not include an application's database unless you explicitly include and verify that component.

Create a DNS A record for the test hostname pointing to the server's public IPv4 address. Configure HTTPS through the site's SSL settings after DNS resolves. Our lab used DNS-only Cloudflare resolution and a Let's Encrypt certificate. Use your own IP and hostname; the demonstration hostname is not a shared deployment service.

2. Choose a repository suitable for the first test
For this rehearsal we used the public, static MDN sample:

Code:
https://github.com/mdn/beginner-html-site-styled.git
It contains an index.html plus styles and images. This avoids a database or build step during the initial Git test. Use a trusted repository and inspect its contents before deployment. A framework application may also need dependency installation, a build command, runtime configuration and a different document root.

3. Connect through Git Manager
Open Website, find the demo site and click Conf. Select Git Manager, then Repository URL. Paste the repository address. For a public repository choose Public authentication. No GitHub account connection, token or SSH key was required for our public example.

Click Test connection. Wait for the result. Our screen reported Connection successful · 4 branches available. Select the intended deployment branch; ours was main. Branch names vary by repository.
   
Successful public-repository connection, with main selected before deployment.

4. Save and deploy
Check the destination site and branch again. Click Save & deploy once. The panel states that saving deploys immediately; it is not merely saving connection preferences. Wait for the task result.

After our successful deployment, reopening Git Manager showed the connected repository, deployed commit and last deployment time. Automatic deployment was Off; connecting a repository does not by itself configure a webhook.
   
Connected repository and active commit after deployment.

5. Read deployment history
Select Deployments. Confirm that the expected commit and branch appear, its result is Success, and the active version is marked. Use the record's Log action when diagnosing a failed deployment.

Our installed Free panel says it retains 5 deployment records, while its upgrade notice advertises 30 for Pro. This is the limit shown by this version, not a comparison test of Pro. The displayed 1.02-second duration applies only to this small sample and is not a deployment-speed benchmark.
   
Deployment history records the tested commit as Success and Active.

6. Verify the actual website
Visit the hostname and check the expected page, stylesheet and images. A success notice alone is not proof that DNS, HTTPS or application configuration is correct. Our hostname initially had no DNS record. After adding it, the local browser retained an NXDOMAIN result temporarily. We first verified the origin over HTTPS using the hostname and explicit IP resolution; certificate checking stayed enabled. Once the resolver cache updated, a fresh browser request also displayed the deployed page and Firefox image over HTTPS.
   
The deployed sample rendered in the browser after DNS propagation.

Optional command for readers:
Code:
curl --resolve YOUR_HOSTNAME:443:YOUR_SERVER_IP https://YOUR_HOSTNAME/
Replace both placeholders. Do not add -k to hide certificate failures. The response in our lab contained the sample's expected HTML and returned HTTP 200. A request for /.git/HEAD returned 404; that specific file was not publicly readable. This is a targeted check, not a comprehensive server security audit.

7. Understand updates before automating
The connected repository screen offers Deploy latest and per-commit deployment controls. Review the selected branch and changes, preserve a recovery copy and test an update on a staging site before using these on production. This guide directly verified the first deployment only. A Git rollback is not a database restore, and runtime uploads or secrets should not be treated as disposable repository files.

Keep automatic deployment disabled until you deliberately configure and test the separate webhook workflow. Do not publish tokens or webhook secrets in screenshots.

Troubleshooting
  • Connection fails: confirm the repository URL, its visibility and outbound access. The public authentication option cannot authenticate to a private repository.
  • Wrong page: check the site's document root, selected branch and default document order; existing index files can affect which page is served.
  • 404 or broken assets: check filenames, asset paths and whether a build directory should be the document root.
  • Application error: check the required PHP/Node version, dependencies and environment configuration. Copying repository files does not complete every application's installation.
  • DNS error: verify the A/AAAA records and allow resolver caches to refresh. Changing Git settings will not repair DNS.

Reference sample: MDN beginner HTML/CSS repository. Its website files belong to the sample's authors; our screenshots document the aaPanel deployment workflow.

Need help? Share the aaPanel version, repository visibility, branch and relevant deployment error in Plugins & Integrations Support. Remove credentials and private configuration values first.

Tested follow-up: Roll Back a Git Deployment in aaPanel and Verify Recovery — our separate native rollback rehearsal is now complete.

Install PHP Intl in aaPanel and Fix Missing Intl Errors Posted by: DEV - 10-13-2026, 03:32 PM - Forum: aaPanel PHP & Extensions Guides - No Replies

To enable Intl in aaPanel, open the PHP version used by your website, choose Install extensions, install intl, and check the loaded-module list after the task completes. This addresses a missing extension; it does not resolve every application error.

Tested setup
Ubuntu 22.04, aaPanel 8.0.7 Free Edition, PHP 8.5.11. We installed Intl in our lab using aaPanel's official PHP manager. The installation log reported success and a PHP-FPM reload; the refreshed extension list showed Uninstall, and the PHP information screen included intl under Loaded. These screenshots document that test. A separate website request and command-line test were not performed in this rehearsal.

What is Intl used for?
Intl provides internationalization functions. For example, NumberFormatter formats a number or currency according to a locale. Some applications require ext-intl and may report that it is missing, or show a class-not-found error for NumberFormatter. Check the application's requirements before adding extensions.

1. Find the PHP version your website uses
Open Website, select the relevant site's settings and check its PHP version. Record it before opening App Store. A server can have several PHP versions installed: an extension added to PHP 8.5 does not automatically become available in PHP 8.4.

If the website uses OpenLiteSpeed, also check its configured PHP handler. Its runtime can differ from the PHP-FPM version managed here. Do not change a working site's PHP version just to match these screenshots.

2. Open the correct PHP manager
Open App Store, search for PHP, find the installed version used by the website and click Setting. Select Install extensions. Find the row named intl. The search field can narrow the list; allow the result to refresh.

If Intl already shows an installed status and an Uninstall action, skip installation and proceed to verification. Do not uninstall it as a troubleshooting shortcut.

3. Install Intl and follow the task
Click Install on the intl row and confirm the installation. The row changes to Installing.... Open that status link to inspect the task log. Compilation produces many lines and may take several minutes. Do not submit the same installation repeatedly or restart the panel while the build is progressing.

In our test the log ended with a successful build, shared-extension installation and Reload service php-fpm done.
   
Completed installer log from the PHP 8.5 lab. A queued task alone is not proof of success.

4. Refresh and verify the installed extension
Return to Install extensions and click Refresh List. Wait for the loading message to disappear. In our lab the intl row changed from Install to Uninstall, confirming the manager's installed status.
   
Intl installed for PHP 8.5. Leave the Uninstall control untouched.

Select phpinfo in the same manager. Check the version and the Loaded list. Our screen reports 8.5.11 and includes intl. This checks the manager's PHP runtime; verify the website separately if its error remains.
   
The PHP information screen lists intl among loaded extensions.

5. Recheck the application
Reload the application's requirements check or the page that originally failed. Confirm that its PHP version matches the version you modified. If you have SSH access, this optional command checks the aaPanel PHP 8.5 CLI binary:

Code:
/www/server/php/85/bin/php -r 'echo PHP_VERSION, PHP_EOL; var_export(extension_loaded("intl")); echo PHP_EOL;'
A loaded extension returns true. Replace 85 with your installed version's directory. Running plain php may check a different system binary. This command is an additional check for readers, not output captured in our rehearsal.

Troubleshooting
  • The task fails: read the first actual error in the log. A compiler/dependency error needs its own fix; a final queue message does not explain the cause. Include the PHP version and relevant error when asking for support.
  • Installed but still missing: check the website's PHP version, PHP handler and application's requirements screen. The CLI and web runtime may differ.
  • Duplicate loading warning: inspect the relevant configuration for repeated extension entries. Avoid adding extension=intl blindly after the manager has already configured it.
  • No intl row: refresh the official app/extension list and check support for your PHP version. Installing the operating system's php-intl package may affect system PHP rather than aaPanel's PHP installation.

Success checklist
The installer finishes successfully, the intl row shows installed, the correct runtime lists intl, and the application's missing-extension check clears. Only the first three were directly verified in this lab rehearsal.

Reference: PHP NumberFormatter documentation and PHP Intl installation documentation.

Need help? Post your aaPanel version, website PHP version and the relevant installation error in PHP & Extensions Support. Remove credentials and private tokens from screenshots or logs.

Check MySQL Status and Error Logs in aaPanel Posted by: DEV - 10-13-2026, 02:20 PM - Forum: aaPanel Databases & phpMyAdmin Guides - No Replies

When a website reports a database error, check the database service, connection settings and logs before restarting MySQL or changing passwords. aaPanel's MySQL manager can show the service controls, live status metrics and database error log in one place.

This guide is for MySQL and MariaDB installations managed by aaPanel. A database problem is different from an Nginx or PHP-FPM problem: a working panel login does not prove that every website component is healthy.

What we verified
We inspected aaPanel 8.0.7 on our Ubuntu 22.04 lab on 13 October 2026. The software button was labelled mariadb_10.11.6, while the database startup log reported MariaDB 10.11.10. We also completed a SQL import and saw its two-row table in the database tools.

The Service screen displayed Current state: Stop, yet Current status returned a launch time, connections and database statistics. This is a verified panel-status mismatch, not proof that MariaDB stopped. We did not restart or reinstall the database to make the label change, and we have not confirmed the underlying cause of that mismatch.

1. Identify which layer is failing
Record the exact error, affected website and time. Keep the message private if it contains a username, client IP or application path.

  • A database connection error in the application: check its database host, database name, username and password, as well as service availability.
  • An import error: use the Import dialog's Show Logs output. A failed SQL statement may leave a partially imported database.
  • 502 or 503 from the web server: inspect the web server/PHP path too. Those HTTP errors do not, by themselves, identify a broken database.
Only one website failing while other database-backed websites work points toward a site-specific problem. All sites failing together makes the shared database service or VPS resources more relevant. Use these clues to narrow the checks; they are not a diagnosis on their own.

2. Open the database service manager
Go to Databases → MySQL, then click the installed service button above the database list. In our lab it was labelled Mysql mariadb_10.11.6. The same manager can also be reached through the installed MySQL/MariaDB app in App Store.

Select Service. Read the state and available controls. Start, Restart and Reload are actions; do not click them merely to test whether the screen responds.

   
Actual lab screen: the Service label says Stop. The next checks are essential before treating this label as the server's actual state.

If the server is truly stopped, first collect the startup error and identify the reason. A restart can briefly interrupt every application using the service, and repeatedly restarting does not repair an invalid configuration, full disk or corrupted data.

3. Cross-check Current status
Open Current status in the manager. Wait for the figures to load. Note the launch time, connection totals and active connections. A momentary -- or NaN while the screen loads is not a final diagnostic result.

Our screen returned real database metrics after loading, even though the Service tab's label remained Stop. Combined with the successful SQL import, this established that the database was responding to the panel at that time.

   
The lab's loaded status metrics. Counters and percentages vary with workload; they are not tuning targets to copy to another server.

Do not increase every memory or cache setting because a panel tip suggests it. An apparently low hit rate can be irrelevant to your engine or workload. For a 4 GB VPS, raising several per-connection buffers can make memory pressure worse.

4. Read Error log
Select Error log. Read the most recent relevant lines and compare their timestamps with the failure time. Server and browser time zones can differ.

   
Our log contains startup information and a ready for connections message. That message is historical; the import and Current status checks provide the additional evidence that the lab is responding now.

Pay attention to severity and context:
  • Note: often normal startup or background information. Our log's FEEDBACK plugin disabled note was not evidence of a stopped database.
  • Warning: something to review, not automatically a fatal error. Our binary-log retention warning did not prevent the sample import.
  • Error: investigate the named file, setting or resource and the lines immediately around it.
Do not use Empty log while diagnosing a failure. It removes useful evidence; it does not resolve the cause. Save a private copy of the relevant output before changing anything. Redact usernames, IP addresses, paths containing secrets and SQL data before posting screenshots for support.

5. Distinguish a connection problem from a login problem
The exact database-client error helps decide what to check next:
  • 2002 or 2003, cannot connect: verify the service and the configured host, port or Unix socket. A running service may still be listening somewhere different from the client's settings.
  • 1045, access denied for user: review the username, password and allowed host/account permissions. The root, aaPanel login and website database passwords are separate credentials.
  • 1044, access denied to a database: check that the application account is permitted to use the requested database.
  • 1049, unknown database: compare the configured database name with the database list and confirm that creation or migration completed.
These are general error interpretations from MariaDB's documentation. We did not reproduce each error or change credentials during this read-only walkthrough.

For an application on the same VPS, opening MySQL port 3306 to everyone is not a fix for a wrong local password or database name. Likewise, changing the database root password is not a substitute for correcting a website's own connection settings.

6. Optional checks through SSH
If you already have working SSH access, these read-only checks can help corroborate a misleading panel label:
Code:
/etc/init.d/mysqld status ss -lntp | grep ':3306' ls -lh /www/server/data/*.err
Use your actual port if it differs from 3306. An open listening port proves that a listener exists; it does not prove that the application can authenticate or query its tables.

A test with the website's own database account is more specific:
Code:
/www/server/mysql/bin/mysql --protocol=TCP  --host=127.0.0.1 --port=3306  --user=YOUR_DATABASE_USER --password  YOUR_DATABASE_NAME -e "SELECT 1;"
The --password option prompts interactively. Do not put a real password directly into a command that may be saved in shell history. This TCP test is different from a localhost Unix-socket connection; use the connection method your application actually requires. The optional SSH commands were not executed in this walkthrough because the lab's browser terminal was not connected.

7. Change one confirmed cause, then verify the website
Back up before a configuration change. Correct the specific failing setting rather than reinstalling the database or deleting files from its data directory. Retest the same connection and a real application page after the change.

If the Service label and successful database queries disagree, report the evidence to aaPanel support: panel version, engine version from the server/log, state screenshot, Current status and the outcome of a harmless query. A hostname/PID-file or process-detection issue is a possibility to investigate, not a cause we have proved on this lab.

Related guides:
Import a SQL Database File in aaPanel
Fix 502 Bad Gateway and 503 Errors in aaPanel

References:
aaPanel MySQL manager
aaPanel service-management commands
MariaDB connection troubleshooting

Import a SQL Database File in aaPanel (Step by Step) Posted by: DEV - 10-13-2026, 02:08 PM - Forum: aaPanel Databases & phpMyAdmin Guides - No Replies

To import a MySQL or MariaDB database in aaPanel, open Databases, choose Import beside the correct database, upload your SQL file and confirm the import. Back up first, then verify the imported tables and data.

This walkthrough uses aaPanel's built-in importer. You do not need to expose phpMyAdmin publicly or open MySQL port 3306 to the internet.

Tested lab
Ubuntu 22.04 and aaPanel 8.0.7, tested on 13 October 2026. The database startup log reports MariaDB 10.11.10; the panel software button still displays the mariadb_10.11.6 label. The destination was our isolated adminsforum_lab tutorial database. We created a fresh backup, imported one sample table and verified that the panel lists it with a Row number of 2. The existing af_backup_check table remained present with one row. We did not import into the WordPress or webmail databases.

Before you begin

  • A running MySQL or MariaDB service and a database created in aaPanel.
  • A trusted .sql export containing database structure and/or data, not website files.
  • Enough free disk space for the upload, extracted archive and database.
  • A current backup of anything already in the destination database.
For a migration, start with a separate empty destination database. A SQL dump can contain DROP TABLE, DELETE, TRUNCATE or USE statements. aaPanel warns that an import may overwrite the selected database. Do not test an unfamiliar file against a working website database.

1. Choose the destination and create a backup
Open Databases → MySQL. The MySQL tab also manages our installed MariaDB service. Read the database name carefully; it is not always the same as the website domain.

If the database does not exist, follow Create a Database and User in aaPanel first. Use a separate database rather than importing over another site's tables.

In the destination row, click its Backup value, such as Exists(1), to open the backup details. Click Backup, wait for the background task to finish and confirm that a new dated archive appears with a non-zero size. Keep a private copy off the VPS for important data. Do not post a real SQL dump or its passwords in a support thread.

   
Our pre-import backup appeared in the list before we continued. Backup creation alone is not a tested restore.

2. Check the file before uploading
Use the SQL export from the source database or a harmless sample for practice. A renamed spreadsheet, HTML error page or ZIP without a SQL file is not a database export.

For this rehearsal, our file was plain SQL. It created a uniquely named training table and inserted two rows:
Code:
CREATE TABLE IF NOT EXISTS af_import_lesson_20261013 ( id INT NOT NULL PRIMARY KEY, title VARCHAR(120) NOT NULL ) ENGINE=InnoDB DEFAULT CHARSET=utf8mb4; INSERT INTO af_import_lesson_20261013 (id, title) VALUES (1, 'Welcome to AdminsForum'), (2, 'SQL import verified') ON DUPLICATE KEY UPDATE title=VALUES(title);
Save this as a UTF-8 file ending in .sql if you want to practise in your own empty lab database. This is demonstration data, not a WordPress migration file. It contains no DROP, DELETE or USE statement.

3. Open Import beside the correct database
Return to the database list and click Import in your destination row. Check the database name in the dialog title before selecting a file.

The dialog lists database archives stored on the server. Do not choose an unrelated backup simply because it appears in the list. The list can contain backups from other databases, including WordPress.

Click Upload from local → Select file, choose your .sql file and click Upload. Wait for the upload to finish. Uploading only transfers the file; it does not yet execute the SQL.

   
The sample file is selected in the upload dialog. Complete the upload before starting Import.

The tested panel lists .sql, .zip, .gz, .tar.gz and .tgz support. When using an archive, check that it actually contains the intended SQL dump. For a file too large for browser upload, aaPanel's dialog suggests SFTP upload to /www/backup/database. Keep database backups outside the public website directory.

4. Start the import and read the warning
After upload, find the exact filename in the import list and click Import on that row. aaPanel asks: Database will be overwritten, continue?

Only confirm after checking the destination database, selected file and backup. Wait while aaPanel runs the background import. Avoid repeated clicks or starting several imports into the same database.

Closing the progress window is not evidence of success. The panel says the task continues in the background; use the log to check its result.

5. Read the import log
In the import dialog, click Show Logs and refresh if necessary. Read the output for the correct database and for errors. Our log reported Import status: Successful and Database recovery successful!

   
Actual log from the two-row lab import. A tiny sample completing quickly is not a speed estimate for large website databases.

If the log reports a SQL error, the database may already contain partially imported tables. Investigate that error before repeating the import. Do not assume a retry automatically undoes earlier statements.

6. Verify the tables and rows
Close the import dialog and open Tools in the destination database row. Confirm that the expected table names appear. Our new af_import_lesson_20261013 table showed two rows, and the old backup-test table was still present.

   
The new training table and the original test table are both visible. We only inspected this screen; Repair, Optimize and engine conversion were not needed.

For an exact data check, use your private database client or phpMyAdmin to run:
Code:
SELECT COUNT(*) AS imported_rows FROM af_import_lesson_20261013; SELECT id, title FROM af_import_lesson_20261013 ORDER BY id;
For this sample, expect two rows and the two titles above. The screenshot's table row number is a useful panel check; use SELECT to verify exact counts for a real migration.

For a website migration, also update the application's database settings to the new database, check a real page and test any login or form that depends on it. Imported tables alone do not prove that the application is configured correctly.

Troubleshooting
  • The file is missing from the list: finish the upload, reopen Import and check the filename. An uploaded file and an imported database are separate steps.
  • Unknown collation or SQL syntax error: compare the source and destination database versions. Request a compatible export or review the failing SQL. Do not blindly replace every collation name in a production dump.
  • Access denied: check the database service and aaPanel's stored database credentials. Opening port 3306 to everyone does not fix a local importer authentication error.
  • Table already exists or duplicate entry: check whether you selected a populated destination or already ran the file. For a migration, use a separate empty database and retain the original backup.
  • Success message but missing data: check the selected database, expected table prefix and actual row contents. A structure-only export can create tables without restoring records.
  • Large import stalls or fails: inspect the log, available disk space and archive contents. Do not change PHP upload limits at random; browser upload and the panel's background database import are different stages.

Rollback and next steps
If an import damages existing data, stop changes and restore the correct pre-import backup through the database backup controls. Validate a restore in an isolated database before making a live application depend on it. See Back Up and Restore a Database in aaPanel for the recovery workflow.

aaPanel MySQL database documentation

Check MySQL Status and Error Logs in aaPanel

Automatically Update the Pure-FTPd FTPS Certificate in aaPanel Posted by: DEV - 10-13-2026, 08:47 AM - Forum: aaPanel FTP, SFTP & File Transfer Guides - No Replies

Renewing a website or mail certificate does not automatically update a separate Pure-FTPd PEM bundle. If you manually copied a certificate for FTPS, the FTP service can keep using an older certificate after the original renews. This guide closes that gap using a checked deployment helper.

What this does
The helper reads an already renewed certificate managed by aaPanel, validates it, and deploys the combined certificate/key bundle used by Pure-FTPd. It does not request a new certificate or replace the existing certificate-renewal mechanism. You must keep that original renewal working and monitor its result.

1. Confirm the source and destination
In our lab the certificate belongs to mail.adminslab.com. Its source files are:

Code:
/www/server/panel/vhost/cert/mail.adminslab.com/fullchain.pem /www/server/panel/vhost/cert/mail.adminslab.com/privkey.pem
Pure-FTPd uses
Code:
/etc/ssl/private/pure-ftpd.pem
Confirm your own hostname, certificate paths and service name first. Do not copy another site's private key or publish the key in a post. Keep the FTP bundle root-owned and readable only by root. Retain a private rollback copy and confirm provider-console access before changing the service.

2. Install the helper after reviewing it
Save the following as /usr/local/sbin/af-sync-ftps-certificate.py using your authorized root session. The code below is the lab version. Adapt the hostname, source folder and private backup folder to your server before using it. It expects Python 3, OpenSSL, ss and systemctl, and the existing pure-ftpd.service.
Code:
#!/usr/bin/python3 """Deploy an already-renewed aaPanel certificate to Pure-FTPd without exposing its key.""" import argparse,fcntl,hashlib,os,ssl,subprocess,tempfile from pathlib import Path parser=argparse.ArgumentParser();parser.add_argument('--dry-run',action='store_true');args=parser.parse_args() if os.geteuid()!=0: raise SystemExit('Root required') lock=open('/run/af-ftps-certificate-sync.lock','w');fcntl.flock(lock,fcntl.LOCK_EX|fcntl.LOCK_NB) source=Path('/www/server/panel/vhost/cert/mail.adminslab.com');target=Path('/etc/ssl/private/pure-ftpd.pem') cert=source/'fullchain.pem';key=source/'privkey.pem' for p in [cert,key,target]: if not p.is_file() or p.is_symlink():raise SystemExit('Expected regular certificate file missing') subprocess.run(['openssl','x509','-in',str(cert),'-noout','-checkend','604800'],check=True,stdout=subprocess.DEVNULL) subprocess.run(['openssl','verify','-CApath','/etc/ssl/certs','-verify_hostname','mail.adminslab.com','-untrusted',str(cert),str(cert)],check=True,stdout=subprocess.DEVNULL) bundle=cert.read_bytes().rstrip()+bytes([10])+key.read_bytes().rstrip()+bytes([10]) fd,name=tempfile.mkstemp(prefix='.af-ftps-',dir=str(target.parent));tmp=Path(name) try: os.fchmod(fd,0o600) with os.fdopen(fd,'wb') as out:out.write(bundle);out.flush();os.fsync(out.fileno()) context=ssl.SSLContext(ssl.PROTOCOL_TLS_SERVER);context.load_cert_chain(str(tmp)) old=target.read_bytes() if old==bundle:print('FTPS certificate already synchronized; no restart');raise SystemExit(0) if args.dry_run:print('DRY RUN PASS: chain, hostname, expiry and matching key validated; update required');raise SystemExit(0) sessions=subprocess.check_output(['ss','-Hnt','state','established','sport','=',':21'],text=True) if sessions.strip():raise SystemExit('Active FTP control session: deferred until next run') backup=Path('/root/af-hosting-batch-20261012/ftps-renewal-20261013');backup.mkdir(mode=0o700,parents=True,exist_ok=True) previous=backup/'previous-bundle.pem';previous.write_bytes(old);previous.chmod(0o600) os.replace(tmp,target);os.chmod(target,0o600) try:   subprocess.run(['systemctl','restart','pure-ftpd.service'],check=True) except Exception:   target.write_bytes(old);target.chmod(0o600);subprocess.run(['systemctl','restart','pure-ftpd.service'],check=False);raise print('FTPS certificate deployed; Pure-FTPd restarted') finally: if tmp.exists():tmp.unlink()
Then set its ownership/permissions and run a dry check:
Code:
chown root:root /usr/local/sbin/af-sync-ftps-certificate.py chmod 700 /usr/local/sbin/af-sync-ftps-certificate.py /usr/local/sbin/af-sync-ftps-certificate.py --dry-run
The helper checks the certificate chain and hostname, a seven-day remaining-validity margin, and that the key matches the certificate. If the existing bundle already matches, it exits without restarting FTP. If a control connection is active, a live deployment is deferred. A failure message needs investigation; do not bypass the validation just to make the job complete.

3. Deploy once and verify trusted FTPS
Run the helper without --dry-run. When the source differs, it preserves the previous bundle privately, replaces the file with mode 600 and restarts Pure-FTPd. It attempts to restore the old bundle if the restart fails.
Code:
/usr/local/sbin/af-sync-ftps-certificate.py
Reconnect using the certificate's hostname and explicit FTPS. Confirm certificate validation succeeds. Do not use an IP address as the hostname when the certificate covers a DNS name. Check an encrypted upload/download after a real renewal, not just the certificate's displayed expiration date.
   
Actual lab deployment: updated bundle, trusted TLS 1.3, then an unchanged second run with no restart.

4. Add the scheduled check
Our lab uses a root-owned /etc/cron.d/af-ftps-certificate-sync file with:
Code:
SHELL=/bin/sh PATH=/usr/sbin:/usr/bin:/sbin:/bin 17 * * * * root /usr/local/sbin/af-sync-ftps-certificate.py >> /var/log/af-ftps-certificate-sync.log 2>&1
This runs at minute 17 of each hour in the server's configured timezone. Use only one copy of the schedule; do not also create an identical panel task. Set the schedule file to root ownership and mode 644, and pre-create the log root-owned with mode 600. Check that the cron daemon is running. If you prefer aaPanel Cron, create the equivalent root Shell Script task and use the helper command, with private logging.

5. Monitor the complete renewal path
Read the private log for validation errors, deferred sessions or a failed restart. Inspect source certificate expiration and the actual certificate presented by FTPS. Persistent FTP sessions can delay deployment; plan a maintenance window if that continues. The old backup bundle includes a private key and must remain private. Arrange suitable log retention and an alert route outside the server.

6. Troubleshooting
  • Source missing: confirm the actual aaPanel certificate folder and that renewal produced files.
  • Chain/hostname check fails: confirm the certificate covers the FTPS hostname and includes the necessary intermediate certificates.
  • Key mismatch: use the key from the same certificate issuance; never guess or combine unrelated files.
  • Expiry margin fails: repair the original renewal process before attempting deployment.
  • Active session deferred: wait for transfers to finish; the next scheduled run can retry.
  • FTP restart fails: inspect the service configuration and restore the private previous bundle if required.

Verified scope
The lab passed dry validation, live deployment, trusted FTPS TLS 1.3, an unchanged no-restart run, and cron-service/schedule checks. A future certificate issuance and a future automatic renewal have not yet occurred, so this is not a claim that the next renewal has already succeeded. The existing aaPanel certificate-renewal job was preserved.

Start with the FTPS setup guide. Original helper and lab evidence: © AdminsForum.

Install Fail2ban Manager in aaPanel and Verify SSH Protection Posted by: DEV - 10-13-2026, 07:27 AM - Forum: aaPanel Security Guides - No Replies

Fail2ban watches configured logs and applies a ban action when failures reach a jail's threshold. Installing a plugin is only the first step: the service, log source, filter and ban action must all match your server. This guide follows an actual Ubuntu 22.04 aaPanel lab installation.

1. Prepare before installation
Keep your existing panel and SSH connections open, and confirm that the VPS provider console works. Record the actual SSH port. Review backups and firewall rules. Do not intentionally fail your own SSH login repeatedly to test a rule: you can block your management address. A firewall and strong authentication remain necessary.

2. Install the official manager
Open App Store → Official App → ALL. Search for Fail2ban. Confirm the row says Fail2ban Manager, developer official, and review the displayed price. Our catalog listed it as Free. Click Install, inspect the version dialog and choose Install Now. Wait until the row changes to Setting / Uninstall. Our installation produced Manager version 2.2.5. Panel/plugin versions and availability can change.

3. Open the controls and check the service
Choose Setting → Service status. The lab showed Current status: On. The manager also contains WebSite protection, Server protection, Black IP, White IP, Alarm Settings and CDN Provide. Installing this version produced SSH and FTP jail rows automatically; inspect the resulting rules immediately rather than assuming installation creates no active protection.

4. Understand a server-protection rule
Open Server protection. Existing services offer Edit and Log. The Create dialog offers these fields:
   

  • Status: whether the rule is enabled.
  • Maxretry: the failure threshold used by that rule.
  • Findtime: the period in which failures are counted, in seconds.
  • Bantime: how long the ban lasts, in seconds.
  • Port: the service's actual port; the default 22 is not correct for every SSH setup.
  • Server: the selected service/filter family. This dialog listed sshd, mysql, dovecot, postfix and ftpd.
The illustrated Create dialog defaults are not a recommended policy. Our installed sshd and ftpd rows showed Maxretry 5, Findtime 300 and Bantime 86400. That ban duration is one day. Review whether that is appropriate before deployment. Do not create a duplicate service rule when one already exists. We inspected the dialog and cancelled it; no extra rule was created for this illustration.

5. Verify the backend, not just the plugin row
Use aaPanel Terminal or your authorized SSH session for these read-only checks:
Code:
fail2ban-client ping fail2ban-client status fail2ban-client status sshd fail2ban-client status ftpd fail2ban-client -t
   
Original lab checks: service responded, sshd and ftpd jails were listed, and the configuration test passed. IP addresses are omitted from the illustration.
Our SSH jail used /var/log/auth.log and reported detected failures and two bans during observation. Those were service observations, not a deliberate controlled login test. The SSH listener remained available. This does not prove every rule blocks traffic correctly from every network.

6. Check the log path for each service
The lab FTP jail reported /var/log/messages. Our follow-up test deliberately supplied an invalid password to the existing lab FTP account over trusted TLS. Pure-FTPd returned 530 and wrote the expected authentication failure to /var/log/messages. Localhost is excluded by the jail, so that local check did not ban the administrator. We then sent distinct synthetic failure records for documentation address 203.0.113.123: Fail2ban detected them, created a UFW REJECT rule, and removed it when the test address was unbanned. Other bans were preserved. This verifies real log placement plus synthetic detection/firewall enforcement; it does not prove external packet reachability. Repeated identical log messages can be collapsed by syslog, so use distinguishable records in a synthetic test.

For SSH, confirm the backend fits your system's logging arrangement. Some installations use files; others use the system journal. If the expected events are missing, inspect the service logging and jail configuration before changing thresholds.

7. Review bans and recovery
Use the relevant rule's Log control and the Black IP/White IP sections to inspect the manager's view. Check the exact IP and jail before unbanning a legitimate user. If you lose management access, use the provider console and investigate the specific ban. Avoid disabling all protection simply because one legitimate client was affected. Only add trusted addresses to exclusions; large or public ranges can undermine protection.

8. Website and CDN rules require a separate test
Website protection depends on the correct web-server logs. The manager warns that rules need to be recreated after changing the web server or log path. A reverse proxy/CDN can alter which IP reaches the origin; verify real-client-IP handling before using IP-based bans. Do not ban a shared proxy address based on unverified logging. This guide does not configure website/CDN rules or notification accounts.

Installation result
Manager 2.2.5 installed; service responded; two jails loaded; configuration test succeeded. SSH failures and bans were observed. FTP log placement, synthetic detection and the UFW ban/unban action subsequently passed. An external network ban test remains unverified. No new public port was opened for this plugin.

Continue with aaPanel firewall rules.
References: aaPanel App Store documentation and Fail2ban project documentation. Screenshots and lab observations: © AdminsForum.

aaPanel App Store Guide: Apps, Plugins and What to Install Posted by: DEV - 10-13-2026, 05:20 AM - Forum: aaPanel Plugins & Integrations Guides - No Replies

You do not need every App Store app to host a website. Start with the components your application requires, then add optional tools for a specific purpose. This reference explains all 98 rows visible in our lab's catalog on 13 October 2026. Availability, versions and prices can change. The descriptions below are our practical summaries, not claims that every plugin has been installed or tested.

1. Find and understand the App Store
Open App Store → Official App. Search by name. Use ALL for the catalog and Installed to see services already present. Deployment, Tools, Plug-ins and Professional narrow the list. Setting opens an installed component's controls; Install starts setup for an available component; paid entries may show a purchase action. Do not treat a catalog listing as proof that an app is running.
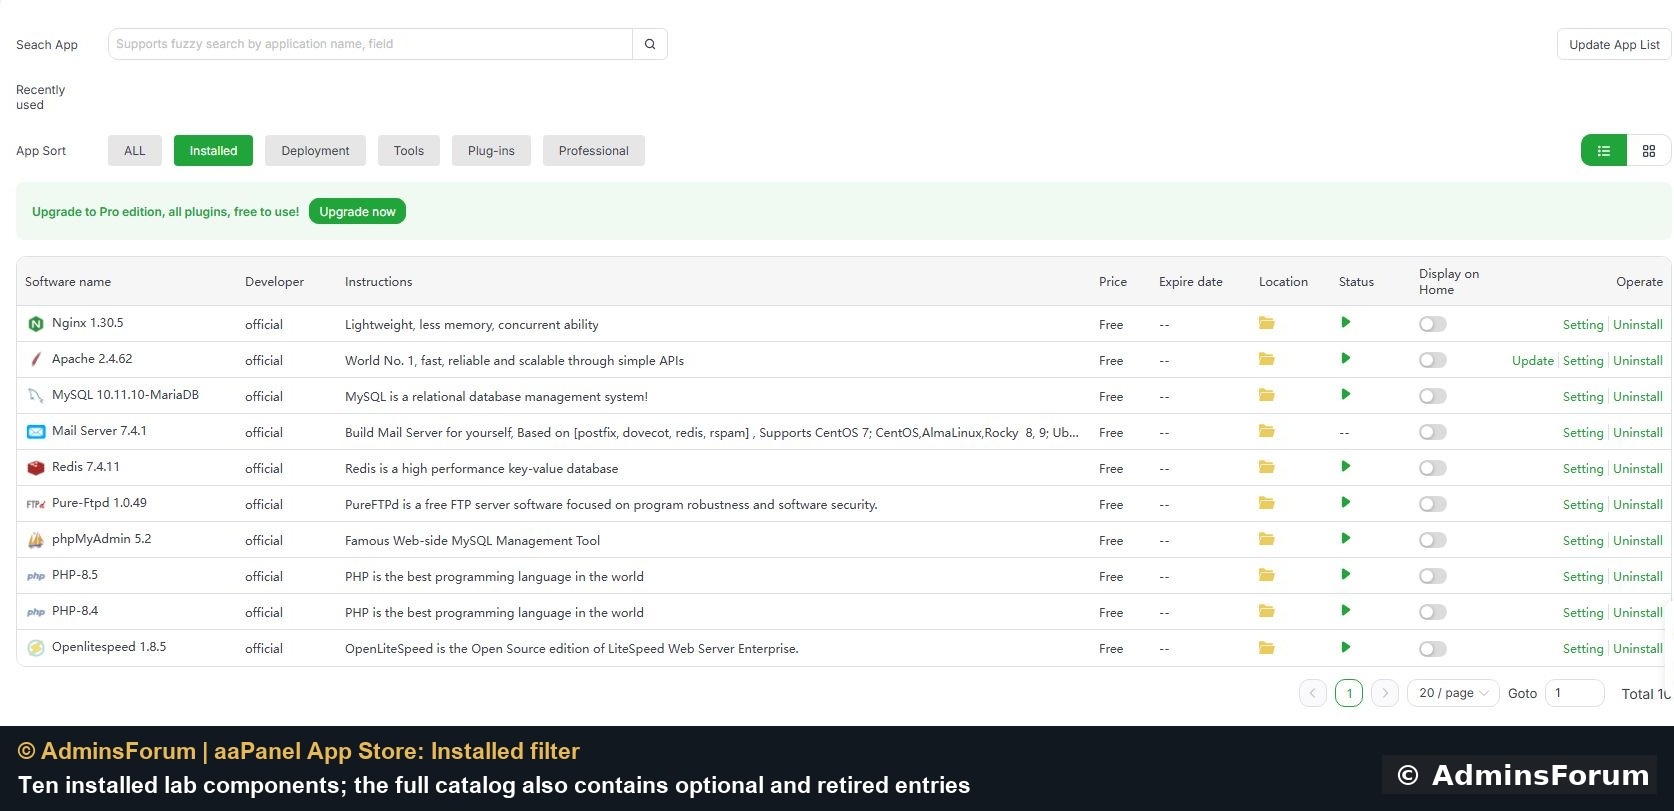
   
Our Installed view contains ten components. The full 98-row catalog also includes optional and retired entries.

2. Choose a small starting stack
For a typical PHP website, choose a supported web server, a PHP runtime compatible with the application and a database when required. phpMyAdmin is an optional administration interface, not the database itself. Redis is optional caching infrastructure. Mail Server and Pure-FTPd are separate services: install them only when you need to operate mail or FTP. Our lab includes multiple web servers to demonstrate hosting configurations; a beginner does not need to install all three.

3. Before clicking Install
Check operating-system and panel-version compatibility, memory/disk requirements and existing dependencies. Back up configuration and data. Review new ports and credentials. A plugin marked Free can still use a cloud account with quotas or charges. A Paid label below means the catalog listed a price; it does not define the terms of a subscription or guarantee current pricing. Review licensing in your own account. After installation, check service status, application behavior and firewall rules.

4. Core hosting, database and runtime entries
Nginx 1.30.5 — Listed Free
Serves websites and can reverse-proxy application backends.

Apache 2.4.62 — Listed Free
Serves websites with Apache modules and per-site configuration.

MySQL 10.11.10-MariaDB — Listed Free
The lab catalog label refers to the installed MariaDB relational database; applications need compatible database settings.

Mail Server 7.4.1 — Listed Free
Manages mail services; delivery also requires DNS, certificates, reverse DNS and provider connectivity.

Redis 7.4.11 — Listed Free
Provides a key-value service used for caches and other applications; secure access and avoid shared-cache flushes.

Pure-Ftpd 1.0.49 — Listed Free
Provides FTP/FTPS accounts and transfers; require encryption and restrict user folders.

phpMyAdmin 5.2 — Listed Free
Provides a browser interface for MySQL/MariaDB administration; protect access.

Node.js version manager — Listed Free
Manages Node.js runtimes; check project compatibility and conflicts with older managers.

ffmpeg manager — Listed Free
Installs and manages FFmpeg for media conversion; resource use depends on the job.

MongoDB — Listed Free
Provides a document database for applications designed to use it.

Memcached — Listed Free
Provides an in-memory cache; restrict network access and expect cache contents to be disposable.

elasticsearch — Listed Free
Provides search and analytics infrastructure; plan its memory and storage requirements.

Openlitespeed 1.8.5 — Listed Free
Provides the OpenLiteSpeed web server; its PHP handling differs from Nginx/PHP-FPM.

RabbitMQ — Listed Free
Provides a message broker for applications that need queues.

PostgreSQL Manager — Listed Free
Installs and manages PostgreSQL databases.

Supervisor — Listed Free
Keeps configured application processes running; set the correct user and working directory.

Java Manager — Listed Free
Supports Java/JSP deployment management; choose compatible runtimes.

Mariadb multi-version management (Docker) — Listed Free
Runs multiple MariaDB versions in containers; separate ports, data and backups.

5. PHP version entries
The catalog lists PHP-8.5, PHP-8.4, PHP-8.3, PHP-8.2, PHP-8.1, PHP-8.0, PHP-7.4, PHP-7.3, PHP-7.2, PHP-7.1, PHP-7.0, PHP-5.6, PHP-5.5, PHP-5.4, PHP-5.3, PHP-5.2. All were listed Free. Each is a PHP runtime version, not a different website application. Select the version required by your software and still covered by appropriate security support. Old PHP 5.x and 7.x entries are legacy choices, not recommendations for a new site. Check the official support table before choosing or migrating a version. Installing a newer runtime does not automatically switch every existing website to it. Back up and test the site, required extensions and the selected web server before changing its runtime.

6. Optional apps and plugins
Site Diagnosis — Listed Paid
Helps investigate common website failures; verify its suggestions against the actual logs.

Network Threat Detection — Listed Paid
Reviews network traffic for suspicious activity; check the supported OS before installing.

Website Analytics — Listed Paid
Adds visitor analytics; review tracking, privacy and storage requirements.

Files Sync — Listed Paid
Transfers files between locations on a schedule or continuously; test conflict and deletion behavior first.

Network Scan Detection — Listed Paid
Looks for scanning activity against the server; alerts still need investigation.

aaPanel Daily Report — Listed Paid
Summarizes operational and security information for regular review.

Website statistics-v2 — Listed Paid
Provides website traffic statistics for supported web servers.

Nginx WAF — Listed Paid
Adds application-layer filtering for Nginx; tune rules to avoid blocking legitimate requests.

Tamper-proof for Enterprise — Listed Paid
Restricts unwanted website file changes; review incompatibilities with other tamper protection.

Load Balance — Listed Paid
Distributes requests across backends; requires healthy services and a tested routing plan.

aaPanel Mobile — Listed Paid
Provides mobile management access; protect the associated account.

Apache WAF — Listed Paid
Adds application-layer filtering for Apache; review compatibility and false positives.

Microsoft OneDrive — Listed Free
Stores backups in a Microsoft cloud account; account limits and charges are separate.

PHP code security — Listed Paid
Adds PHP behavior checks; test application compatibility before enabling blocking.

Task manager — Listed Paid
Provides controls for processes and other system tasks; stopping the wrong service can interrupt hosting.

Website Tamper-proof — Listed Paid
Protects selected website files against changes; allow your legitimate deployment workflow.

aaPanel user Manager — Listed Paid
Manages panel users and menu permissions on supported panel versions; grant the minimum access needed.

System hardening — Listed Paid
Offers system protection settings; review each change and its recovery route.

File monitor — Listed Paid
Records file changes and offers related checks or backups.

Disk analysis — Listed Paid
Helps locate large files and directories; review files before cleanup.

aaCloud — Listed Free
Connects servers to centralized management; review the access and data involved.

OpenClaw(Docker) — Listed Free
Runs a self-hosted AI assistant through Docker; plan disk, memory, model and integration requirements.

OpenClaw — Listed Free
Runs a self-hosted AI assistant; use a separate lab and review messaging integrations and credentials.

Tencent EdgeOne CDN — Listed Free
Connects edge/CDN services; review the provider account, plan and DNS requirements.

Anti-intrusion — Listed Paid
Adds protections around service and process activity; validate compatibility with your workloads.

Website basic Statistics — Listed Free
Provides a basic view of website visits.

CloudFlare free CDN — Listed Free
Integrates Cloudflare website/CDN configuration; DNS and account requirements still apply.

Website Log Analyzer — Listed Free
Analyzes selected Nginx access logs to help investigate traffic.

WebSite Speed — Listed Free
Offers website acceleration controls; review its current documentation and test before enabling.

WebHook — Listed Free
Runs configured actions on callbacks; protect webhook secrets and limit command privileges.

DeepSeek-R1 — Listed Free
Provides an AI model integration; review its current deployment, memory and model requirements.

S3 Storage (AWS S3) — Listed Free
Sends backups to S3-compatible storage; protect access keys and test recovery.

Google Drive — Listed Free
Sends backups to Google Drive; verify account authorization and storage capacity.

Fail2ban Manager — Listed Free
Manages bans triggered by repeated authentication failures; verify log paths and trusted-client access.

Cloud dns — Listed Free
Manages supported DNS-provider records; use narrowly scoped provider tokens.

DDNS Manager — Listed Free
Updates supported DNS records when an address changes.

One-click migration beta — Listed Free
Helps migrate panel data; verify backups, compatibility and the destination before relying on it.

one-click deployment — Listed Free
Deploys supported applications; update and secure each application after installation.

Intrusion Detection — Listed Free
Monitors for possible intrusion activity; review alerts instead of treating them as proof.

FTP Storage — Listed Free
Sends backups to an FTP destination; review encryption support before transmitting private data.

ClamAV — Listed Free
Scans files for malware signatures; scan results do not replace patching or incident review.

frp manager — Listed Free
Manages reverse-proxy tunnels; review which private services become reachable.

Platform Ops — Listed Paid
Coordinates maintenance across servers; protect stored access and review batch operations.

Disk Mount Manager — Listed Free
Manages disk mounts; back up first and distinguish mounting from formatting.

Google Cloud Storage — Listed Free
Sends backups to Google Cloud Storage; provider permissions and charges are separate.

Performance testing — Listed Free
Runs CPU, memory, disk and network benchmarks; schedule away from busy production periods.

System boot items — Listed Free
Manages startup services and environment settings; avoid disabling hosting dependencies.

NFS Manager — Listed Paid
Manages network file shares and mounts; restrict clients and export permissions.

Server performance testing — Listed Free
Provides server benchmarking; tests can compete with live workloads.

Linux Tools — Listed Free
Provides system utilities including DNS, swap and network settings; review disruptive changes.

PHP Guardian — Listed Free
Monitors PHP-FPM availability; investigate the underlying failure rather than only restarting it.

Log cleanup — Listed Free
Removes selected logs or temporary data; retain troubleshooting and audit evidence first.

Anti-Spam Gateway — Listed Free
Filters mail through a gateway; review routing and false-positive behavior.

IP setup tool — Listed Free
Changes network address configuration; its listed OS support is old, so check compatibility and console recovery.

Nginx free firewall — Listed Free
The catalog gives little detail; check maintenance and documentation before choosing it for protection.

7. Retired or replaced catalog entries
These rows were still visible but their catalog notices direct users to replacements. Do not use an old install guide without checking the current location and support status.

Dns Manager — Listed Free
Retired catalog entry; use the panel Domains area indicated by the catalog.

aaPanel AI Assistant — Listed Free
Unmaintained plugin entry; use the current AI menu indicated by the catalog.

Sync Tool — Listed Paid
Retired entry; the catalog directs users to Files Sync.

Abnormal Push — Listed Paid
Retired entry; the catalog directs users to Settings → Alarm.

SYS Firewall — Listed Free
Retired entry; use the current Security area.

PM2 Manager — Listed Free
Retired entry; use Website → Node Project as indicated by the catalog.

Docker Manager — Listed Free
Retired entry; use the current Docker menu.

Python Manager — Listed Free
Older entry marked for replacement; use Website → Python Project.

Website statistics — Listed Paid
Retired entry; use Website statistics-v2.

8. How to verify an installation
Return to Installed, open Setting, confirm the service status and inspect logs. Test the actual function: load a website, connect to the database through the intended private route, transfer a file using encryption or restore a backup into an isolated environment. A green service indicator alone does not prove the application is configured correctly. If setup fails, record the app/version, OS, precise error and relevant redacted log lines when asking for support.

Lab scope
The installed view shows Nginx, Apache, MariaDB, Mail Server, Redis, Pure-FTPd, phpMyAdmin, PHP 8.5, PHP 8.4 and OpenLiteSpeed. Our related guides demonstrate selected functions of this stack. The remaining catalog entries are explanations based on the visible catalog; they have not all been installed, audited or benchmarked.

Continue with focused guides
WordPress Redis object cache
Pure-FTPd installation and service checks
Firewall rules after installing services

References: aaPanel App Store documentation and PHP supported versions. Catalog review and original lab screenshot: © AdminsForum.

Secure aaPanel After Installation: HTTPS, Access and Backups Posted by: DEV - 10-13-2026, 05:17 AM - Forum: aaPanel Security Guides - No Replies

After installing aaPanel, secure management access before adding production websites. This checklist separates settings verified on our lab from account changes you must complete yourself. It does not claim that enabling one option makes a server fully secure.

1. Save a recovery route first
Confirm you can open the VPS provider console. Keep a working SSH session while changing management settings. Store the actual panel address and security entrance in a private password manager. Create an off-server backup of website files, databases and the configuration needed to restore them. A backup that has never been restored is not a verified recovery plan.

2. Use a hostname with trusted HTTPS
Create a DNS-only record such as cp.example.com pointing to the panel server. aaPanel's port may not be supported by a CDN proxy; our lab uses 18443 with DNS-only resolution. In Settings → Panel SSL, request and install a certificate for the hostname. Open the panel using that exact name, not the IP address. Check the browser's certificate information and expiration date.
   
The lab panel uses a trusted certificate for cp.adminslab.com. The private login entrance is intentionally omitted.
Follow the complete panel SSL tutorial. Monitor renewal before expiry. A currently valid certificate does not prove that a future renewal has succeeded.

3. Review the firewall
Open Security → Firewall and preserve your actual SSH and panel ports. Keep only the services required for websites, mail and file transfers. Review TCP and UDP separately and check IPv6. Databases and internal web-server backends should not be generally accessible from the Internet. Our lab retains management access while denying direct database and backend ports; Redis also binds to localhost.
Use the tested firewall walkthrough. Do not run a firewall reset or remove a management rule before confirming a recovery route.

4. Strengthen the panel account
Use a unique, strong password stored in your password manager. If your installed panel offers multi-factor authentication, enroll it and keep recovery information privately. Check the account or security settings for session controls and notifications. Sign in successfully from a second session before ending the first. Password rotation and MFA enrollment were not performed during this lab walkthrough; these require the owner to complete the credential and recovery steps.

5. Review SSH authentication
Prepare a non-root administrator account and a tested SSH key before considering removal of password authentication. Confirm that the new account can sign in and use the administration privileges it needs. Keep the provider console available. Validate the SSH configuration before reloading it, and test another connection afterward. Do not disable root/password access based only on a screenshot or an untested key. The lab's SSH authentication method has not been changed in this article.

6. Use encrypted file transfer
Use SFTP over SSH or explicitly encrypted FTPS. Restrict FTP users to the folder they need, deny anonymous access, validate the FTPS certificate and encrypt the data channel as well as the login. Our restricted lab account passed a protected upload/download check, and access outside its assigned folder was refused.
FTPS configuration and certificate guide. The lab FTPS certificate bundle was manually deployed: renewal must also update that service's bundle and be verified.

7. Keep runtime versions and plugins maintainable
Review panel, operating-system and installed app updates. Back up first and check compatibility before a major runtime change. The App Store may still list old PHP versions; availability does not mean security support. Remove unused plugins through the supported uninstall workflow after checking dependencies. Avoid installing every optional service on a small VPS.

8. Verify backups without overwriting the live site
Check archive integrity, extract into an isolated private folder, import the database under a separate name and verify the staged application. Keep staged credentials and files out of the public web root. Our lab restore rehearsal checked 3,935 file hashes, imported 12 tables and bootstrapped WordPress in an isolated copy. It did not overwrite the live site or prove every browser workflow.
Full restore verification walkthrough.

9. Monitor and repeat the checks
Review panel/SSH login events, service failures, disk space, backup results and certificate expiry. Investigate unexpected open ports after installing apps. Test website access, mail and file transfers after changes. Store logs privately and redact credentials, tokens and personal details before posting a support question.

Lab verification summary
Trusted panel HTTPS, reviewed IPv4/IPv6 firewall rules, protected FTPS, localhost Redis and an isolated WordPress restore were checked. Owner password rotation, MFA enrollment and SSH-key migration remain separate owner actions. These checks are useful evidence, not a security audit of every installed application.

Reference: aaPanel Settings documentation. Original lab image: © AdminsForum.