AdminsForum
Install npm Packages for a Node.js App on aaPanel Posted by: DEV - Yesterday, 03:13 AM - Forum: aaPanel Websites & Web Servers Guides - No Replies

Installing a Node.js runtime is only the first step. An application may also need packages from npm. This guide installs Express in a separate lab folder on an aaPanel server, fixes a writable-cache problem and verifies a clean lockfile-based installation.

   
npm dependency workflow based on the isolated lab test.

Tested: Ubuntu 22.04.5 LTS, aaPanel Free 8.0.7, Node.js 24.21.0, npm 11.19.0 and Express 5.3.0 on 14 October 2026. Commands ran as www in /www/af-npm-lab. This is an SSH workflow, not a demonstration of aaPanel's Module button. The live website was not modified.

1. Confirm the intended Node.js runtime
Install Node.js first using the aaPanel runtime guide. Check the Node version supported by your application and dependencies. Use the same intended runtime for package installation and app execution.

Our runtime is under /www/server/nodejs/v24.21.0/bin. Replace that path if your installed version differs. A shell's node command can point to a different runtime from the one selected for an aaPanel project.

2. Create a separate practice directory
As an administrator over SSH, choose a directory that does not already contain an application:

Code:
sudo mkdir /www/af-npm-lab sudo chown www:www /www/af-npm-lab sudo runuser -u www -- bash
The final command opens a shell as www. The remaining npm commands below belong in that shell. Do not initialise a new package.json over a real application's existing manifest. For an existing project, use its supplied manifest, lockfile and installation instructions.

3. Set the runtime and a writable npm cache
Code:
export PATH=/www/server/nodejs/v24.21.0/bin:$PATH export npm_config_cache=/www/af-npm-lab/.npm-cache cd /www/af-npm-lab node --version npm --version
We verified v24.21.0 and 11.19.0. These exports affect the current shell; they are not a permanent change to aaPanel's project configuration.

Our first attempt encountered a shared npm cache at /www/server/nodejs/cache that www could not write to. A separate writable cache fixed the problem without running npm as root or making shared directories writable to everyone. For real deployments, choose a protected cache location outside publicly served files and ensure the intended run user owns it.

4. Initialise only the new sample project
Code:
npm init -y
This creates package.json for the practice folder. Review the result. Its default test script is a placeholder, not a passing application test.

5. Install the example dependency
Code:
npm install express --ignore-scripts --registry=https://registry.npmjs.org npm ls express
The test used the official npm registry. Express installed as version 5.3.0, and npm ls showed it as a dependency of af-npm-lab. The command also produced package-lock.json and populated node_modules.

We used --ignore-scripts for this controlled example. Some real packages require installation scripts or build steps; disabling those can leave them unusable. Follow the application's documented requirements rather than applying this flag indiscriminately.

6. Understand the files
  • package.json: Declares the project and its dependency requirements.
  • package-lock.json: Records npm's resolved dependency tree for this project.
  • node_modules: Contains installed packages; its presence alone does not prove a working app.
  • .npm-cache: Our chosen local download cache, not application source.
Preserve the manifest and lockfile in your source and recovery process. Do not mix package managers casually: a project built around a Yarn or pnpm lockfile needs its corresponding workflow.

7. Verify a clean installation from the lockfile
Only run the following in the isolated practice folder:
Code:
sha256sum package-lock.json npm ci --ignore-scripts --registry=https://registry.npmjs.org sha256sum package-lock.json npm ls express
The two lockfile checksums matched in our test, and Express remained installed. npm ci requires an existing matching lockfile, installs the whole project and replaces an existing node_modules directory. It is therefore not a harmless diagnostic command to run inside a serving production release.

If the manifest and lockfile disagree, npm ci reports an error rather than silently updating the lockfile. Resolve that mismatch in a controlled development or build workflow; do not delete the lockfile merely to hide the problem.

8. Check that Node can load the package
From the practice directory:
Code:
node -e 'const express=require("express"); const app=express(); console.log(typeof app.get === "function" ? "EXPRESS_LOAD_PASS" : "FAIL")'
Our output was EXPRESS_LOAD_PASS. This confirms that Node can import Express and create an application object. It does not start a web service or prove an entire application, database or domain works.

npm's audit output reported zero known vulnerabilities during this test. That result is time-dependent and is not a guarantee that a package or application is secure. The lab also displayed a warning about an unknown global --init.module configuration; it did not prevent these checks from passing.

9. Common installation errors
  • EACCES or cache write failure: Check directory ownership and use a writable cache for the intended user. Avoid permissions 777 or a root install as shortcuts.
  • npm ci needs a lockfile: Check you are in the right directory and have the project's npm lockfile.
  • Module not found: Check the working directory, installed dependency and runtime used to start the app.
  • Unsupported engine: Compare package requirements with the selected Node version.
  • Registry or certificate error: Check connectivity and registry settings; do not bypass TLS validation to force a download.

10. Return to aaPanel deployment
Type exit to leave the www practice shell. For a real application, prepare dependencies and any required build in a separate release directory, then configure the correct runtime and start command in aaPanel. Restart the intended project and verify its expected response. See Deploy a Node.js app with a domain and HTTPS.

Lab result: Express loaded successfully; npm ci passed; the lockfile checksum stayed unchanged. The isolated practice directory is retained. No public application or production dependency update was performed.

References: npm ci documentation and Express installation documentation.

Back Up and Restore a Node.js App on an aaPanel Server Posted by: DEV - Yesterday, 03:00 AM - Forum: aaPanel Backups & Migration Guides - No Replies

A backup is useful only if you can restore and run the application. This guide backs up our aaPanel-managed Node.js sample, extracts it into a separate folder, compares the restored files and runs the copy on a temporary localhost port. The live website is not replaced.

   
Backup and isolated restore workflow, based on the lab test below.

Tested setup: Ubuntu 22.04.5 LTS, aaPanel Free 8.0.7, Node.js 24.21.0. Source folder /www/wwwroot/af-node-lab; project afnodelab; live domain node.adminslab.com. Tested on 14 October 2026. These steps use SSH on the aaPanel server; they do not demonstrate aaPanel's native Backup / Restore button.

1. Decide what the backup must include
For this dependency-free sample, we preserved server.js, package.json and yarn.lock. For a real application, also identify configuration, required environment variables, uploaded files, generated assets and external services.

A source-file archive is not a database backup or a full aaPanel configuration backup. Record the project name, runtime, run user, startup command, port, domain mapping and Boot setting separately. Store secrets securely. Do not put an archive containing credentials under a publicly served website directory.

2. Check the live app before starting

Code:
curl -I https://node.adminslab.com/ ls -l /www/wwwroot/af-node-lab df -h /www
Use your own domain and directory. Confirm the app is healthy and enough disk space is available. Our live app returned 200 before the test. For an application writing files or a database, plan a consistent backup process; copying changing files does not automatically produce a consistent recovery point.

3. Create the archive outside the website root
The following commands are for our lab. Use a unique archive filename to avoid overwriting an older backup:
Code:
sudo tar --exclude=af-node-lab/node_modules  -czf /www/backup/af-node-20261014.tar.gz  -C /www/wwwroot af-node-lab sudo chmod 600 /www/backup/af-node-20261014.tar.gz
The -C option changes the base directory before archiving. The archive contains the af-node-lab folder rather than absolute server paths. We excluded node_modules for this sample; a real app needs a reproducible dependency installation or another deliberate dependency-backup strategy. Preserve its lockfile and build requirements.

Our archive was 878 bytes because the sample contains only a few tiny source and lock files. That size is not representative of a real application.

4. Inspect the archive and keep an off-server copy
Code:
sudo tar -tzf /www/backup/af-node-20261014.tar.gz sudo sha256sum /www/backup/af-node-20261014.tar.gz
Check that the expected files appear. A readable archive list is useful, but it does not prove the app can run after restoration. Transfer a protected copy to a separate backup location and record its checksum. Our lab test verified a local archive and restore; an off-server transfer was not part of this test.

5. Restore into a new directory
Choose a directory that does not already exist. Never extract over the live app as your first recovery test:
Code:
sudo mkdir /www/af-node-restore-20261014 sudo tar -xzf /www/backup/af-node-20261014.tar.gz  -C /www/af-node-restore-20261014
The restored app is now under /www/af-node-restore-20261014/af-node-lab. This directory is separate from the live application's document root.

Before modifying the copy, compare hashes:
Code:
sha256sum /www/wwwroot/af-node-lab/server.js sha256sum /www/af-node-restore-20261014/af-node-lab/server.js
Repeat for package.json and yarn.lock. Matching digests confirm identical file contents at this point. Our test compared all three and they matched. A file checksum does not validate database contents or application behaviour.

6. Prepare the restored copy for an isolated test
Set ownership only on the separate test directory:
Code:
sudo chown -R www:www /www/af-node-restore-20261014
In the restored server.js only, change the sample port from 3100 to 3102 and update its startup message to match. Leave the live server.js untouched. Confirm that the temporary port is unused:
Code:
ss -ltn | grep ':3102'
No matching listener should be present before this test. Do not use an occupied port. Keep the sample bound to 127.0.0.1 so the temporary copy is not exposed publicly.

Check its JavaScript syntax:
Code:
/www/server/nodejs/v24.21.0/bin/node --check  /www/af-node-restore-20261014/af-node-lab/server.js
Replace the runtime path with your installed version. Real applications may also need dependencies, compilation and test environment configuration. Do not connect a recovery test to production services that could send mail, charge payments or modify live data.

7. Run the copy and check its response
In one SSH session, start it in the foreground as www:
Code:
sudo runuser -u www -- /www/server/nodejs/v24.21.0/bin/node  /www/af-node-restore-20261014/af-node-lab/server.js
In a second SSH session:
Code:
curl -i http://127.0.0.1:3102/ curl -I https://node.adminslab.com/
The restored sample should return HTTP 200 and the AdminsForum Node.js Lab page. The live domain should still return 200 independently. We verified the restored response and the live domain during our test.

When finished, stop the foreground test with Ctrl+C. Our test also stopped its temporary process after validation; the live app remained running. Confirm that the temporary listener has gone before reusing the port.

8. Record the recovery result
Our test result was:
Code:
server.js file hash: MATCH package.json file hash: MATCH yarn.lock file hash: MATCH Restored app on localhost:3102: EXPECTED PAGE Live HTTPS website: 200
The archive and isolated restored folder were retained for later inspection. This proves recovery of this small source-based sample, not a full server or database restore.

9. Before replacing a real deployment
Keep the current release and its backup, restore any database consistently, verify dependencies and secrets, then plan the switch and rollback. Use aaPanel to configure the intended project directory and runtime only after the recovery copy passes its checks. Repeat response tests after the change. This guide deliberately stops before a live cutover.

Related guide: Deploy a Node.js app in aaPanel with a domain and HTTPS.

Fix Node.js 502 Bad Gateway in aaPanel: Check Ports, Mapping and Logs Posted by: DEV - Yesterday, 02:52 AM - Forum: aaPanel Websites & Web Servers Support - No Replies

For a Node.js website behind aaPanel's Nginx mapping, a 502 Bad Gateway often means the web server could not get a usable response from the application. Start by testing the app locally, then compare its listening port with the mapping. Reinstalling Node.js or disabling the firewall is not a useful first diagnostic step.

Tested lab: aaPanel Free 8.0.7, Node.js 24.21.0, project afnodelab, app at 127.0.0.1:3100, domain node.adminslab.com. On 14 October 2026 we stopped only this sample app using aaPanel's native project controls, observed HTTPS 502, started it again and observed HTTPS 200. The app is restored and running.

1. Identify which layer fails
Run these checks over SSH on the VPS:

Code:
curl -i http://127.0.0.1:3100/ curl -I https://node.adminslab.com/
Replace the sample port and domain with yours. The local request reaches the Node application directly. The domain request goes through DNS, TLS and the web server. Compare the results:
  • Local connection refused + public 502: Check whether the app is running and whether the port is correct.
  • Local 200 + public 502: Check the mapping's upstream address and port, then the website error log.
  • Both return 200: The fault may have cleared. Check logs and monitoring before changing settings.
  • TLS validation fails: Investigate the certificate separately; a certificate error is different from an HTTP 502 response.

2. Find the actual listening port
For our sample:
Code:
ss -ltnp | grep ':3100'
The expected listener is 127.0.0.1:3100. We also tested 127.0.0.1:3101, where no app was listening, and curl returned connection refused. This demonstrates why guessing an upstream port is unreliable. We did not deliberately change the live mapping to that incorrect port.

If your app listens on another port, use that port in the local check and the aaPanel project settings. For an app behind a local reverse proxy, a localhost-only listener is appropriate. It does not need its application port opened publicly just to be reached by Nginx on the same machine.

3. Check project configuration
Open Website → Node.js Project, click the project name and inspect Project config. Compare the directory, start command, selected runtime, run user and port against the application's own configuration.

   
Reference screenshot from the sample deployment: project port 3100, www user and Node.js runtime.

Changing the Project Port field does not rewrite a hard-coded port in server.js. The two must agree. Also check that the selected directory contains the expected package.json and startup file. Our sample uses start → node server.js and runs as www.

4. Read Project log before restarting
Open Project log. Look for the latest startup message and any error that precedes it.

   
Reference startup log from the sample deployment shows the app listening on localhost:3100.
  • Module not found: Check the application's dependency installation and selected runtime.
  • Permission denied: Check the run user's access to the app directory and required resources.
  • Address already in use: Identify the existing listener; do not start duplicate copies.
  • App starts then exits: Read the exit error and check required environment variables or external services.
Do not switch the app to root or use permissions 777 to hide an access problem. Fix the specific missing permission instead.

5. Check the mapping
In Domain Manager, confirm the intended hostname is present. In Mapping, confirm mapping is enabled. Check the relevant web-server configuration read-only before making changes.

Our generated configuration contains:
Code:
server_name node.adminslab.com; proxy_pass http://127.0.0.1:3100;
That upstream matches the app's listener. Configuration filenames differ between projects and versions; inspect the relevant site's configuration rather than editing an unrelated file. Prefer the panel's controls for changes, and validate the web-server configuration before reloading it.

6. Restore a stopped application
Use Service status → Start for a stopped project, or Restart when appropriate for the selected app. Confirm the action and wait for startup to finish. Repeat the local and domain checks; a Running label alone does not prove the application returns the expected page.

Our controlled test produced:
Code:
Native project stop: Stopped successfully HTTPS while stopped: 502 Native project start: Successfully started HTTPS after recovery: 200
This test changed only the isolated sample project's process state and restored it in the same test. It did not require changing DNS, TLS, firewall rules or the working mapping.

7. Watch for a reboot startup delay
We previously saw a brief 502 while the VPS was coming back after reboot. The app then recovered automatically with Boot enabled. See Auto-start Node.js apps after reboot in aaPanel for the recovery test.

Allow a reasonable startup period and check the app log. If 502 persists, investigate it; do not assume that every 502 will resolve itself. If you manually start the app, record the intervention so you do not mistake it for successful automatic recovery.

8. Confirm the result
Check the expected response body as well as the status:
Code:
curl -i http://127.0.0.1:3100/ curl -i https://node.adminslab.com/
Use normal TLS validation. Save the relevant error and the change that fixed it. If requesting support, include the aaPanel version, Node runtime, start command, listening port and redacted error excerpt. Keep credentials and private configuration values out of the post.

Related setup: Deploy a Node.js app in aaPanel with a domain and HTTPS.
Reference: aaPanel Node.js project documentation.

Auto-Start Node.js Apps After Reboot in aaPanel: Logs and Recovery Checks Posted by: DEV - Yesterday, 02:44 AM - Forum: aaPanel Websites & Web Servers Guides - No Replies

A Node.js app that runs today may still fail after a VPS restart if automatic startup is disabled. This guide shows where aaPanel's Boot option is, how to read the right logs, and how to prove that an app recovers after a real reboot.

Lab result: We enabled Boot for our sample project, rebooted the tutorial VPS and verified that it started automatically without pressing Start. There was a temporary 502 while the server was coming back; a later HTTPS check returned 200 with the expected page. The app continued running as www on 127.0.0.1:3100.

Tested: Ubuntu 22.04.5 LTS, aaPanel Free 8.0.7 and Node.js 24.21.0 on 14 October 2026. Project: afnodelab. Domain: node.adminslab.com. This is a disposable tutorial server; schedule a maintenance window before rebooting a server that hosts real users.

1. Start with a known working app
Follow Deploy a Node.js app in aaPanel with a domain and HTTPS first. Record the project name, directory, runtime, start command and listening port.

Before changing startup settings, check that the application is already responding:

Code:
curl -i http://127.0.0.1:3100/ curl -I https://node.adminslab.com/
Replace the port and domain for your own app. Both checks should return 200 for this sample. The local request checks the application directly; the HTTPS request checks the domain, web-server mapping and certificate as well.

2. Find the application log
Open Website → Node.js Project and click the project name. Select Project log. Read the latest startup output, including errors before the final line.

Our sample logs this line when it starts:
Code:
AdminsForum lab listening on http://127.0.0.1:3100
An error such as module not found, permission denied or address already in use points to different problems. Check the start script and files for missing modules, the selected user's permissions for access errors, and the port for address conflicts. Do not repeatedly restart without reading the error.

Project log and Website log are not interchangeable. The project log concerns the application process. Website logs concern requests handled by the mapped web server. A 502 can occur when Nginx is running but the application behind it is not ready.

3. Restart only the application when appropriate
Open Service status → Restart and confirm the project restart. This affects the selected app rather than rebooting the whole VPS. Repeat the local and HTTPS response checks afterwards.

We tested a project restart in the deployment guide and confirmed the expected page returned. A successful project restart alone does not prove startup after a full machine reboot: those are separate tests.

4. Enable startup after reboot
Open Project config. Review the existing directory, start script, port, www user and Node runtime. Check Boot → Follow the system to start the service, then click Save. Wait for Modify the project successfully.

   
The Boot checkbox is enabled for afnodelab and saved successfully.

Do not assume that checking the box without saving has changed the server configuration. Keep the application files in a persistent directory and make sure its runtime remains installed. Startup cannot repair a broken start command or missing dependency.

5. Record the current boot before testing
Over SSH, record:
Code:
cat /proc/sys/kernel/random/boot_id uptime -s
The boot ID lets you distinguish an actual server reboot from merely reconnecting your terminal. Also check the app's current listener:
Code:
ss -ltnp | grep ':3100' ps -eo user,pid,args | grep '[n]ode server.js'
These checks match our sample. Other applications may use a different start command. Our pre-reboot listener and process were present, and the app ran as www.

6. Perform a controlled VPS reboot
Make sure you have provider-console access, current backups and no installation or migration in progress. Notify users if this is a live service. A full reboot interrupts all services on that VPS, including websites and mail.

On the authorised lab server we ran:
Code:
sudo systemctl reboot
Expect SSH to disconnect. Give the machine time to start, then reconnect. Do not open a second copy of the app manually during this test; doing so would obscure whether automatic startup worked and could introduce a port conflict.

7. Verify automatic recovery
After reconnecting, repeat:
Code:
cat /proc/sys/kernel/random/boot_id uptime -s ss -ltnp | grep ':3100' ps -eo user,pid,args | grep '[n]ode server.js' curl -i http://127.0.0.1:3100/ curl -I https://node.adminslab.com/
A changed boot ID confirms a new boot. The listener, process owner and responses confirm that the app returned. New process IDs are normal after a reboot.

In our test, the first HTTPS check shortly after startup returned 502. A later check returned 200 automatically, and we verified the expected response body, a localhost-only listener and a www-owned Node process. We did not manually start the project between those checks. Do not treat a short startup delay as proof that the Boot setting failed; also do not assume that every persistent 502 is harmless.

   
The expected sample page is available over HTTPS after the VPS reboot.

8. If recovery does not complete
Check whether the VPS, aaPanel and web server are available. Sign back into aaPanel if the reboot ended your panel session. Review the project status, Boot setting and latest Project log. Test localhost before investigating DNS or SSL.
  • No listener: The app has not started, is starting slowly or exited. Read the application log and check its runtime and start command.
  • Local response works, domain returns 502: Check the web-server mapping and its configured upstream port.
  • Permission errors: Check the run user's access to files and required resources; avoid switching to root as a shortcut.
  • Port conflict: Identify the process using the port. Do not launch another duplicate process to fix it.
  • Only HTTPS fails: Check the certificate and web-server configuration separately from the app.

If you need a manual Start to restore service, record that intervention and re-test automatic startup later. A manually recovered app has not passed an automatic-start test.

What this test proves
The Boot option worked for this sample on the tested aaPanel version. It does not prove that a different application, database dependency or background queue will recover in the same way. Repeat recovery testing for each real deployment, including its dependencies and expected response.

References: aaPanel Node.js project documentation.

Deploy a Node.js App in aaPanel with a Domain and HTTPS Posted by: DEV - Yesterday, 02:09 AM - Forum: aaPanel Websites & Web Servers Guides - No Replies

This walkthrough creates a small Node.js website, starts it as the www user in aaPanel, connects a domain through Nginx and enables HTTPS. It includes the actual sample files and checks used in our lab, so you can confirm each stage before moving on.

Tested setup: Ubuntu 22.04.5 LTS, aaPanel Free 8.0.7, Nginx 1.30.5, Node.js 24.21.0. Our project is afnodelab, its folder is /www/wwwroot/af-node-lab, and its domain is node.adminslab.com. Replace the domain and server IP with your own. Tested on 14 October 2026.

1. Install the runtime first
Complete Install Node.js LTS in aaPanel and verify Node and npm. You should have a supported runtime available in Website → Node.js Project. This example has no third-party dependencies and does not need a database.

2. Create a separate application folder
In aaPanel Files, open /www/wwwroot and create a directory named af-node-lab. Inside it create two files: server.js and package.json. Keep this sample in its own folder rather than replacing an existing website.

Put the following in server.js:

Code:
const http = require('node:http'); const host = '127.0.0.1'; const port = 3100; http.createServer((req, res) => {   res.writeHead(200, { 'Content-Type': 'text/html; charset=utf-8' });   res.end('<!doctype html><html><head><title>AdminsForum Node.js Lab</title></head><body><h1>AdminsForum Node.js Lab</h1><p>Node.js is running behind aaPanel.</p></body></html>'); }).listen(port, host, () => {   console.log('AdminsForum lab listening on http://127.0.0.1:3100'); });
Put the following in package.json:
Code:
{   "name": "adminsforum-node-lab",   "version": "1.0.0",   "private": true,   "scripts": {     "start": "node server.js"   } }
The package's start script tells the panel how to launch the app. The app listens on 127.0.0.1:3100, which is local to the VPS. Nginx will handle public website requests later. This simple example deliberately returns the same page for every request; it is a test app, not a complete production application.

Set the folder and files to owner www so the selected run user can read them. Standard directory permissions 755 and file permissions 644 are sufficient here; do not use 777 as a troubleshooting shortcut.

3. Add the application to aaPanel
Open Website → Node.js Project → Add Project → Default Project. Use the folder button beside Path to open the directory picker. Select af-node-lab under /www/wwwroot and confirm it.

Use these values:
  • Path: /www/wwwroot/af-node-lab
  • Project Name: afnodelab
  • Run User: www
  • Node.js runtime: v24.21.0, or your application's supported installed version
  • Start command: From package.json → start [node server.js]
  • Project Port: 3100
  • Install dependencies: Off for this dependency-free sample
Our panel displayed Yarn as the detected package manager. Because this sample has no dependencies, we left automatic dependency installation off. For a real app, select its intended package manager and follow its lockfile and build instructions.

Use a simple project identifier with letters, numbers or underscores. Our first identifier containing hyphens was rejected by the panel. The folder and package.json name can contain hyphens; the panel's project identifier has its own validation rule. Dismiss any error popup before correcting and resubmitting the form.

Click Confirm and wait for the project to show Running.

   
Final project configuration: app folder, start script, runtime, port and www user.
   
The sample project is running and shows its process IDs and memory usage.

4. Verify the app locally
Before adding a domain, run these checks over SSH:
Code:
curl -i http://127.0.0.1:3100/ ss -ltnp | grep ':3100'
Expect HTTP 200 and the AdminsForum Node.js Lab page. The listening address should be 127.0.0.1:3100. We verified both in this lab. If the local request fails, fix the app startup before troubleshooting DNS or SSL.

5. Point a domain to the VPS
In Cloudflare DNS, create an A record for your chosen hostname. Our record was node → 217.217.235.82, with DNS only and automatic TTL. Check for conflicting records before adding it. Do not copy our IP for your own server.

We used DNS only while validating direct access to the origin. If you later enable Cloudflare proxying, check the origin certificate and Cloudflare SSL mode separately.

6. Add the domain and turn on Mapping
Click the project name to open its settings. In Domain Manager, enter node.adminslab.com and click Add. Add only a hostname, without https:// or a path.

Open Mapping, enable the switch and confirm. Mapping connects the hostname on the web server to the local Node.js service. Our HTTP domain check returned 200 after this stage. The project's port must match the listening port in server.js; changing one does not automatically change the other.

   
Mapping connects public web requests to the running local application.

7. Issue the HTTPS certificate
Open SSL → Let's Encrypt. Select File Verification and check your hostname, then click Apply. The DNS record must resolve to this VPS and HTTP validation must be reachable. Wait for certificate issuance and deployment to finish.

   
Select the mapped hostname for Let's Encrypt file verification.

Open https://node.adminslab.com in your browser. For your own installation, use your own hostname. Verify from the command line as well:
Code:
curl -I https://node.adminslab.com/
Do not add a certificate-validation bypass to make this check pass. Our request returned HTTP 200 with normal TLS validation enabled, and the browser displayed the expected page.

   
The Node.js sample page is accessible over HTTPS.

8. Check logs and restart the app
In project settings, Project log shows application startup output. Website log is for the mapped web server. These are different layers: an app can fail before Nginx can reach it.

Open Service status → Restart and confirm. We restarted only this sample project, then repeated the HTTPS request and confirmed that the expected page still loaded.

   
The application startup log confirms the local listening address.

The lab log also contained an npm warning about the global --init.module configuration. It did not prevent this sample from starting or passing the response checks. Read warnings as well as errors, but use the app's actual state and response to identify whether startup failed.

9. Common problems
  • 502 Bad Gateway: Test localhost first. Check Running status, the start script, project port and Project log. Confirm Mapping points to the same port.
  • Module not found: A real app may need dependencies or a build step. Install them with the application's supported runtime and package manager; this sample needs neither.
  • Permission denied: Check the selected www user's access to the app files. Avoid running the app as root to hide a permissions issue.
  • SSL validation fails: Check DNS, HTTP reachability and redirects/CDN settings before retrying. A working local app does not prove that certificate validation can reach the hostname.
  • App stops after a VPS reboot: Review the Boot option in Project config and test recovery during a planned maintenance window. We tested an application restart, not a full VPS reboot; the lab Boot checkbox remained off.

Result: The sample app runs as www, listens only on localhost, responds through Nginx under its own domain, has working HTTPS and recovered after a project restart. This is a useful foundation before deploying a real application with dependencies, environment variables and a build process.

Reference: aaPanel Node.js project documentation.

Install Node.js LTS in aaPanel and Verify Node and npm Posted by: DEV - Yesterday, 01:41 AM - Forum: aaPanel Websites & Web Servers Guides - No Replies

Install a supported Node.js runtime before adding a Node application to aaPanel. This guide covers the version manager, the runtime itself, the command-line selector and verification. Installing Node.js does not automatically publish an application or create an HTTPS website.

Tested setup
Ubuntu 22.04.5 LTS, aaPanel Free 8.0.7, Node.js version manager 2.3, Node.js v24.21.0 and npm 11.19.0. Tested on 14 October 2026. Menu labels and patch versions can change.

1. Check what you need
You need an existing aaPanel installation, administrator access to its dashboard and outbound connectivity for downloads. A domain is not required for installing the runtime. A domain and DNS will be needed later when publishing a website with HTTPS.

Node.js runs JavaScript on the server. npm manages JavaScript packages. A Node application is separate from a PHP website: changing a site's PHP version does not change its Node runtime.

2. Open the Node.js project page
Open Website → Node.js Project. On a new installation, aaPanel may display Node version manager is not installed. Click its Install link, then Install Now for the official version manager. Wait for Installation succeeded before continuing.

3. Choose a supported LTS release
Click Node version manager. Search for the runtime version you want, or use the version filters. In this lab we selected v24.21.0, the supported Node.js 24 LTS release available on the test date.

Check your application's supported Node versions first. The panel's Stable Version label alone does not mean a release is still maintained: its list also includes older releases. Check the official Node.js release schedule rather than choosing an old version just because it is marked stable.

Click Install in the matching row. The panel downloads the runtime and may then show a separate PM2 module installation stage. Let both finish; do not refresh while the progress window tells you to wait.

   
Node.js 24 LTS installation in the aaPanel version manager.

4. Confirm that installation finished
The installed row should offer Environment, Module and Uninstall controls instead of Install. This confirms that the manager recognises the runtime. Avoid clicking Uninstall while a project uses that version.

5. Set the command-line version
At the top of the manager, set Command line ver from Not set to your installed runtime. Wait for the environment-variable update to complete. This selects what a fresh shell uses for commands such as node and npm; a project's own runtime selection is a separate setting.

Close the old SSH session and reconnect before checking the result. An already-open terminal can retain its previous environment. On a server with existing Node projects, first check their runtime requirements before changing the default.

   
The installed runtime row and command-line version selection.

6. Verify Node.js and npm
In a fresh SSH login, run:

Code:
command -v node node --version npm --version node -e 'console.log(1 + 1)'
Our lab returned:
Code:
/www/server/nodejs/v24.21.0/bin/node v24.21.0 11.19.0 2
The path identifies the executable being used. The version commands identify the installed runtime and package manager. The final command confirms that Node can execute a simple JavaScript expression.

7. If node is still not found
Return to the manager and check that installation finished and Command line ver is not Not set. Reconnect your terminal, then retry. To distinguish a missing PATH setting from a failed installation, check the selected binary directly:
Code:
/www/server/nodejs/v24.21.0/bin/node --version
Replace the version in this path with your installed release. If the absolute path works but the plain node command does not, investigate the shell environment rather than reinstalling the application. If the file is missing, review the installation result and retry the failed download through the manager.

What comes next?
The runtime is ready. The next stage is creating an application directory, choosing its start command and runtime, verifying local output, and then mapping a domain through the web server with HTTPS. No application port needs to be opened publicly just to complete this installation guide.

References: aaPanel Node.js project documentation and Node.js release status.

CloudPanel vs aaPanel (2026): Is CloudPanel the Better Choice for Your VPS? Posted by: DEV - 10-13-2026, 07:06 PM - Forum: CloudPanel Getting Started Guides - No Replies

CloudPanel vs aaPanel: an honest look from the CloudPanel side

CloudPanel is often called the clean, fast alternative to aaPanel. Is that true, and what do you give up? We ran both panels on the same 4 vCPU / 8 GB VPS and compared them hands-on. Here's what CloudPanel users (and people thinking of switching) should know.


The short answer

  • CloudPanel is the better pick for focused web hosting: PHP, WordPress, Node.js and Python sites, each with its own Linux user, on a tuned Nginx stack, completely free.
  • aaPanel is the better pick if you want one panel for the whole server (Docker, mail, FTP, 200+ apps) or you're on a tiny VPS.

Test setup
CloudPanel 2.5.4 on Ubuntu 24.04, and aaPanel 8.0.6 on Ubuntu 22.04 (its recommended release; 8.0.7 is now current). Same VPS, tested October 2026, with real screenshots throughout.
   

Where CloudPanel is different by design
CloudPanel doesn't try to manage everything. It installs a complete, tuned stack for you (Nginx, every PHP version from 7.1 to 8.5, MySQL 8.4 or MariaDB, Redis and Varnish) and gives you a calm interface with just Dashboard and Sites. aaPanel's dashboard packs in gauges, software lists, traffic graphs and a long tools menu.
   

Requirements: the one place CloudPanel asks for more
CloudPanel needs at least 2 GB RAM and 10 GB disk, and supports Ubuntu 22.04/24.04/26.04 and Debian 12/13 on x86 and ARM64. aaPanel starts at 512 MB (1 GB recommended) and supports more distros.
   

Install tip: verify the installer checksum from the CloudPanel docs, choose your DB engine (we used MySQL 8.4), then open
Code:
https://YOUR_IP:8443
and create the admin user immediately. Until it exists, the first visitor can create it. Better still, restrict port 8443 to your IP.

Hosting features, side by side
For everyday hosting the two are close: PHP versions, databases with one-click phpMyAdmin, free Let's Encrypt with auto-renew, a file manager and FTP.
   

What CloudPanel deliberately leaves out: there's no Docker manager, no mail server and no app store. Use an external email service, and run containers yourself behind a CloudPanel reverse-proxy site.
   

Memory: what CloudPanel actually uses
We didn't run a controlled benchmark of the two panels, so no speed claims here. We did measure our CloudPanel server: two sites, a few hours after install, 1.95 GB used of 7.9 GB.
   
Most of it is MySQL's cache (~970 MB, sized to the server's RAM), plus PHP-FPM pools for every installed PHP version, Nginx and Varnish. That memory is put to work, but it's why CloudPanel wants 2 GB minimum. aaPanel installs only what you choose, so it can start smaller.
   

Security: isolation is CloudPanel's big win
Every CloudPanel site runs as its own Linux user. On our aaPanel server, site files were owned by the shared www user, so one compromised site has more reach there.
   

aaPanel has the bigger security toolbox (security centre, SSH controls, brute-force protection, intrusion detection, optional WAF, with more in Pro). CloudPanel covers the essentials: firewall rules, basic auth, IP and bot blocking, 2FA and Cloudflare-only mode, plus fail2ban out of the box.
   

Keep it updated: take a snapshot, then run
Code:
clp-update
. aaPanel updates from its Update button. Either way, OS updates and off-server backups are still on you. CloudPanel's remote backups (S3, Wasabi, Dropbox, Google Drive, SFTP and others) make the second part easy.

Price
CloudPanel is free, with no paid tiers. aaPanel's free edition also hosts sites fully, but aaPanel Pro costs $28.80/month, $198/year or $699 lifetime for the advanced WAF, anti-tamper, statistics and WordPress Pro tools.
   

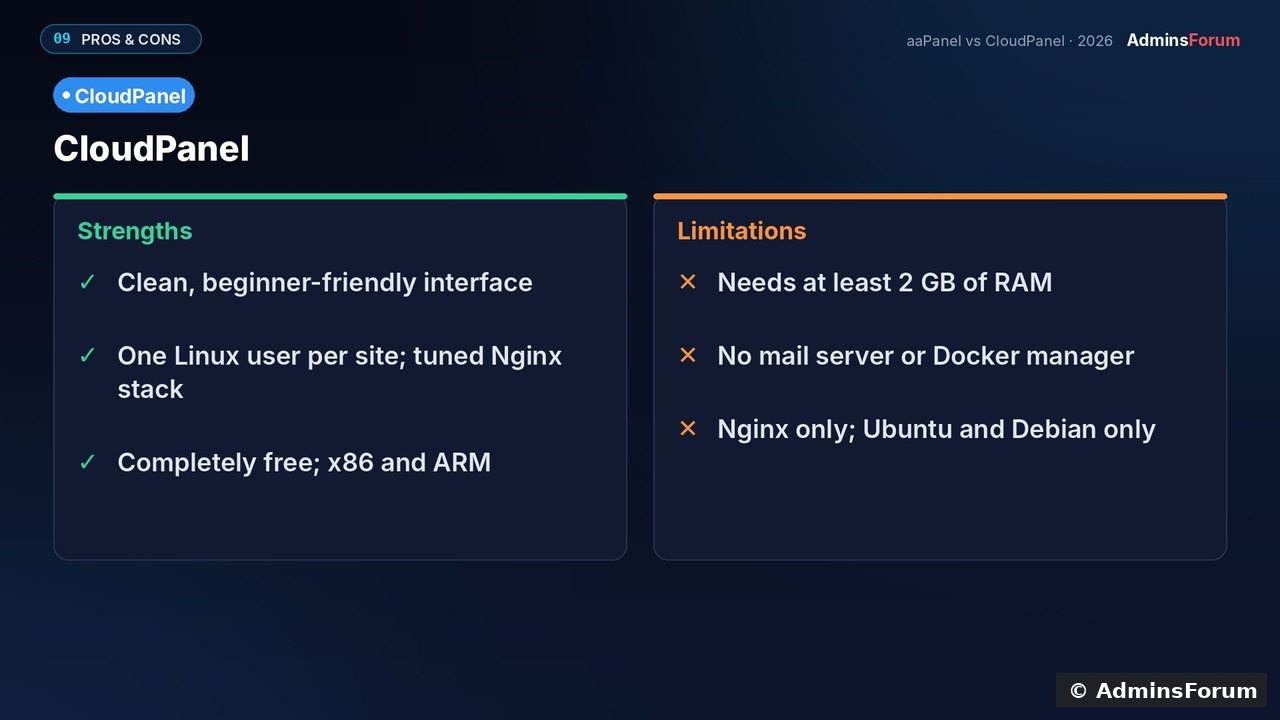
Strengths and limitations


Should you choose CloudPanel?
Yes, if you mainly host PHP, WordPress or Node.js sites, want every site isolated, run ARM servers or many client sites, and want nothing to buy, ever.
Pick aaPanel instead if you need Docker, a mail server or lots of one-click apps, need Apache or OpenLiteSpeed, or have only 1 GB of RAM.
   

Sources (checked October 2026; prices change): CloudPanel requirements · CloudPanel install docs · aaPanel pricing · aaPanel requirements

Running CloudPanel already? Tell us what you host on it. Questions about installing or migrating are welcome in CloudPanel Support & Troubleshooting.

aaPanel vs CloudPanel (2026): Hands-On Comparison on the Same VPS Posted by: DEV - 10-13-2026, 07:04 PM - Forum: aaPanel Getting Started Guides - No Replies

aaPanel vs CloudPanel: which free control panel should you run in 2026?

If you already know aaPanel, you've probably seen CloudPanel recommended as the "lighter, faster" alternative. We installed both on the same VPS and used them for real (sites, SSL, databases, backups and security), so you can see exactly where aaPanel wins, where CloudPanel wins, and which one fits your server.
   

How we tested

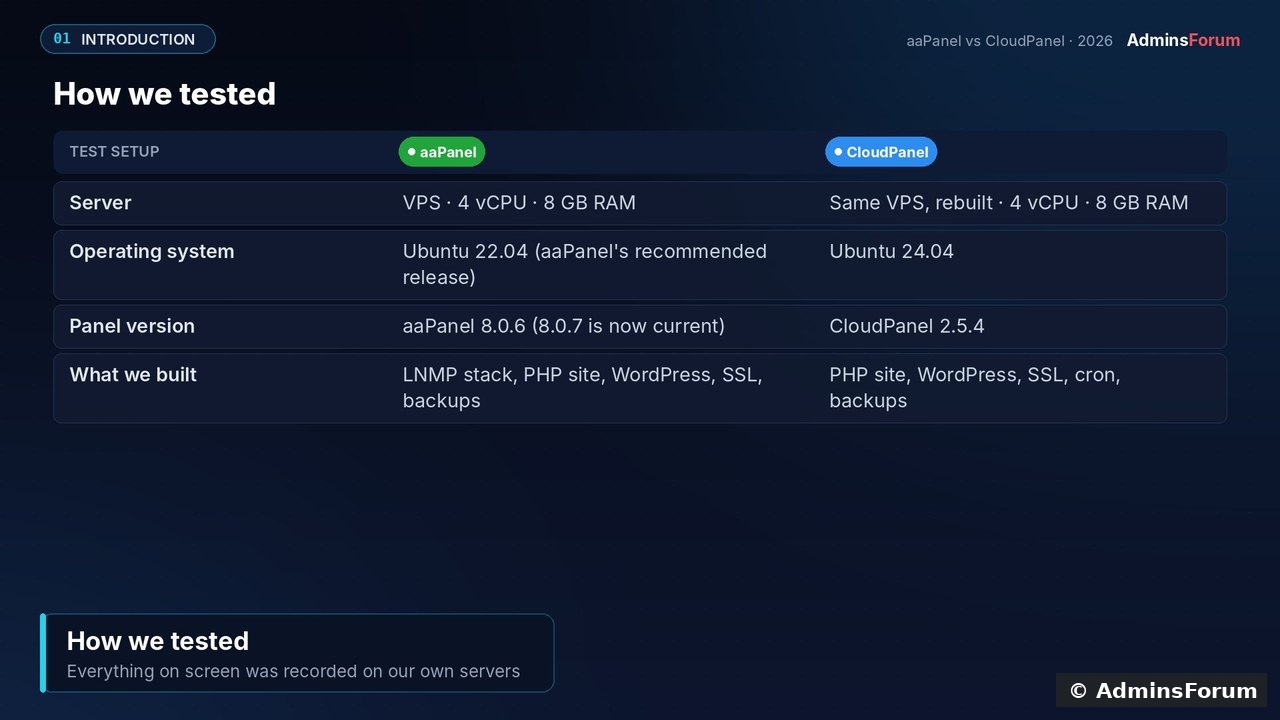
  • Server: the same VPS for both: 4 vCPU, 8 GB RAM.
  • aaPanel 8.0.6 on Ubuntu 22.04 (aaPanel's recommended release). 8.0.7 is now current.
  • CloudPanel 2.5.4 on Ubuntu 24.04.
  • Every screenshot below comes from those installs, tested in October 2026.
   

1. What each panel is built for
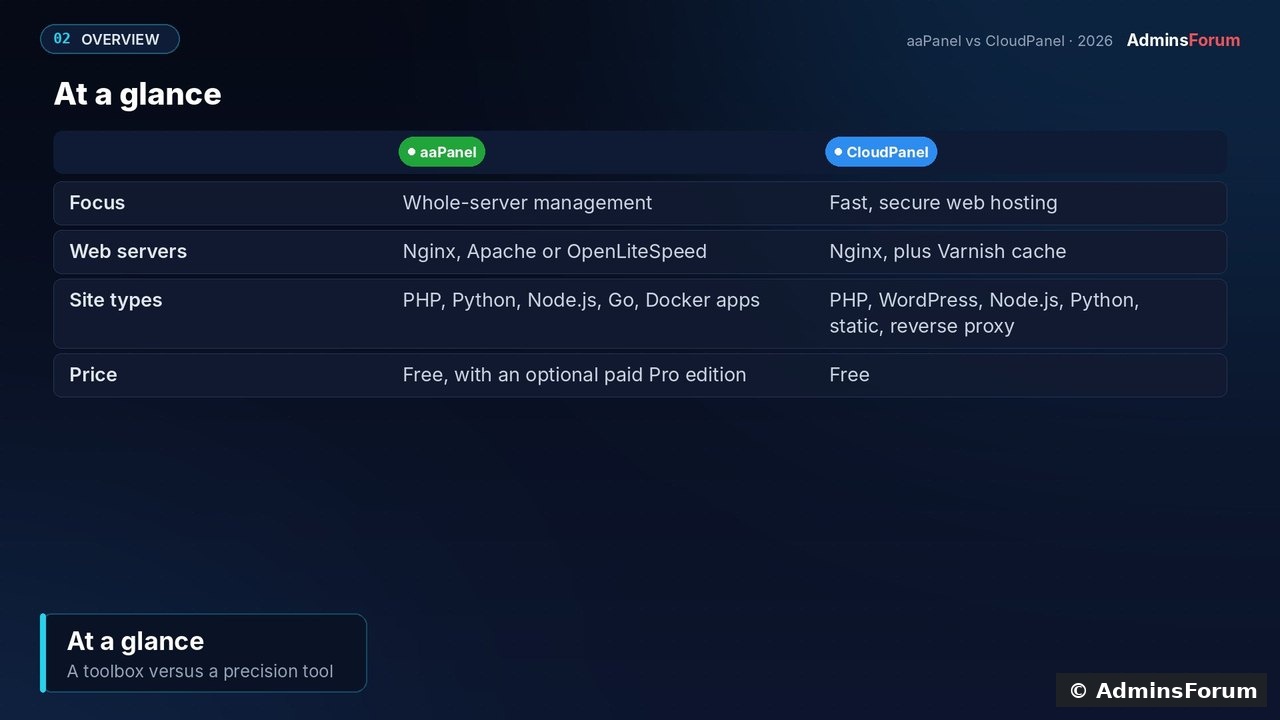
aaPanel is an all-in-one server panel. Besides websites it manages databases, FTP, Docker, a mail server, cron, a firewall and an app store with 200+ one-click apps. You can run Nginx, Apache or OpenLiteSpeed, with PHP, Python, Node.js and Go projects.

CloudPanel is narrower by design: a free panel for running web apps fast on Nginx, PHP-FPM, MySQL or MariaDB, Redis and Varnish. It hosts PHP, WordPress, Node.js, Python, static sites and reverse proxies, each isolated, on x86 or ARM.
   

2. Requirements and installation
  • aaPanel: 1 core and 512 MB RAM minimum (1 GB recommended), and it supports many distros. Install is one command and takes about one minute. The installer prints a panel URL with a random port and security entrance, plus a generated login.
  • CloudPanel: 1 core, 2 GB RAM and 10 GB disk minimum; Ubuntu 22.04/24.04/26.04 or Debian 12/13 only. Install is one command (verify the SHA-256 checksum from the docs), with the database engine chosen up front. It took about five minutes on our server. Create the admin user on port 8443 right away, because until you do, the first visitor can claim it.
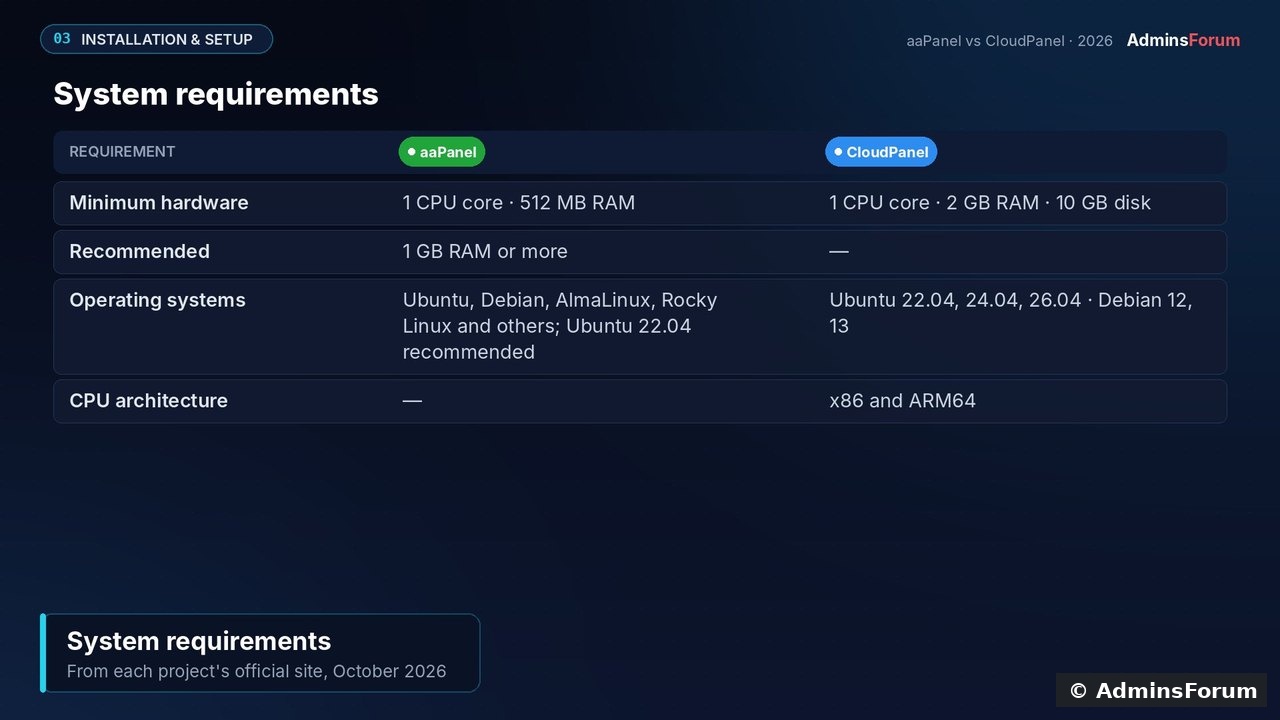
   

The first big difference: on first login aaPanel asks you to choose your stack (Nginx/Apache/OpenLiteSpeed, versions, quick or compiled install). CloudPanel installs and tunes everything for you.
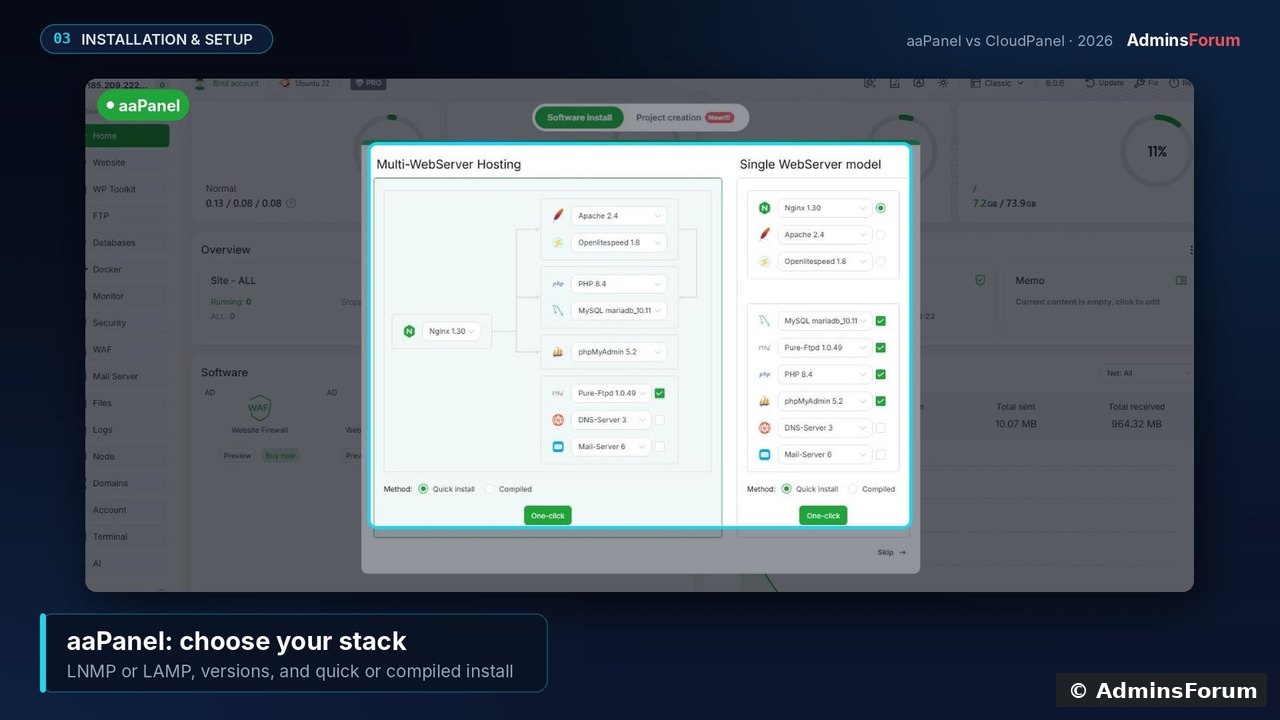
   

3. Interface and ease of use
aaPanel's dashboard is dense: gauges, overview, software and traffic panels, plus a long menu. CloudPanel's is calm: server details, monitoring charts, and two main links. In daily use, CloudPanel is easier to learn; aaPanel rewards the time you spend exploring it.
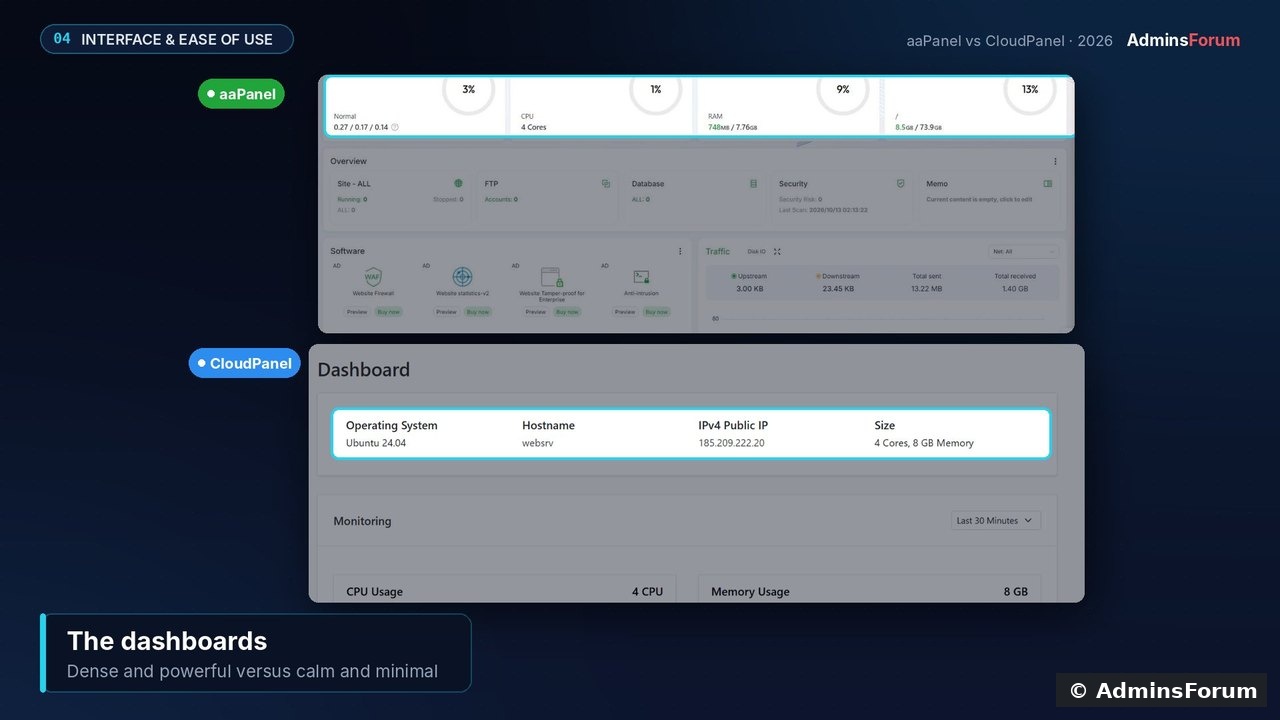
   

4. Features
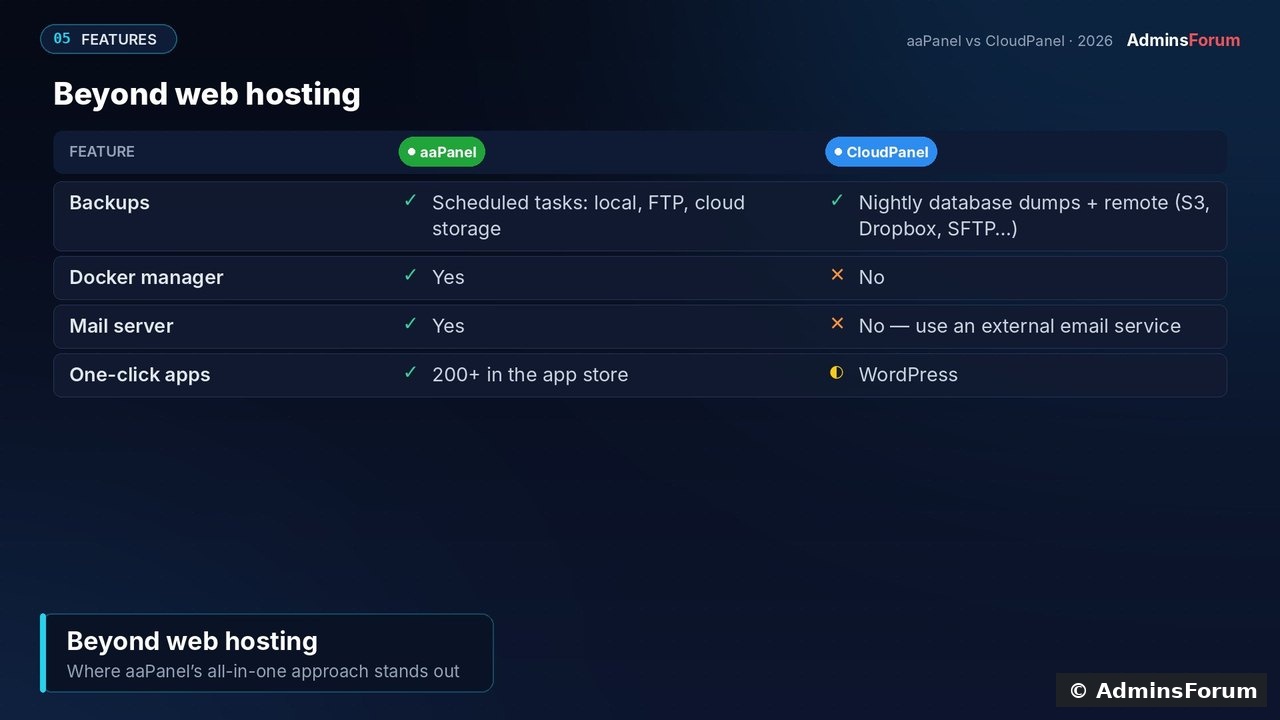
Both cover the essentials: multiple PHP versions, MySQL/MariaDB with phpMyAdmin, free Let's Encrypt SSL with auto-renew, a file manager and FTP. aaPanel adds Apache/OpenLiteSpeed and tabs for SQL Server, MongoDB, Redis and PostgreSQL.
   

Beyond hosting, aaPanel pulls ahead: a Docker manager, a mail server and a big app store. CloudPanel has none of these by design, so for email you'd pair it with an external service.
   

5. Performance and resources
We did not run a controlled load test of both panels, so we make no speed claims. What we can compare is design and defaults:
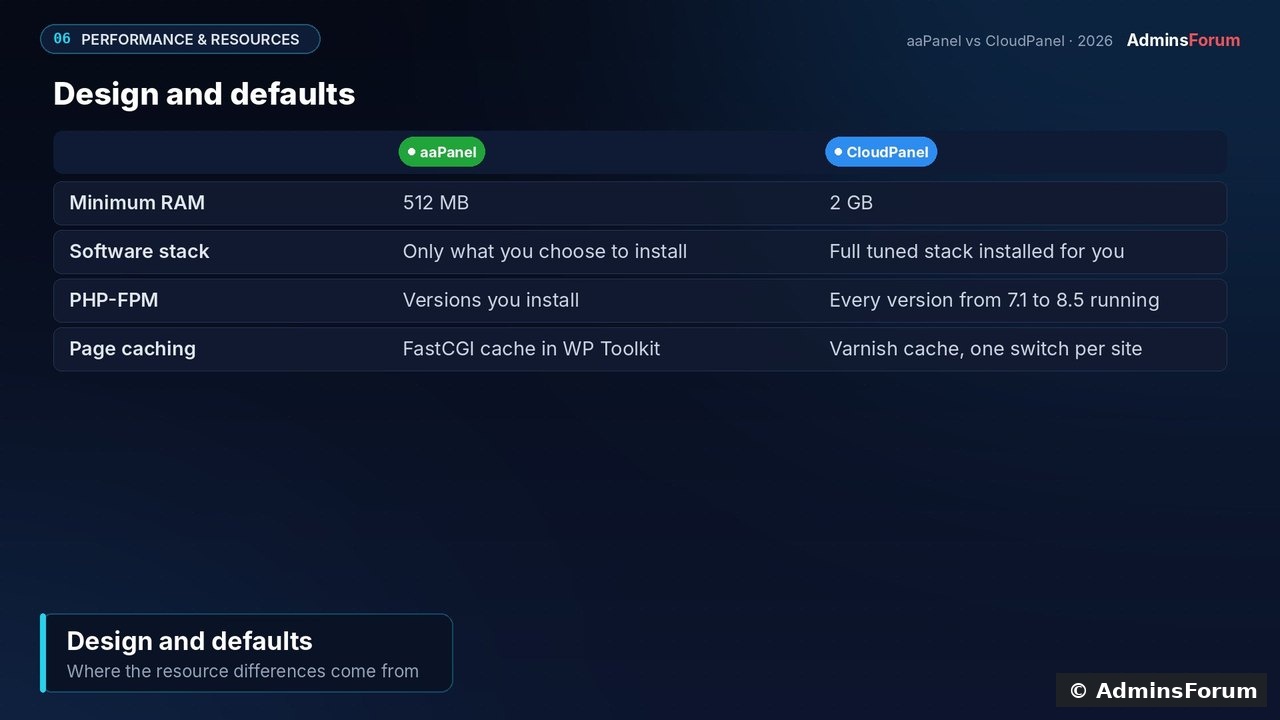
   

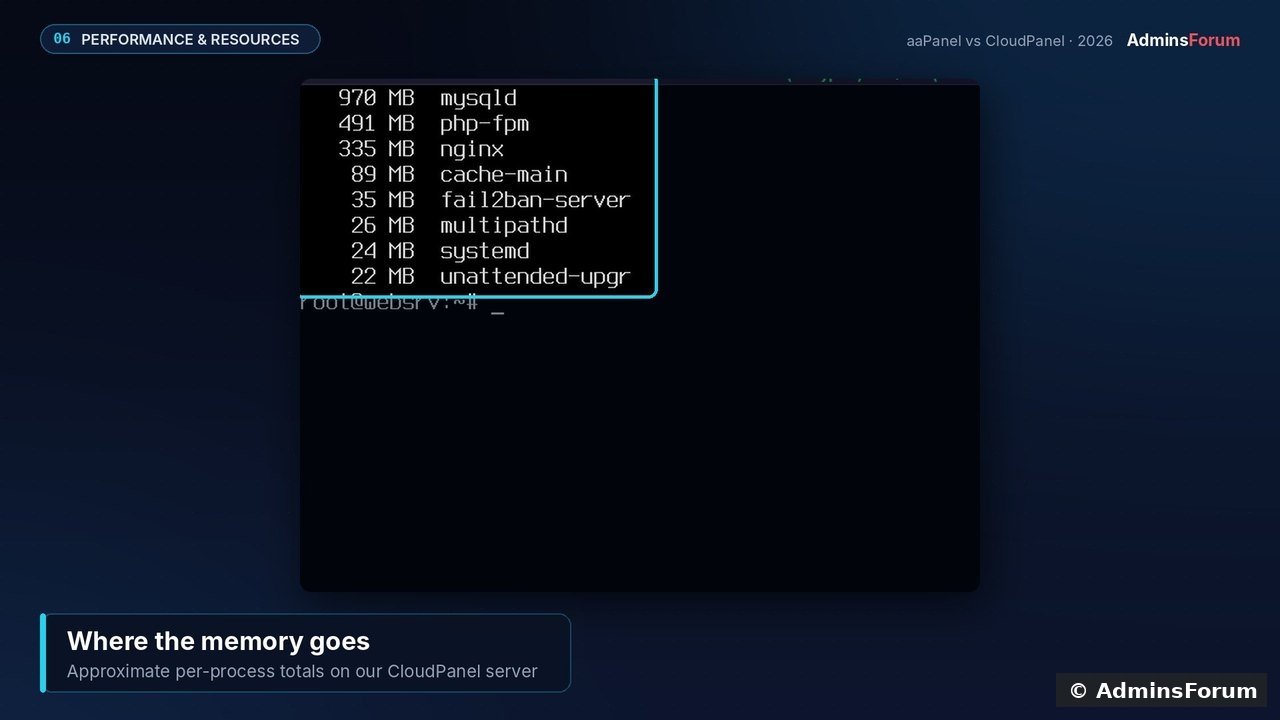
On our CloudPanel server (two sites, a few hours after install), 1.95 GB of 7.9 GB was in use. Most of that was MySQL (~970 MB, sized for the server's RAM), plus PHP-FPM pools for every PHP version, Nginx and Varnish. aaPanel only installs what you pick, which is why it can run on 512 MB.
   

Takeaway: on a very small VPS, aaPanel's lighter minimum is a real advantage. On a dedicated web server, CloudPanel gives you a tuned stack out of the box. For real numbers, load test your own site (k6 or wrk) on the plan you actually use.

6. Security and updates
aaPanel has a full security centre: firewall, SSH settings, brute-force protection, intrusion detection, scanning and an optional WAF. CloudPanel sticks to the essentials: firewall rules, basic auth in front of the panel, IP and bot blocking, 2FA and a Cloudflare-only mode. It also ships fail2ban, which we saw running on our server.
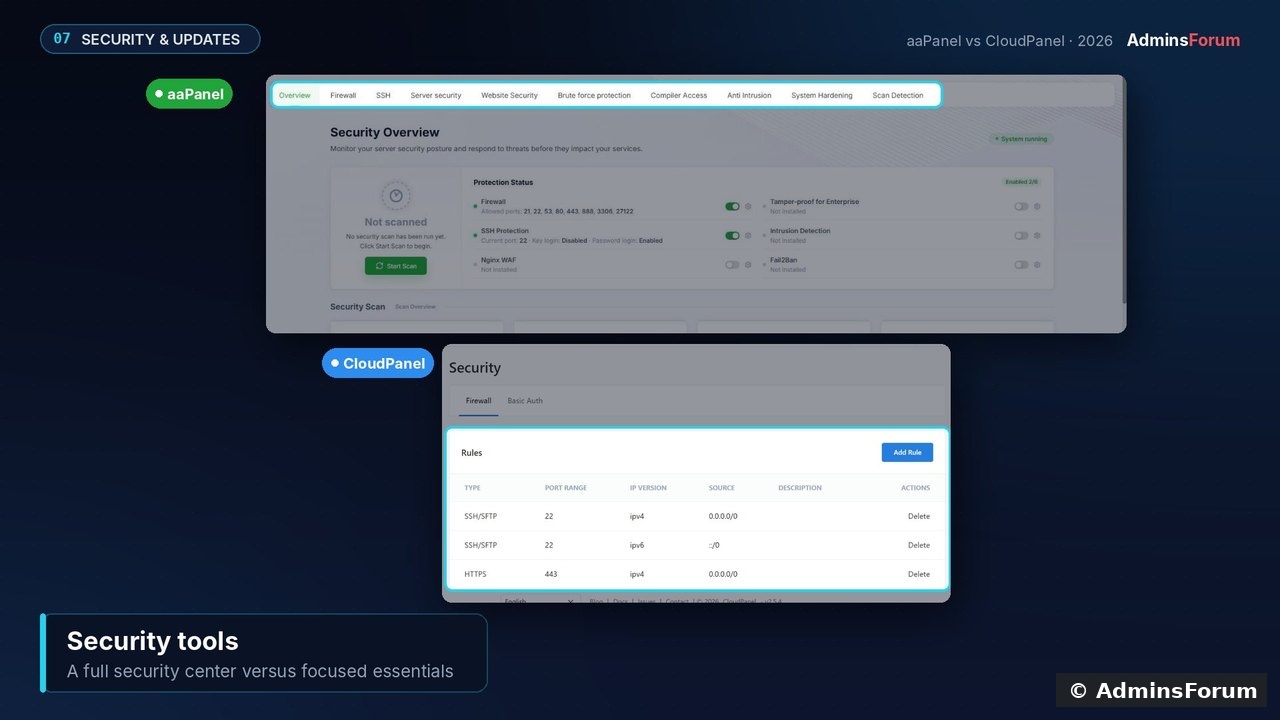
   

A structural difference: on our aaPanel server, site files were owned by the shared www user. CloudPanel gives every site its own Linux user, which limits the damage if one site is compromised.
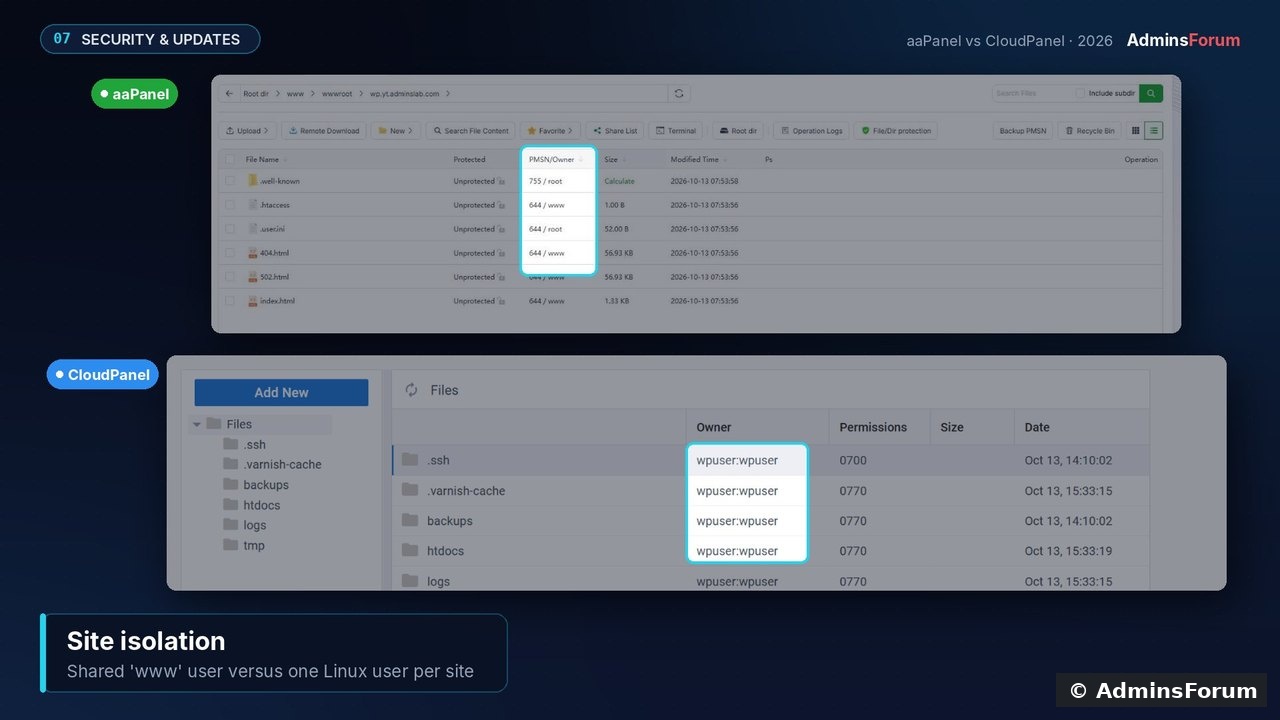
   

Updates: aaPanel uses the Update button in the panel, and CloudPanel uses the
Code:
clp-update
command (take a snapshot first). OS updates, strong passwords and off-server backups are still your job with either panel.

7. Pricing
  • aaPanel: the free edition hosts websites fully. aaPanel Pro is $28.80/month, $198/year or $699 lifetime (sales run at times). It adds an advanced WAF, anti-tamper, website statistics, WordPress Pro tools, priority support and 20+ Pro extensions.
  • CloudPanel: free, with no paid tiers listed.
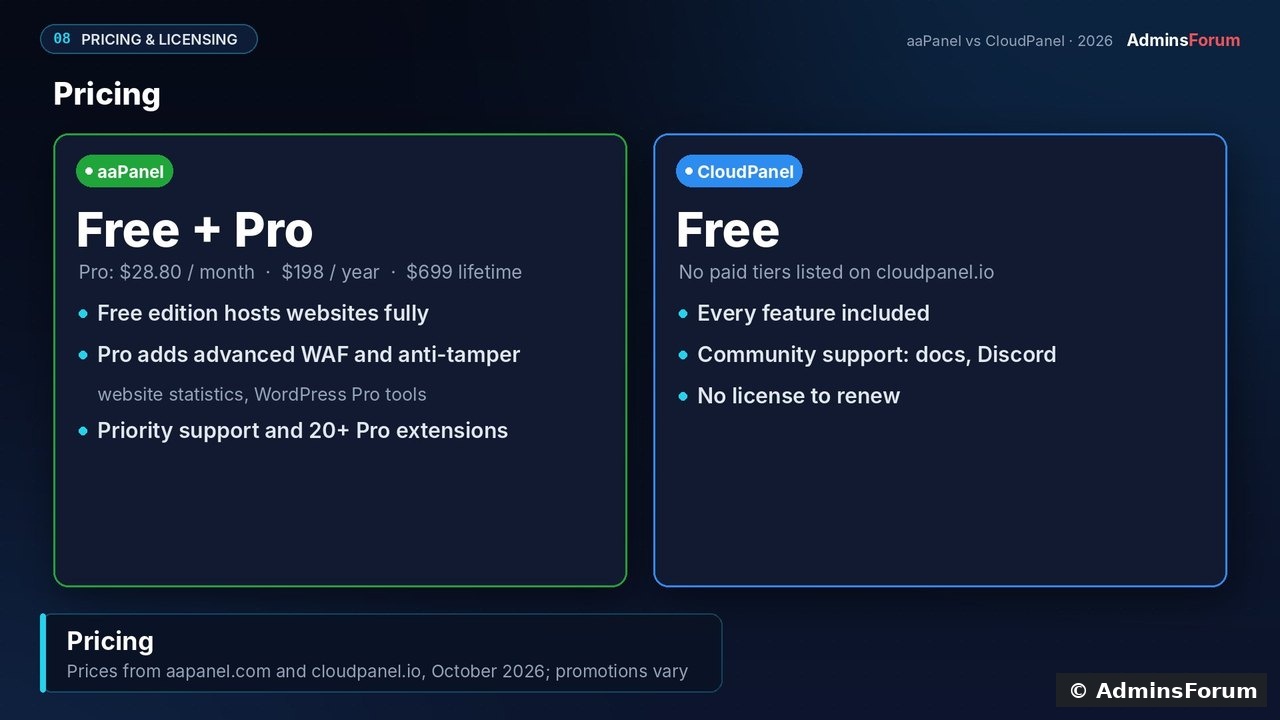
   
The bigger cost is usually the server: aaPanel runs on a 1 GB VPS, while CloudPanel needs at least 2 GB.

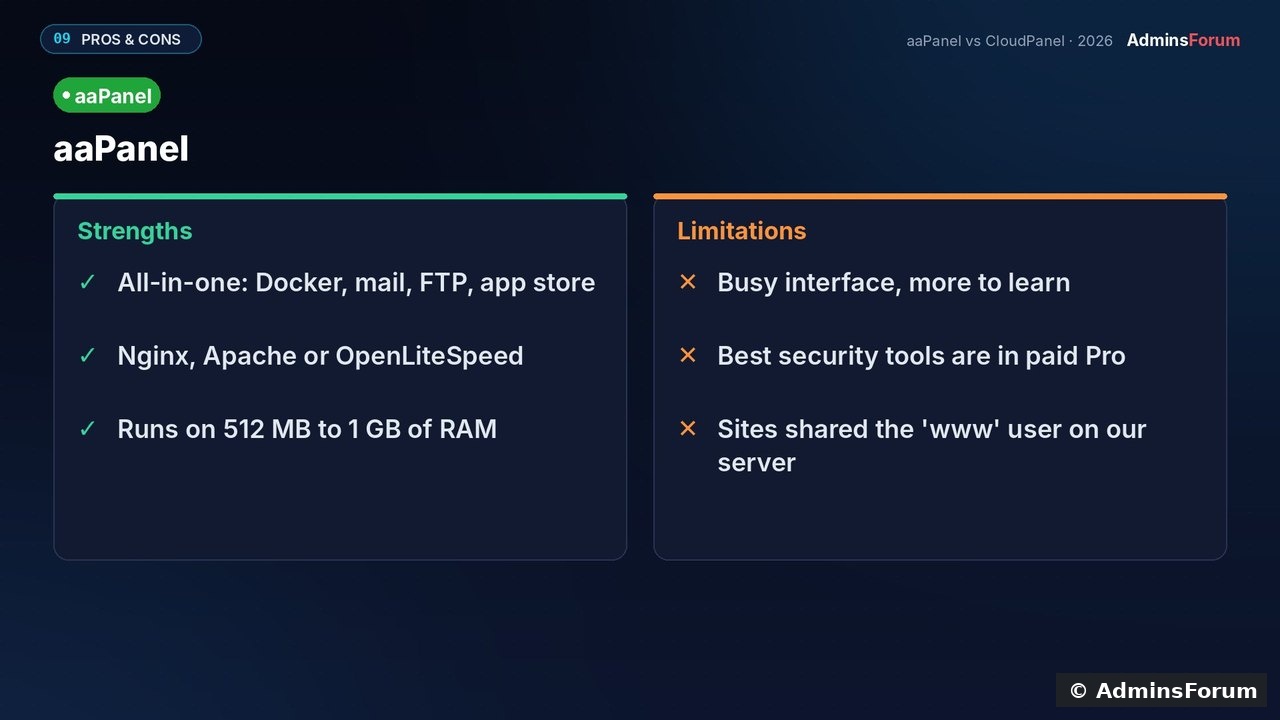
8. Pros and cons


Verdict
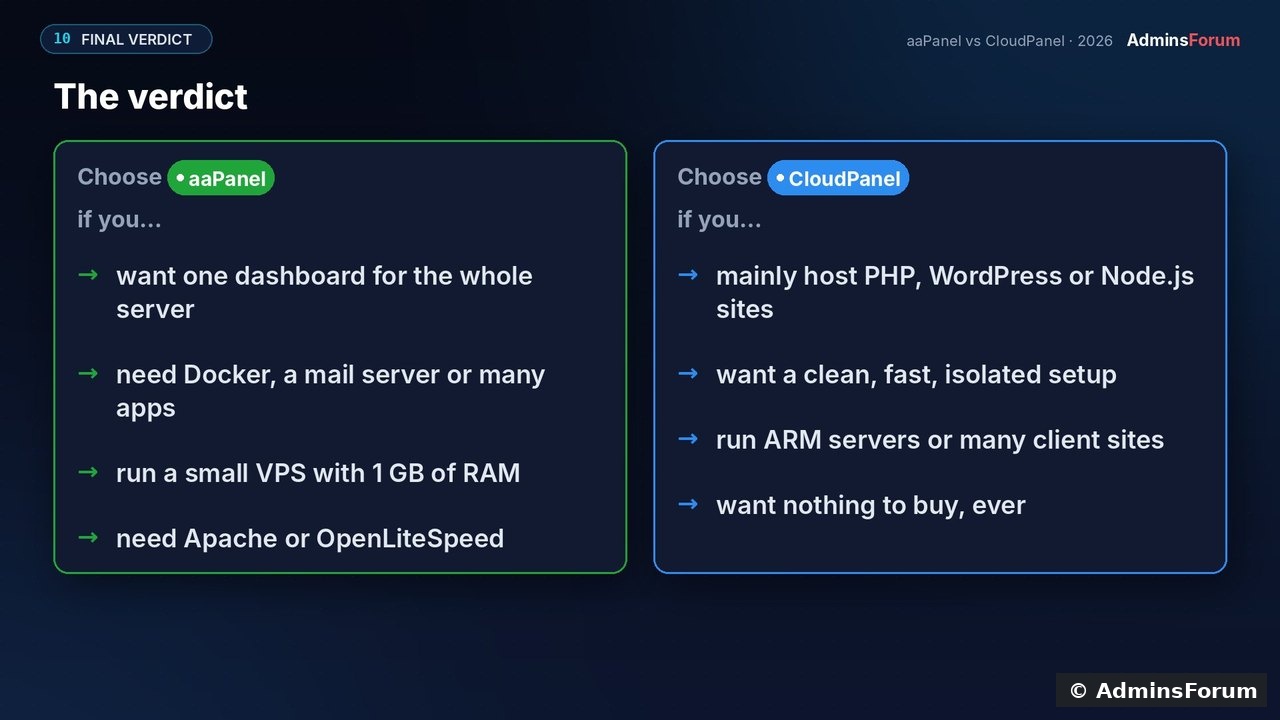
Stay with (or choose) aaPanel if you want one dashboard for the whole server, need Docker, a mail server or many apps, run a small 1 GB VPS, or need Apache/OpenLiteSpeed.
Choose CloudPanel if you mainly host PHP, WordPress or Node.js sites and want a clean, fast setup where every site is isolated, on ARM servers too, with nothing to buy.
   

Sources (checked October 2026; prices change): aaPanel pricing · aaPanel requirements · CloudPanel requirements · cloudpanel.io

Which panel do you run, and why? Share your setup below. If you get stuck installing either one, ask in the aaPanel or CloudPanel support forums.

Use Composer with PHP 8.5 in aaPanel and Verify Dependencies Posted by: DEV - 10-13-2026, 06:50 PM - Forum: aaPanel PHP & Extensions Guides - No Replies

Use the PHP binary required by your project when running Composer on aaPanel. Check Composer's version first, run dependency operations as the website user in the correct directory, and verify the generated autoloader. A panel message saying a command was sent is not proof that dependencies installed successfully.

Tested environment
Ubuntu 22.04, aaPanel 8.0.7 Free Edition and PHP 8.5.11. Our lab initially had Composer 2.0.14, which produced deprecation warnings with PHP 8.5. We backed up its PHAR, updated through the official stable self-update channel to 2.10.3, then installed psr/log 3.0.2 as user www in a separate non-public directory. Autoload and platform-requirement checks passed. A subsequent install from composer.lock reported nothing to install, update or remove.

1. Inspect the panel controls and find your runtime
In aaPanel open Website → Conf → Composer. Our interface exposes PHP, command parameters, source, execution user and directory controls. Its version field was blank and the PHP selector offered Auto. Submitting composer --version returned Command has been sent! without command output in this screen.
   
Inspected Composer controls. This screenshot does not prove that the submitted command completed.

For a verifiable first test we used SSH instead. Sign into your own server with an authorized SSH account. The commands below are for our aaPanel PHP 8.5 layout; confirm the installed paths before copying them. A site's PHP handler and the shell's plain php command can point to different runtimes.

Code:
/www/server/php/85/bin/php -v command -v composer /www/server/php/85/bin/php /usr/bin/composer --version
The first checks PHP, the second finds Composer and the third executes that PHAR with the chosen PHP binary. Our Composer location was /usr/bin/composer. Use the location reported by your own server.

2. Update an old Composer installation carefully
Composer 2.0.14 was the observed lab version, not a recommended version. Before updating a shared installation, record its path/version and preserve a private copy. Our administrator used:
Code:
install -d -m 700 /root/af-composer-backups cp -p /usr/bin/composer /root/af-composer-backups/composer-2.0.14-before-20261013.phar /www/server/php/85/bin/php /usr/bin/composer self-update --stable --no-interaction
These commands require administrative access and affect the shared Composer executable. They do not update every project's dependencies. We retained the old executable for recovery, but did not test restoring it. Recheck --version after the update; ours reported 2.10.3. Do not hard-code today's version as an evergreen latest-version claim.

If self-update is unavailable for your installation method, use the official Composer download instructions and their current installer-verification procedure rather than copying an old installer checksum.

3. Create an isolated project directory
Our test directory was /www/af-composer-lab, outside the websites' document roots. We created it with www ownership and 750 permissions:
Code:
install -d -o www -g www -m 750 /www/af-composer-lab
Check the correct website user/group on your server. This preparation uses administrative access; the dependency operation itself runs as www. No root-owned website dependency tree or public diagnostic endpoint was needed.

4. Install one small test dependency
We used psr/log, a logging-interface package from the official Composer registry. It is a library test, not a complete website application:
Code:
runuser -u www -- env COMPOSER_HOME=/www/af-composer-lab/.composer /www/server/php/85/bin/php /usr/bin/composer --working-dir=/www/af-composer-lab require 'psr/log:^3.0' --no-scripts --no-plugins --prefer-dist --no-interaction
COMPOSER_HOME keeps this test's Composer configuration/cache separate. --working-dir selects the exact project. We disabled scripts and plugins for the small test; do not assume those flags are suitable for every real application, because some projects require them.

The actual output created composer.json, locked psr/log at 3.0.2, extracted the package and generated autoload files. aaPanel File Manager then showed composer.json, composer.lock and vendor with www ownership.
   
Actual files produced in the isolated project directory. verify.php was our additional CLI-only test file.

Open composer.json in File Manager to inspect it without changing anything. Our generated manifest contains psr/log with the ^3.0 requirement.
   
The generated dependency requirement. composer.lock records the resolved version separately.

5. Verify autoloading and platform requirements
For the rehearsal we created a non-public verify.php containing:
Code:
<?php require '/www/af-composer-lab/vendor/autoload.php'; echo 'PHP: ', PHP_VERSION, PHP_EOL; echo 'psr/log: ', ComposerInstalledVersions::getPrettyVersion('psr/log'), PHP_EOL; echo 'LoggerInterface autoload: ', interface_exists(PsrLogLoggerInterface::class) ? 'PASS' : 'FAIL', PHP_EOL;
Run it with the same runtime and user:
Code:
runuser -u www -- /www/server/php/85/bin/php /www/af-composer-lab/verify.php
Our actual output was:
Code:
PHP: 8.5.11 psr/log: 3.0.2 LoggerInterface autoload: PASS

We also ran check-platform-reqs in that directory using the same PHP binary. It reported php 8.5.11 success. This verifies the requirements of the installed sample, not every possible PHP extension or a website's web runtime.

6. Confirm installation from the lock file
We repeated an install in the same project:
Code:
runuser -u www -- env COMPOSER_HOME=/www/af-composer-lab/.composer /www/server/php/85/bin/php /usr/bin/composer --working-dir=/www/af-composer-lab install --no-scripts --no-plugins --no-interaction
It read the lock file, verified platform compatibility and reported Nothing to install, update or remove. Keep an application's committed lock file with its deployment workflow. Deliberately resolving new dependency versions is a separate change from reproducing the locked installation.

Troubleshooting
  • Wrong PHP version: inspect the binary path used by the command, not only the site's panel setting.
  • Permission failure: check ownership and the chosen working directory. Avoid solving it by running all dependency operations as root.
  • Missing extension: read the requirement error and enable the needed extension for the runtime that actually executes Composer. Do not bypass platform checks to declare success.
  • Old-tool warnings: check Composer's version and installation method. Back up and verify an update before changing projects.
  • Panel says command sent: inspect execution output and generated files. Our verified dependency operation used SSH, not an assumed successful panel command.

Scope and final lab state
Composer updated; isolated sample and lock file retained; autoload/platform checks passed. Existing Git demo files, WordPress and mail projects were not used as dependency destinations. No full framework deployment or browser-based PHP application test is claimed.

Reference: Official Composer command documentation.

Enable Hotlink Protection in aaPanel Without Breaking Images Posted by: DEV - 10-13-2026, 06:25 PM - Forum: aaPanel Security Guides - No Replies

aaPanel hotlink protection can restrict image requests based on their HTTP Referer header. Open Website → Conf → Hotlink Protection, choose the protected extensions and allowed domains, then test actual requests. The empty-referrer setting matters: direct image links can fail when it is disabled.

Tested environment
Ubuntu 22.04, aaPanel 8.0.7 Free Edition, Nginx 1.30.5 and a separate static demo website. We protected PNG files, allowed the demo hostname and used the panel's 404 response. Same-site requests returned 200, an outside referrer returned 404, and direct requests changed from 200 to 404 when we disabled empty-referrer access. We reverted the test configuration afterwards.

What this feature does
Hotlinking occurs when another page embeds a resource hosted on your server. Referrer filtering can reduce ordinary browser-based embedding from domains you have not allowed. It is not authentication, copyright enforcement or complete download prevention: the Referer header can be supplied by a client, and legitimate browsers sometimes omit it. Use an access-controlled delivery method when a file must be private.

1. Record your current settings
Open Website, locate the site and choose Conf → Hotlink Protection. Record whether protection is enabled, the suffix list, allowed domains, response and empty-referrer setting before editing. Work on a test site first.

Our original demo settings had protection disabled, suffixes jpg,jpeg,gif,png,js,css, allowed domain demo.adminslab.com and response 404. We narrowed the test to png so other file types were outside this exercise. Protecting JavaScript or CSS without testing your integrations can affect more than images.

2. Set allowed domains and direct-access behaviour
Use URL suffix for the comma-separated extensions you intend to protect. In Access domain, include the actual site hostname and any legitimate embedding domains required by your workflow. Do not copy our lab hostname into your own configuration.

Select Enable hotlink protection. For the first test, also select Allow empty HTTP_REFERER requests. This allows requests without a Referer header while the allowed-domain check still applies to requests carrying one. Keep the configured 404 response for this walkthrough and click Save.
   
PNG-only protection enabled, demo hostname allowed, and empty-referrer requests allowed.

In our panel, changing these checkboxes submitted immediately; text fields and the Save button were separate controls. Wait for any submitting message to finish and recheck the visible states. Some fields became disabled while protection was enabled. Do not assume an unsaved-looking checkbox is only a draft.

3. Test three request types
Choose one existing protected image. Our test used the static sample's /images/firefox-icon.png. Test the image directly, with the site's own page as Referer, and with an outside Referer. We used example.com only as a simulated header value; no request was sent to that domain.

The verified results with empty-referrer access allowed were:

Code:
No Referer header:                    HTTP 200 Referer: https://demo.adminslab.com/    HTTP 200 Referer: https://example.com/          HTTP 404

Optional commands for your own site:
Code:
curl -o /dev/null -w '%{http_code} ' 'https://YOUR_DOMAIN/images/test.png' curl -o /dev/null -w '%{http_code} ' -e 'https://YOUR_DOMAIN/' 'https://YOUR_DOMAIN/images/test.png' curl -o /dev/null -w '%{http_code} ' -e 'https://example.com/' 'https://YOUR_DOMAIN/images/test.png'
Replace the hostname and image path. These examples use Linux's /dev/null; on Windows use NUL. A 404 in the outside-referrer test does not mean the file was deleted. Compare it with the same-site response.

4. Understand the stricter empty-referrer option
We then unchecked Allow empty HTTP_REFERER requests while protection remained enabled.
   
Stricter test: empty-referrer requests are no longer allowed.

Fresh requests returned 404 without a Referer and 200 with the allowed same-site Referer. This directly demonstrates the effect of the setting in our Nginx installation. A bookmarked image URL or a client that omits the header can be affected. Verify real pages, image previews and any required integrations before adopting that stricter setting. We did not test every browser, CDN or search-engine preview.

5. Revert the lab test or apply your chosen production policy
For this tutorial we unchecked Enable hotlink protection, restored the original suffix list and saved. Both checkboxes returned to their original unchecked states. The allowed hostname and response stayed unchanged.
   
The demo restored to its original disabled-protection state after testing.

A fresh request with the simulated outside Referer then returned 200, confirming cleanup. On your actual website, keep protection enabled only after choosing and verifying the access policy you need. Our disabled final state is lab cleanup, not a recommendation for every site.

Troubleshooting
  • Images disappear on your own pages: compare the actual embedding hostname with Access domain. Check the empty-referrer option and any privacy or referrer policy involved.
  • External requests still succeed: confirm the suffix matches the requested file and test the server response rather than a cached image. A CDN may serve a previously cached copy; this lab did not test CDN cache behaviour.
  • Direct links return 404: repeat the request with and without a same-site Referer to distinguish filtering from a missing file.
  • New domain or subdomain: review the allowed-domain list after a site move. Test required root and www hostnames individually.
  • Files must be confidential: referrer filtering is insufficient. Use real authentication or another appropriate access-control mechanism.

Reference: Official Nginx Referer module documentation explains its purpose and limitations.

Need help? Include the aaPanel/web-server versions, protected suffix, allowed hostname, empty-referrer setting and status results in Server Security Support. Avoid sharing private URLs or tokens.