



Yesterday, 01:41 AM
Install a supported Node.js runtime before adding a Node application to aaPanel. This guide covers the version manager, the runtime itself, the command-line selector and verification. Installing Node.js does not automatically publish an application or create an HTTPS website.
Tested setup
Ubuntu 22.04.5 LTS, aaPanel Free 8.0.7, Node.js version manager 2.3, Node.js v24.21.0 and npm 11.19.0. Tested on 14 October 2026. Menu labels and patch versions can change.
1. Check what you need
You need an existing aaPanel installation, administrator access to its dashboard and outbound connectivity for downloads. A domain is not required for installing the runtime. A domain and DNS will be needed later when publishing a website with HTTPS.
Node.js runs JavaScript on the server. npm manages JavaScript packages. A Node application is separate from a PHP website: changing a site's PHP version does not change its Node runtime.
2. Open the Node.js project page
Open Website → Node.js Project. On a new installation, aaPanel may display Node version manager is not installed. Click its Install link, then Install Now for the official version manager. Wait for Installation succeeded before continuing.
3. Choose a supported LTS release
Click Node version manager. Search for the runtime version you want, or use the version filters. In this lab we selected v24.21.0, the supported Node.js 24 LTS release available on the test date.
Check your application's supported Node versions first. The panel's Stable Version label alone does not mean a release is still maintained: its list also includes older releases. Check the official Node.js release schedule rather than choosing an old version just because it is marked stable.
Click Install in the matching row. The panel downloads the runtime and may then show a separate PM2 module installation stage. Let both finish; do not refresh while the progress window tells you to wait.
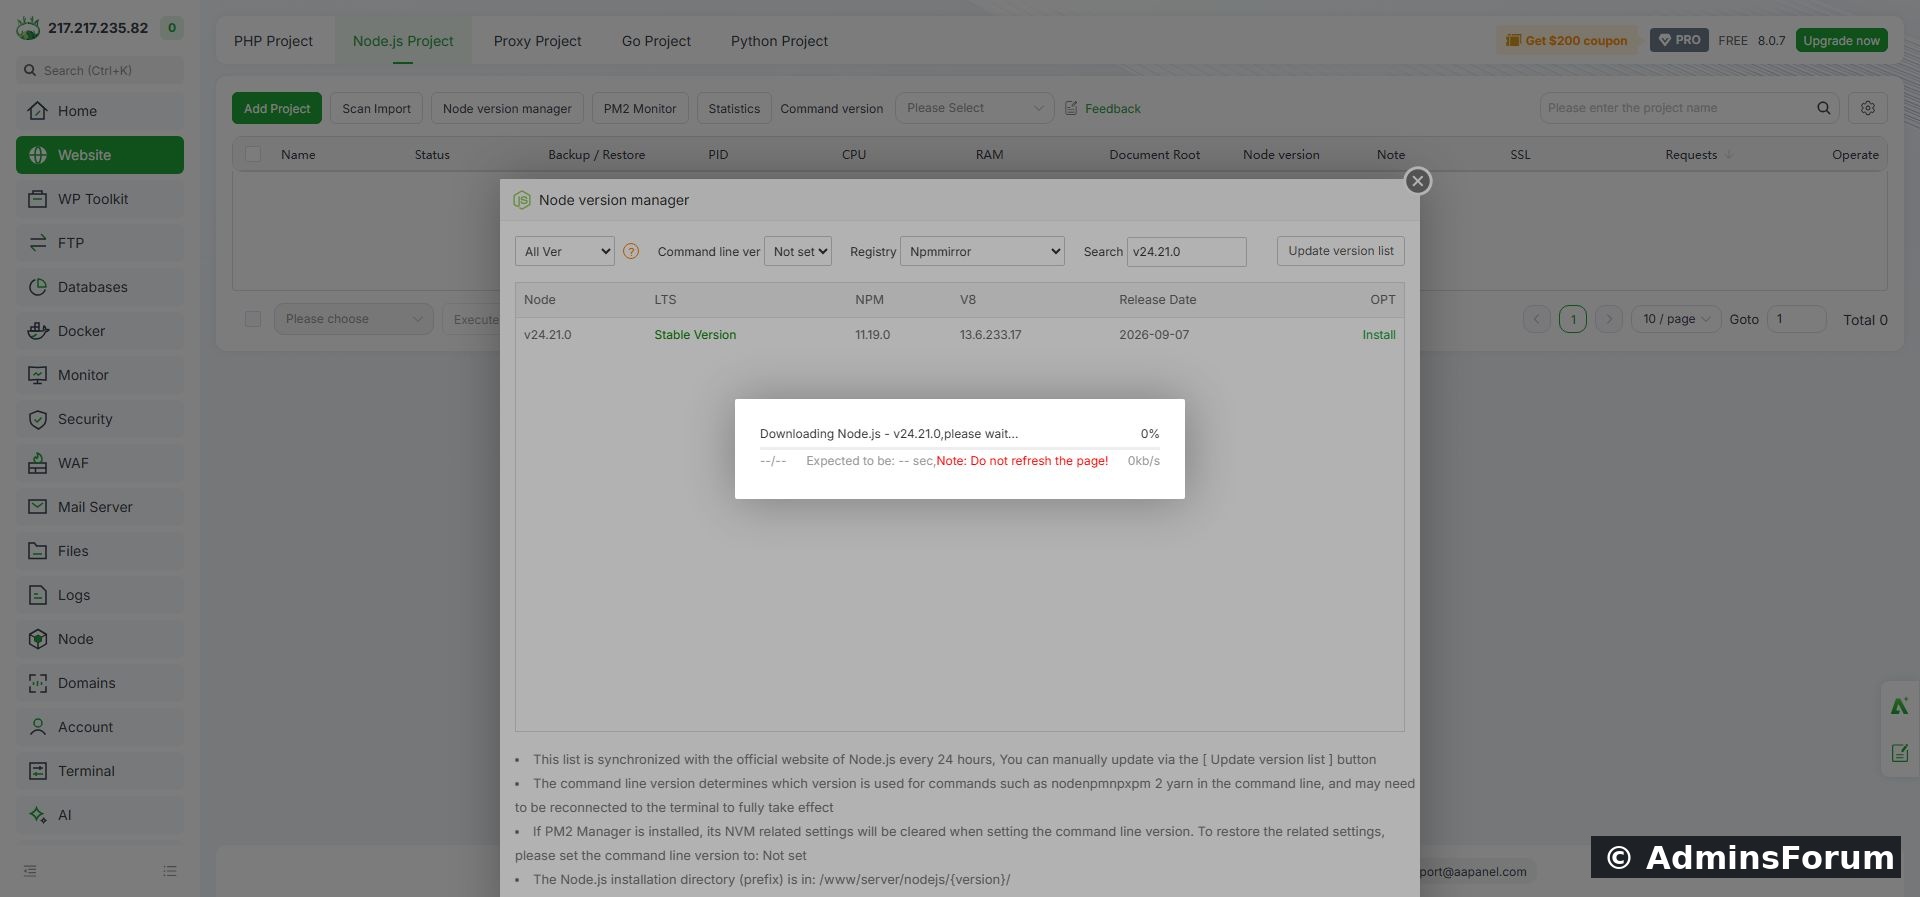
Node.js 24 LTS installation in the aaPanel version manager.
4. Confirm that installation finished
The installed row should offer Environment, Module and Uninstall controls instead of Install. This confirms that the manager recognises the runtime. Avoid clicking Uninstall while a project uses that version.
5. Set the command-line version
At the top of the manager, set Command line ver from Not set to your installed runtime. Wait for the environment-variable update to complete. This selects what a fresh shell uses for commands such as node and npm; a project's own runtime selection is a separate setting.
Close the old SSH session and reconnect before checking the result. An already-open terminal can retain its previous environment. On a server with existing Node projects, first check their runtime requirements before changing the default.
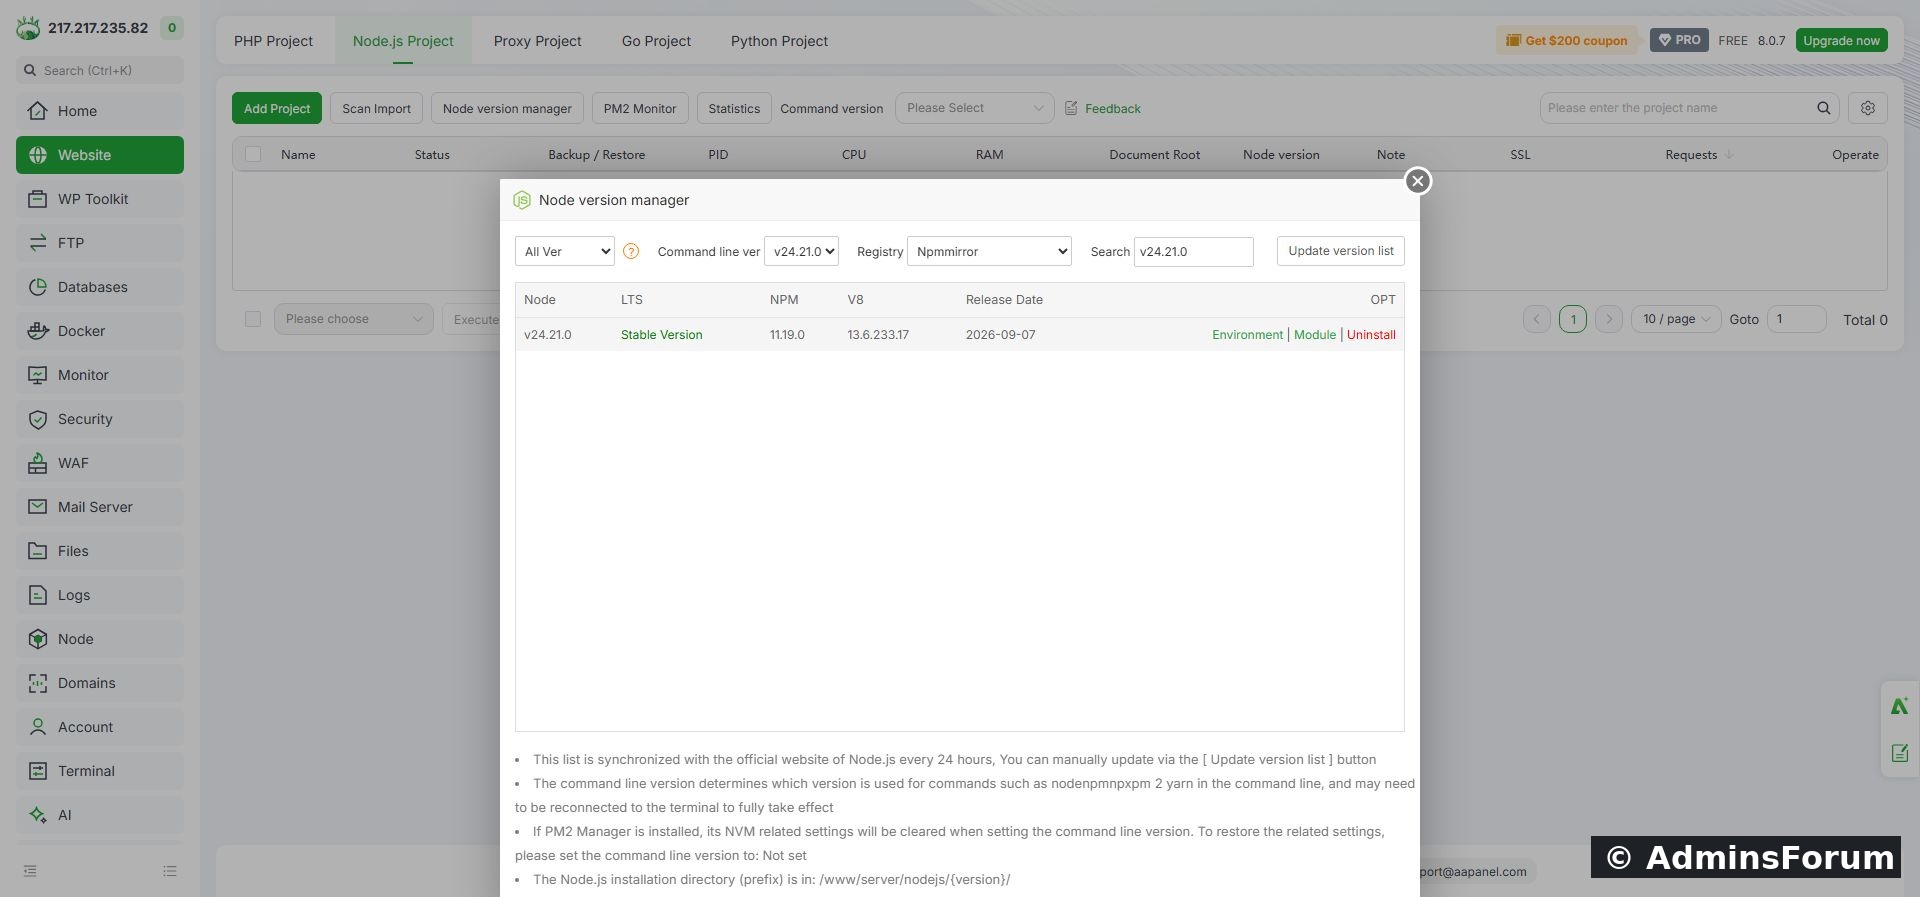
The installed runtime row and command-line version selection.
6. Verify Node.js and npm
In a fresh SSH login, run:
Our lab returned:
The path identifies the executable being used. The version commands identify the installed runtime and package manager. The final command confirms that Node can execute a simple JavaScript expression.
7. If node is still not found
Return to the manager and check that installation finished and Command line ver is not Not set. Reconnect your terminal, then retry. To distinguish a missing PATH setting from a failed installation, check the selected binary directly:
Replace the version in this path with your installed release. If the absolute path works but the plain node command does not, investigate the shell environment rather than reinstalling the application. If the file is missing, review the installation result and retry the failed download through the manager.
What comes next?
The runtime is ready. The next stage is creating an application directory, choosing its start command and runtime, verifying local output, and then mapping a domain through the web server with HTTPS. No application port needs to be opened publicly just to complete this installation guide.
References: aaPanel Node.js project documentation and Node.js release status.
Tested setup
Ubuntu 22.04.5 LTS, aaPanel Free 8.0.7, Node.js version manager 2.3, Node.js v24.21.0 and npm 11.19.0. Tested on 14 October 2026. Menu labels and patch versions can change.
1. Check what you need
You need an existing aaPanel installation, administrator access to its dashboard and outbound connectivity for downloads. A domain is not required for installing the runtime. A domain and DNS will be needed later when publishing a website with HTTPS.
Node.js runs JavaScript on the server. npm manages JavaScript packages. A Node application is separate from a PHP website: changing a site's PHP version does not change its Node runtime.
2. Open the Node.js project page
Open Website → Node.js Project. On a new installation, aaPanel may display Node version manager is not installed. Click its Install link, then Install Now for the official version manager. Wait for Installation succeeded before continuing.
3. Choose a supported LTS release
Click Node version manager. Search for the runtime version you want, or use the version filters. In this lab we selected v24.21.0, the supported Node.js 24 LTS release available on the test date.
Check your application's supported Node versions first. The panel's Stable Version label alone does not mean a release is still maintained: its list also includes older releases. Check the official Node.js release schedule rather than choosing an old version just because it is marked stable.
Click Install in the matching row. The panel downloads the runtime and may then show a separate PM2 module installation stage. Let both finish; do not refresh while the progress window tells you to wait.
Node.js 24 LTS installation in the aaPanel version manager.
4. Confirm that installation finished
The installed row should offer Environment, Module and Uninstall controls instead of Install. This confirms that the manager recognises the runtime. Avoid clicking Uninstall while a project uses that version.
5. Set the command-line version
At the top of the manager, set Command line ver from Not set to your installed runtime. Wait for the environment-variable update to complete. This selects what a fresh shell uses for commands such as node and npm; a project's own runtime selection is a separate setting.
Close the old SSH session and reconnect before checking the result. An already-open terminal can retain its previous environment. On a server with existing Node projects, first check their runtime requirements before changing the default.
The installed runtime row and command-line version selection.
6. Verify Node.js and npm
In a fresh SSH login, run:
Code:
command -v node
node --version
npm --version
node -e 'console.log(1 + 1)'Code:
/www/server/nodejs/v24.21.0/bin/node
v24.21.0
11.19.0
27. If node is still not found
Return to the manager and check that installation finished and Command line ver is not Not set. Reconnect your terminal, then retry. To distinguish a missing PATH setting from a failed installation, check the selected binary directly:
Code:
/www/server/nodejs/v24.21.0/bin/node --versionWhat comes next?
The runtime is ready. The next stage is creating an application directory, choosing its start command and runtime, verifying local output, and then mapping a domain through the web server with HTTPS. No application port needs to be opened publicly just to complete this installation guide.
References: aaPanel Node.js project documentation and Node.js release status.