AdminsForum

Paste the error. Find the fix.

Step-by-step guides and community answers for Linux servers, VPS and hosting control panels.

New threads

The latest guides and questions from every forum.

aaPanel WordPress Guides

Install LiteSpeed Cache in aaPanel WordPress and Verify Cache Hits

Quick answer
Install the official LiteSpeed Cache WordPress plugin, confirm your website actually uses OpenLiteSpeed, enable public-page caching and check repeated anonymous HTTPS requests for X-LiteSpeed-Cache: hit. Test purging separately. A plugin activation message or green settings switch is not proof that visitors receive cached pages.

Our test used aaPanel 8.0.6, OpenLiteSpeed 1.8.5, lsphp 8.5.11 and LiteSpeed Cache 7.9.1 on an isolated Ubuntu 22.04 lab on 12 October 2026. We verified real cache hits, observed misses after a homepage purge, and then disabled/deactivated the plugin before returning the lab site to Nginx.

1. Verify the backend before installing a cache plugin
This guide tests OpenLiteSpeed's server page cache. The WordPress plugin also has other optimization features, but those do not make its LiteSpeed server cache work on an ordinary Nginx/PHP-FPM backend.

Open WordPress Tools → Site Health → Info → Server. Our test reported Web server: LiteSpeed and PHP SAPI: litespeed after selecting Nginx + Openlitespeed in aaPanel. Follow the engine-switch and rollback walkthrough first if necessary.

Keep a current website/database/configuration backup. Record other cache plugins or reverse-proxy caching already in use so you do not mistake one cache layer for another. Our lab had no other active WordPress plugin when this test began.

2. Install the official plugin
In WordPress, open Plugins → Add Plugin. Search for LiteSpeed Cache. Identify the plugin published by LiteSpeed Technologies, then click Install Now. Wait until installation finishes and the button becomes Activate. Click Activate and confirm the installed plugin is active.
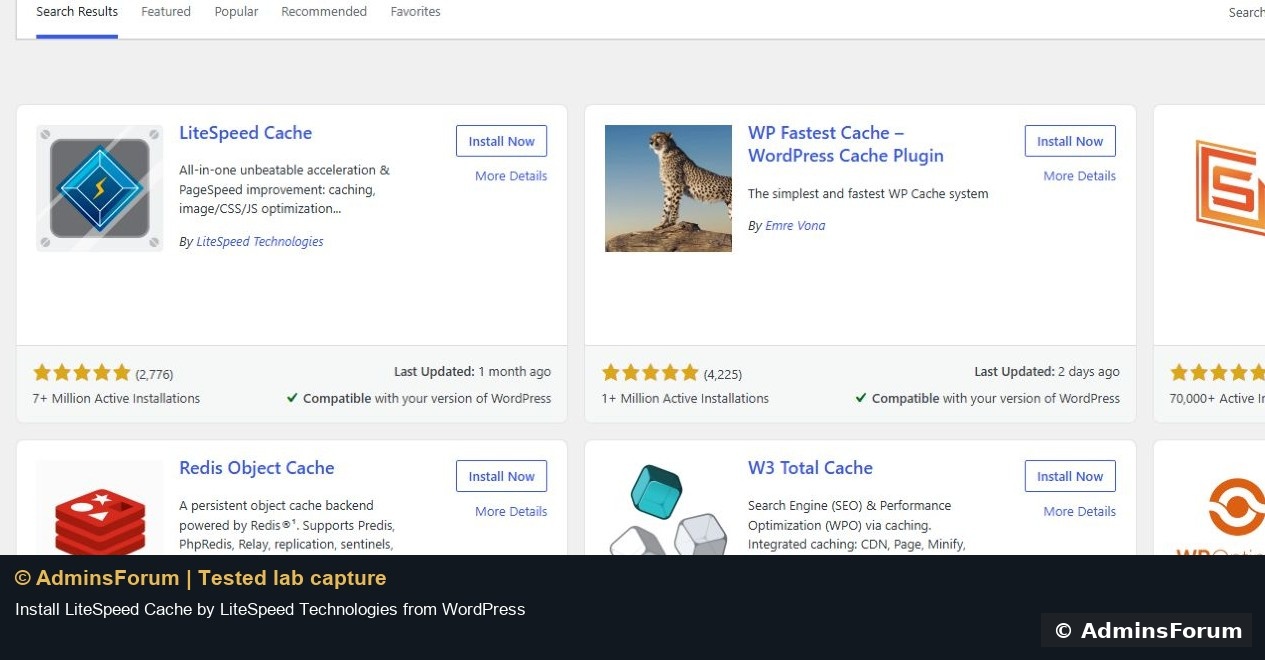
   

We installed version 7.9.1 through WordPress's native Plugin Directory interface. Do not install a similarly named package from an unknown download page.

3. Use a simple public-page configuration
Open LiteSpeed Cache → Cache → the Cache tab. Confirm Enable Cache is ON. For this public-page lab test we set Cache Logged-in Users, Cache Commenters and Cache REST API to OFF, then clicked Save Changes. Cache Login Page and Cache Mobile were already OFF.
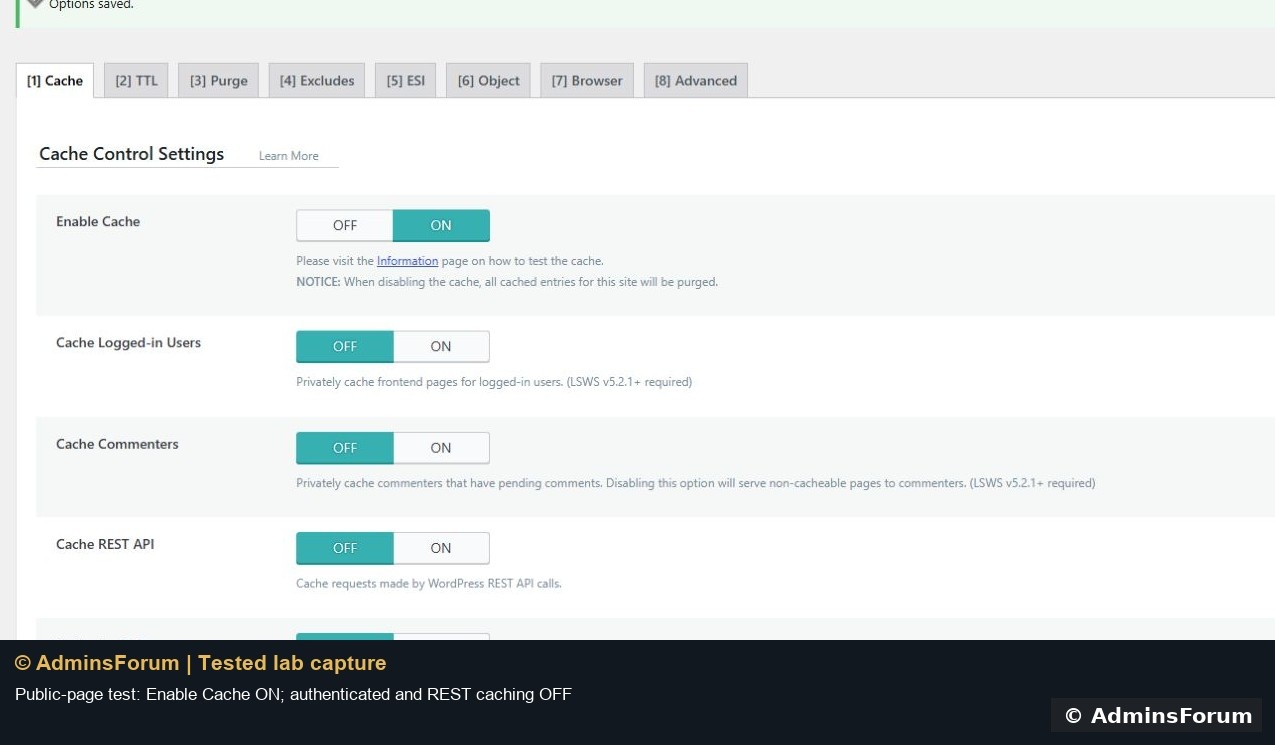
   

These choices keep the test focused on anonymous public pages. They are not a universal performance preset. Evaluate membership, shopping-cart, personalized and API behavior separately before enabling additional caching. We did not add Force Public Cache URIs or force private/account pages into public cache.

We did not connect QUIC.cloud, enable a CDN, request remote image optimization or enable the crawler. None of those steps was needed to verify the local OpenLiteSpeed page cache in this lab. Avoid changing minification and other optimization settings while diagnosing basic caching.

4. Test without your administrator login cookies
An administrator browser session is not a reliable anonymous cache test. Use a separate signed-out browser session and inspect the document response headers, or run cookie-free requests from a terminal.

This is the exact spaced request test we used. Replace the URL with your public homepage. It makes three ordinary HTTPS GET requests without login cookies, checks curl's exit code, and prints only the relevant response headers:
Code:
python3 - <<'PY' import subprocess,time for n in range(1,4): print('Anonymous GET',n) r=subprocess.run(['curl','-sS','--max-time','20','-D','-','-o','/dev/null','https://wp.adminslab.com/'],capture_output=True,text=True) print('curl exit:',r.returncode) for line in r.stdout.splitlines():   if line.lower().startswith(('http/','server:','x-litespeed-cache:','x-litespeed-cache-control:','cache-control:','age:')):print(line) if r.returncode:print('Request failed; inspect connectivity before retrying') time.sleep(2) PY

This uses GET rather than assuming that a HEAD request behaves identically. It does not log in, weaken certificate verification or print authentication/cookie headers.

Interpret the result
  • HTTP 200 and curl exit 0: the requested page was reached successfully.
  • X-LiteSpeed-Cache: miss: this response was not served from a stored LiteSpeed cache entry.
  • X-LiteSpeed-Cache: hit: this response was served from LiteSpeed's page cache.
  • No hit/miss header: confirm the selected backend, cache configuration and eligible URL before claiming caching works.

Our first tests returned repeated misses. Later anonymous requests returned hits. A cold cache or operation still completing can affect the first results; recheck after processing finishes rather than treating one immediate miss as a finished diagnosis. If misses persist, inspect cache storage permissions, server configuration, exclusions and conflicting layers using the official troubleshooting documentation.

Nginx remained the public front end, so the response's Server header said nginx even when X-LiteSpeed-Cache reported hit. The backend was independently verified through WordPress's litespeed SAPI.

5. Test the purge operation
Open LiteSpeed Cache → Toolbox → Purge. For the plugin's page cache, choose Purge All - LSCache. The lab displayed Notified LiteSpeed Web Server to purge all LSCache entries. We also tested Purge Front Page to invalidate only the homepage.
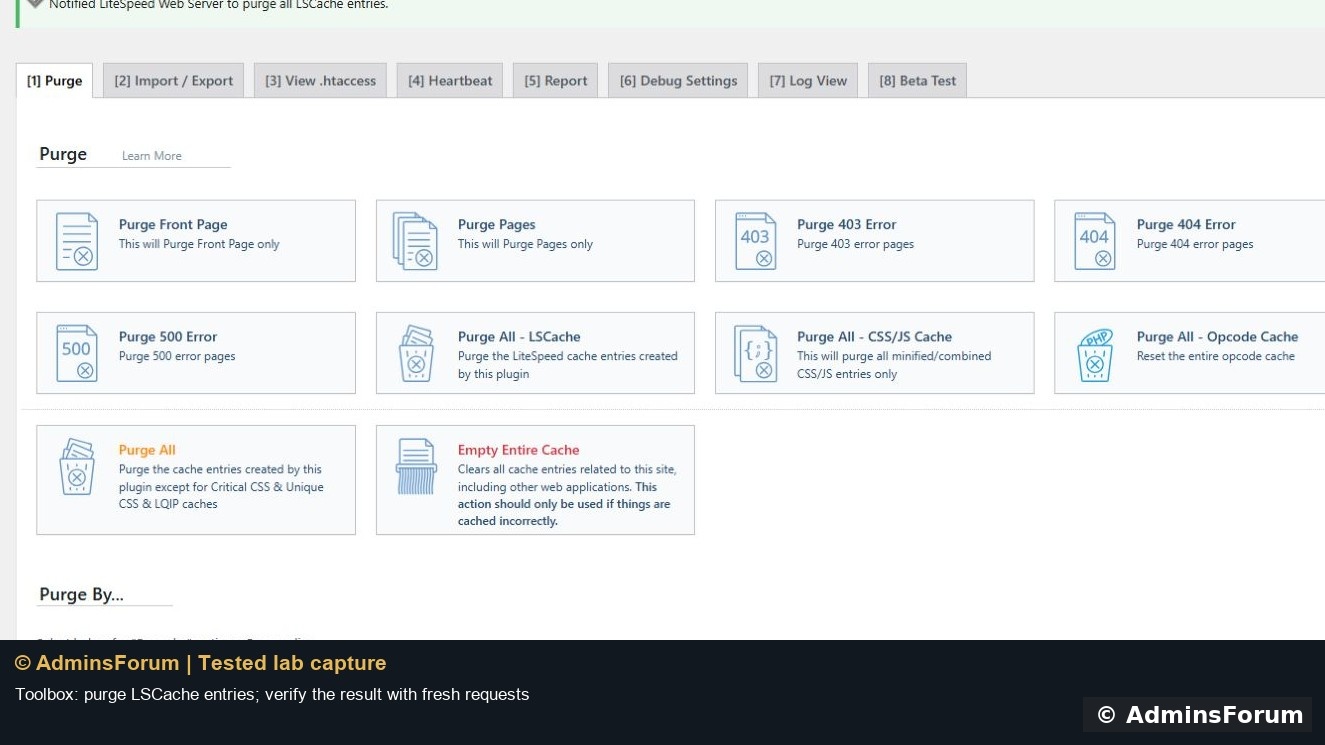
   

Repeat the anonymous request check. Our targeted homepage purge was not instantaneous: the first observed response still showed hit, followed by subsequent miss responses. The screenshot captures that transition. This checks the actual response after the notification rather than treating the notification alone as evidence.
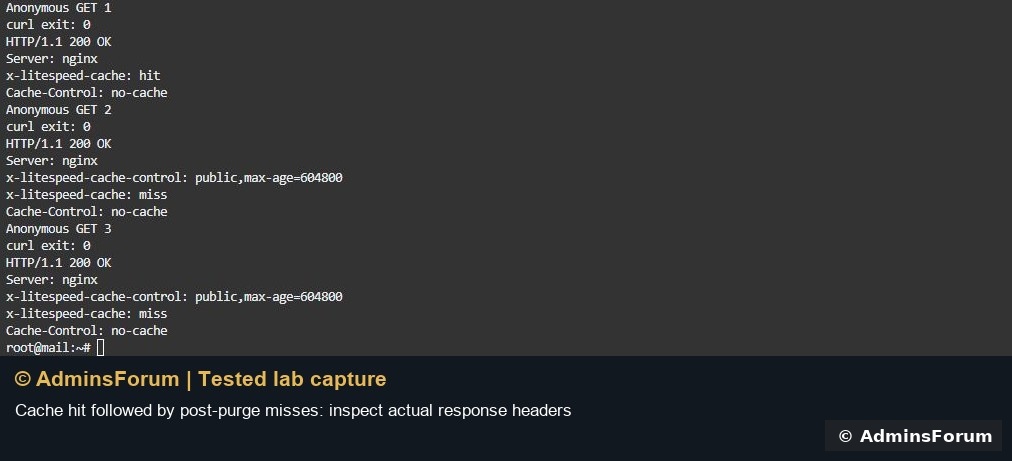
   

After a purge, allow the site to generate fresh eligible responses and recheck for hits before declaring it warmed again. We did not measure a purge latency guarantee or performance improvement. Do not use Empty Entire Cache as a routine substitute for the narrower plugin/page purge; its scope is broader.

6. Check normal website behavior
Open a post and a standalone page over HTTPS. In the lab, /hello-world/ and /sample-page/ rendered successfully on OpenLiteSpeed. We also opened the dashboard and uploaded an original branded JPEG through WordPress; its public HTTPS image loaded at its original dimensions.

For a real site, check logged-in and logged-out behavior separately and test any forms, carts or personalized screens before keeping new cache settings in production.

7. Disable caching before an engine return test
We set Enable Cache to OFF and saved the setting, then deactivated LiteSpeed Cache through Plugins → Installed Plugins. The plugin remained installed for future lab testing. We used aaPanel's native Rollback and a validated Nginx reload, then verified WordPress reported nginx/1.30.5 with fpm-fcgi SAPI.

Anonymous HTTPS requests still returned HTTP 200, but no longer reported a LiteSpeed cache hit/miss header. Public content and the uploaded image remained accessible. The lab is left on Nginx with LiteSpeed Cache inactive.

What this test proves
The official plugin installed and activated, public-page settings saved, anonymous requests received cache hits, and the homepage purge was followed by misses. Website content/media checks and the return to PHP-FPM passed. This is a tested setup and verification guide, not a speed benchmark or a recommendation to cache every URL.

References: official WordPress plugin listing, LiteSpeed installation/cache verification and cache troubleshooting. Screenshots are original © AdminsForum lab captures.
DEV 10-12-2026, 06:57 PM Read thread
aaPanel Websites & Web Servers Guides

Switch WordPress to OpenLiteSpeed in aaPanel and Test Rollback

Quick answer
In aaPanel WP Toolkit, open the website's Modify → Web Server page, select Nginx + Openlitespeed and save the switch. Then check the actual WordPress PHP SAPI, a published post, a page and a fresh upload. Keep a verified return path: the panel's Current badge alone does not prove that the running website has changed engines.

We tested this on our isolated Ubuntu 22.04 lab with aaPanel 8.0.6, Nginx 1.30.5, OpenLiteSpeed 1.8.5 and PHP 8.5.11 on 12 October 2026. We also tested native Rollback and the follow-up Nginx reload needed in this installation.

1. Prepare the installation and backup
Enable and verify Multi-WebServer Hosting first. Follow the installation guide rather than uninstalling a working Nginx server. Confirm Nginx and OpenLiteSpeed are running.

Preserve website files, database and web-server/PHP configuration. Our lab had a current full WP Toolkit archive plus a private configuration copy. A backup archive's existence is not proof that its restore function works; see the backup verification guide. On a live site, use a maintenance window and a tested recovery plan.

Record the original engine and PHP version. Our original engine was Nginx. Keep internal backend and OpenLiteSpeed administration ports private; this walkthrough does not require exposing them publicly.

2. Check the separate OpenLiteSpeed PHP runtime
OpenLiteSpeed uses lsphp, separate from aaPanel's regular PHP-FPM installation. A PHP extension installed for PHP-FPM may be missing from lsphp. Follow the lsphp runtime checks and install application requirements in the correct version.

We installed and functionally tested Imagick for lsphp 8.5 before switching. See the Imagick walkthrough. Avoid changing PHP major versions and web-server engines together on a production website; separate changes make failures easier to diagnose.

3. Select and save the website's engine
Open WP Toolkit, find the intended domain and click Modify. Choose Web Server in its side menu. Wait for the saved website configuration to load before reading the selector; a temporary form value during loading is not the saved engine.

Choose Nginx + Openlitespeed, confirm the selector shows that choice, and click Save. Review the Switching Services confirmation, then Confirm. Wait for the operation to finish. Reopen or refresh the modification view if necessary.

Our saved view showed Current: Openlitespeed and Web Server: Nginx + Openlitespeed.
   

Nginx remains the public front end in this architecture. Seeing Server: nginx in an HTTP response does not by itself disprove an OpenLiteSpeed backend.

4. Verify the application-side runtime
Sign in to WordPress and open Tools → Site Health → Info. Expand Server. Our actual request reported Web server: LiteSpeed, PHP version: 8.5.11, PHP SAPI: litespeed and Imagick: Yes.
   

Check upload_max_filesize and post_max_size as well. The effective upload limit can be lower than either value shown elsewhere. Our OpenLiteSpeed WordPress upload page allowed 8 MB because post_max_size was 8M, although upload_max_filesize was 50M. We did not change these limits during the engine test.

5. Test the website's normal workflows
Open the homepage, a published post and a standalone page over HTTPS. We opened /hello-world/ and /sample-page/ successfully with Post name permalinks. Check for a complete rendered page, not only a successful connection.

Next, open Media → Add Media File and upload a small original test image. We uploaded an 800 × 554 branded JPEG, saved its alternative text/title, then opened the public HTTPS image successfully. This tests a fresh upload rather than only an old cached image.
   

Also open the dashboard and relevant application settings. For a shop or member site, separately test login, cart/checkout and private pages before deploying this change.

6. Test return to the original engine
Before returning to Nginx, we turned LiteSpeed Cache's Enable Cache OFF and deactivated the test plugin. Keep the old configuration and backup; do not remove OpenLiteSpeed just to switch one site back.

Reopen WP Toolkit → Modify → Web Server, click Rollback and confirm the return to the previous service. Our panel then showed Current: Nginx and selected Nginx.
   

Important result from our lab: the panel badge changed before WordPress stopped reporting the LiteSpeed handler. We checked the restored Nginx routing and ran its configuration test successfully. We then used App Store → installed Nginx → Setting → Service → Reload and confirmed the reload. This applies the valid configuration without stopping the server. If a configuration test fails, fix it before reloading; do not repeatedly restart services or overwrite custom rules blindly.

After a fresh Site Health request, WordPress reported nginx/1.30.5 and PHP SAPI: fpm-fcgi. Imagick remained available. The screenshot below shows the restored PHP-FPM handler.
   

We reopened the published post, Sample Page and uploaded HTTPS image successfully. This is the evidence for a working return path, beyond a panel success message.

If a check fails
  • 502/503: inspect the selected backend's service state, PHP version/handler and corresponding error log.
  • Post URLs fail while the homepage works: inspect the selected engine's rewrite configuration; do not replace rules for the wrong engine.
  • Extensions disappear: compare lsphp and PHP-FPM installations and the actual application SAPI.
  • Rollback badge changes but the handler does not: inspect routing and configuration validity, then reload the relevant service and make a fresh request.

Our verified result
WordPress content, dashboard and a fresh image upload worked on OpenLiteSpeed. Native Rollback followed by a validated Nginx reload restored PHP-FPM, and the content/media checks passed again. The lab is left on Nginx with the test cache plugin inactive. This is a functionality test, not a performance benchmark.

Reference: aaPanel Multi-WebServer Hosting documentation. All screenshots are original © AdminsForum lab captures.
DEV 10-12-2026, 06:56 PM Read thread
aaPanel PHP & Extensions Guides

Install Imagick for OpenLiteSpeed PHP in aaPanel

Quick answer
Open App Store → Installed → Openlitespeed → Setting → Install extensions, select the website's lsphp version and install imagemagick. Verify the Imagick PHP extension with the matching lsphp binary and then check an actual website request.

We tested this on aaPanel 8.0.6, OpenLiteSpeed 1.8.5 and lsphp 8.5.11 on our isolated Ubuntu 22.04 lab. Imagick was initially missing from lsphp, although the normal aaPanel PHP installation already had it. The lsphp installation completed and the functional image test passed on 12 October 2026.

Before you start
  • Have OpenLiteSpeed installed and identify the PHP version used by the website.
  • Preserve the relevant PHP/web-server configuration and a current website backup before changing the runtime.
  • Use the lsphp runtime-check guide to distinguish the separate installation and its loaded configuration file.

1. Open the lsphp extension list
Open the installed Openlitespeed application's Setting link. Choose Install extensions and select the correct version; ours was PHP-85. Find imagemagick, described as the Imagick graphics library.

In our initial list, the row showed Install. Other extensions such as Fileinfo were already available. Install only the extension your application needs.
   

2. Start installation and wait for the result
Click the imagemagick row's Install link. Our row changed to Installing while aaPanel ran the setup. Wait for it to finish rather than repeatedly clicking Install.

After completion, the row showed the installed checkmark and an Uninstall action. This is an installation-status check, so continue with the runtime test rather than stopping at the button label.
   

If installation fails, inspect the task/error result before retrying. Package/build availability depends on PHP version and operating system; do not copy an extension binary from another PHP installation.

3. Run a functional test with the lsphp binary
In the aaPanel Terminal, this exact test was run against our lsphp 8.5 installation:
Code:
/usr/local/lsws/lsphp85/bin/php -r 'echo "PHP: ".PHP_VERSION.PHP_EOL;echo "INI: ".php_ini_loaded_file().PHP_EOL;if(!class_exists("Imagick"))throw new Exception("Imagick is missing");echo "Imagick: ".phpversion("imagick").PHP_EOL;$i=new Imagick();$i->newImage(64,64,new ImagickPixel("#27ae60"));$i->resizeImage(32,32,Imagick::FILTER_LANCZOS,1);$i->setImageFormat("png");echo "Resize/PNG test: ".$i->getImageWidth()."x".$i->getImageHeight()."; bytes=".strlen($i->getImageBlob()).PHP_EOL;'
It creates a 64 × 64 image in memory, resizes it to 32 × 32 and encodes a PNG. It does not write an image into a public website directory. Replace the version directory with the actual one used by your installation.

Our result was PHP 8.5.11, Imagick 3.8.1, and Resize/PNG test: 32x32; bytes=160. A different library build can produce a different byte count; the important checks are that processing succeeds, dimensions match and the encoded image is non-empty.
   

The loaded configuration file reported by the binary was:
Code:
/usr/local/lsws/lsphp85/etc/php/8.5/litespeed/php.ini
Use the runtime's reported path when diagnosing configuration. In this aaPanel build, the panel's path label differed from the loaded path; we did not create or edit a second ini file to match that label.

4. Confirm the actual website detects Imagick
For WordPress, open Tools → Site Health → Info → Server. After switching our test site to Nginx + OpenLiteSpeed, it reported PHP SAPI: litespeed and Is the Imagick library available? Yes.
   

The SAPI check matters: a CLI test from the right binary still does not prove which runtime a website request uses. If an existing application still reports the old extension list, check its selected PHP version and follow the appropriate PHP-worker/service reload procedure before testing a fresh request.

We also uploaded a fresh branded JPEG through WordPress on this backend and opened its public HTTPS file successfully. That checked the upload workflow separately from the in-memory CLI image test.

If Imagick is still missing
  • Confirm you installed it in the Openlitespeed manager for the selected lsphp version.
  • Check the binary path, loaded ini file and application-side PHP SAPI again.
  • Inspect the installation result and application errors rather than adding duplicate extension directives.
  • Recheck after the appropriate worker reload if the application was already running during installation.

Our verified result
The lsphp extension row showed installed, Imagick 3.8.1 processed an image, and WordPress detected Imagick under litespeed SAPI. We did not change the website's upload limits or benchmark image-processing speed.

Reference: PHP Imagick manual and aaPanel OpenLiteSpeed PHP management. Screenshots are original AdminsForum lab captures.
DEV 10-12-2026, 06:31 PM Read thread
aaPanel PHP & Extensions Guides

Check OpenLiteSpeed PHP Version and Extensions in aaPanel

Quick answer
For OpenLiteSpeed, inspect App Store → Installed → Openlitespeed → Setting → PHP Info. Select the PHP version you intend to use. OpenLiteSpeed uses a separate lsphp installation, so an extension installed through the normal PHP-8.5 manager is not proof that lsphp has it.

This guide was tested on our isolated aaPanel 8.0.6 / Ubuntu 22.04 lab on 12 October 2026. The OpenLiteSpeed manager reported version 1.8.5, and both PHP installations reported PHP 8.5.11. We also checked the actual WordPress runtime after switching that test site to Nginx + OpenLiteSpeed.

1. Identify the website's engine and PHP version
Open the website's configuration and check Web Server and PHP version. For our WP Toolkit site, those controls were under WP Toolkit → Modify. Do not assume that the server's default engine or a bare php command describes this particular website.

If you still need to enable multiple services, see the tested multi-webserver installation guide. Changing engines is a separate operation from checking PHP information.

2. Open the correct PHP manager
In App Store → Installed, open the Openlitespeed row's Setting link, then choose PHP Info. We selected PHP-85. Wait for the data to finish loading: temporary empty cells or default No values are not a reliable result while the request is pending.

The Basic Information section reported PHP 8.5.11 and the lsphp binary under /usr/local/lsws. Our initial capture is below.
   

3. Distinguish the two installations
Our lab had:
  • Normal aaPanel PHP binary:
    Code:
    /www/server/php/85/bin/php
  • OpenLiteSpeed PHP binary:
    Code:
    /usr/local/lsws/lsphp85/bin/php
The matching 8.5.11 version numbers did not make these the same installation. Before we installed the lsphp Imagick extension, the normal aaPanel binary loaded Imagick while lsphp did not.
   

These comparison commands were run in CLI mode; the first label in the screenshot identifies the aaPanel PHP installation used with PHP-FPM, not an active FPM worker request. CLI settings and website settings can differ.

4. Verify the configuration file with the intended binary
In the aaPanel Terminal, this read-only check prints the PHP version, loaded configuration file and selected extension availability:
Code:
/usr/local/lsws/lsphp85/bin/php -r 'echo "PHP version: ".PHP_VERSION.PHP_EOL;echo "Loaded ini: ".php_ini_loaded_file().PHP_EOL;foreach(["exif","fileinfo","imagick","Zend OPcache"] as $e)echo $e.": ".(extension_loaded($e)?"loaded":"missing").PHP_EOL;'
Replace 85 with the version directory that actually exists on your server. Do not copy a path from another PHP version and do not create a public phpinfo.php file just to run this check.

One detail mattered in our test: the panel displayed an ini path containing /php/85/litespeed/, while the lsphp binary reported the actual loaded path as:
Code:
/usr/local/lsws/lsphp85/etc/php/8.5/litespeed/php.ini
Check the loaded path before editing configuration. A path label in a panel is not a reason to create a second configuration file that the runtime never reads. We did not change a php.ini setting in this walkthrough.

5. Check the extensions required by your application
Scroll through PHP Info and look at the database, image-processing and file-handling sections. WordPress needs its database connection and the image/file features used by your site. Install extensions for actual application requirements rather than enabling every optional item.

After our lsphp setup, the panel showed EXIF, GD, ImageMagick and Fileinfo available. Imagick was installed during a separate tested setup step; this screenshot is the resulting configuration, not a promise that every fresh lsphp installation has it by default.
   

To install a missing lsphp extension through aaPanel, use Openlitespeed → Install extensions for the selected version. Using the normal PHP-8.5 extension manager can affect the other installation instead.

6. Confirm what a real website request uses
For WordPress, open Tools → Site Health → Info → Server. After the engine switch, our WordPress page reported:
  • Web server: LiteSpeed.
  • PHP version: 8.5.11.
  • PHP SAPI: litespeed.
  • Imagick available: Yes.
  • Opcode cache: Enabled.
   

This application-side result is stronger evidence of the active website runtime than a command-line PHP version alone. The opcode-cache statistics visible in the capture are a momentary lab snapshot, not a speed benchmark or a recommended target.

If the results do not match
  • Check the saved website engine and selected PHP version again.
  • Verify which binary and configuration file you inspected.
  • After an extension/configuration change, follow the appropriate service/PHP-worker reload process and recheck a fresh application request.
  • Check application errors before changing more settings; different runtimes can have different upload and memory limits as well as extensions.

Our verified result
We identified separate aaPanel and lsphp installations, verified their loaded ini files and extension lists, and confirmed WordPress requests used litespeed SAPI. We did not use this guide to tune performance or change PHP limits.

References: aaPanel multi-webserver PHP management and OpenLiteSpeed PHP documentation. All screenshots are original AdminsForum lab captures.
DEV 10-12-2026, 06:25 PM Read thread
aaPanel Websites & Web Servers Guides

Enable aaPanel Multi-Webserver Hosting and Switch a Website

Quick answer
aaPanel's Multi-WebServer Hosting can run Nginx, Apache and OpenLiteSpeed on the same server, with a per-website engine choice. Enable it through the Nginx manager, wait for all services to run, then change one test website's Web Server setting and verify the application before switching anything else.

This is a tested installation walkthrough, not just a list of options. On our isolated Ubuntu 22.04 lab with aaPanel 8.0.6, we enabled the feature, brought all three services to Running, switched a WordPress site from Nginx to Nginx + Apache, opened its content/dashboard/media, and used Rollback to return to Nginx. The original Nginx installation remained 1.30.5 and the WordPress site used PHP 8.5.

1. Prepare a backup and a return path
This is a server-wide service change. On a production machine, back up the files, databases and relevant configuration for every affected website, and arrange a maintenance window. A provider snapshot is useful, but it does not replace a verified recovery plan.

Our disposable lab had a current full WordPress backup and private copies of the vhost, Nginx and PHP configuration plus the panel database. The Nginx configuration test passed before installation. See how to create a WordPress backup and how to verify what that backup proves.

Review custom master/vhost configuration before enabling the feature. The panel warns about manually modified service configuration and ports. Preserve the aaPanel marker comments and do not blindly uninstall a working web server to get past a warning. Resolve custom configuration compatibility in a lab first.

2. Open Multi-WebServer Hosting
Open the Nginx manager. In our lab, we reached it from WP Toolkit → the Nginx service button. You can also open the installed Nginx settings from App Store. On the manager's Service page, find Multi-WebServer Hosting and turn it on.
   

Before doing so, inspect port conflicts. Our target backend ports were unused, while the existing Nginx service correctly owned the public HTTP/HTTPS listeners. Record which process owns a port rather than treating a list of numbers as a reason to stop everything.

3. Review the installer and wait for completion
The panel opened Enable multiple services with Apache and OpenLiteSpeed choices and Quick install/Compiled methods. We used Quick install from aaPanel's official installer and clicked Confirm. The screenshot shows the OpenLiteSpeed selector expanded.
   

The disabled Nginx selector displayed a default label in this build; our already installed Nginx remained 1.30.5. Check actual installed versions afterward rather than assuming every label in an installer dialog is the resulting installed version.

The Messages Box queued Install[apache-2.4] and Install[openlitespeed-1.8]. Wait until the queue finishes. Do not keep clicking Confirm or restart the panel merely because a download takes time.

4. Confirm service health
After the queue finished, our panel initially showed Apache stopped. We used the Apache row's Repair action, then reopened the manager. All three services showed Running. Nginx and Apache configuration tests passed, and the expected backend listeners were present.
   

If a service remains stopped, inspect the installation result, configuration test and relevant error log before retrying. A green Multi-WebServer switch by itself is not proof that every service started.

The panel also displayed defaults for new websites: PHP Project used nginx, while WP Toolkit used openlitespeed. These defaults are different from the engine already used by an existing website. We kept the existing WordPress site's engine unchanged until the deliberate test below.

Keep backend ports private
In our lab, Nginx remained the public front end on HTTP/HTTPS. Apache listened on its backend ports and OpenLiteSpeed had separate backend/admin listeners. Before installation, we preserved UFW rules and added restrictive rules for 7080/tcp, 8188:8190/tcp and 8288:8290/tcp. After installation, those deny rules remained in effect for IPv4 and IPv6; the existing SSH, panel and HTTP/HTTPS rules were retained.

Do not expose backend or administration ports merely because they appear in an architecture diagram. If you deliberately need remote backend access, design access restrictions for that purpose. Our test only needed local proxy-to-backend connections.

5. Switch one compatible test website
Open WP Toolkit → your website → Modify → Web Server. The same type of per-site setting is available from a PHP website's configuration.

Confirm the current engine first. Our site showed Current: Nginx. Choose Nginx + Apache from Web Server and click Save. Read the Switching Services confirmation: the application must support Apache, original engine configuration can change, rewrite compatibility matters and subdirectory bindings may need attention.

We tested a root-installed WordPress site with its backup already preserved. After confirming, Current showed Apache, while the selection showed Nginx + Apache. The Current badge names the backend; Nginx remains in front in this mode.
The combined capture below shows A: the Apache backend after switching, and B: the Nginx result after the rollback tested in step 7.
   

For an application that relies on special rewrite rules, Apache modules, a custom proxy or a subdirectory, test that layout before applying the change to live traffic. Installing the server does not automatically establish that every application's rules are compatible.

6. Test more than the homepage
After switching, we opened:
  • The published WordPress post at /hello-world/.
  • The published Sample Page using its readable URL.
  • The WordPress administration dashboard with the existing session.
  • An uploaded JPEG, which loaded at its original 1912-pixel width.
   

The main lab website and Roundcube login page also loaded after the global installation. Loading webmail is an HTTP check; it does not prove SMTP delivery or every mail function was retested.

On your own site, also test a logged-out session, forms, application logs and important workflows. Keep secrets out of diagnostic screenshots. A successful public homepage is not a complete compatibility test.

7. Test rollback before relying on it
In the same website's Web Server setting, click Rollback and read the confirmation asking whether to return to the previous service. We confirmed it and the site's Current badge returned to Nginx. The /hello-world/ post still opened afterward.

This changed the website back to its previous engine; it did not disable the server-wide Multi-WebServer feature or perform a files/database backup restore. The lower half of the switch-and-rollback screenshot above shows the completed rollback result.

PHP on OpenLiteSpeed is a separate setup
We tested the Nginx + Apache path in this walkthrough. OpenLiteSpeed uses lsphp rather than the normal aaPanel PHP-FPM installation. Before switching a website to the OpenLiteSpeed backend, check its actual PHP version and extensions in the OpenLiteSpeed manager. Extensions installed for /www/server/php/85 are not proof that the separate lsphp runtime has them.

What we verified
All three services ran; Nginx and Apache configuration checks passed; backend/admin firewall restrictions remained; WordPress content, dashboard and an uploaded image worked on the Apache backend; native rollback returned that site to Nginx and its post still loaded. We did not switch the site to OpenLiteSpeed or run performance benchmarks in this guide.

Reference: aaPanel Multi-WebServer documentation. All screenshots are original AdminsForum lab captures.
DEV 10-12-2026, 05:54 PM Read thread
aaPanel Backups & Migration Guides

Verify a WordPress Backup Before Restoring in aaPanel

Quick answer
A backup job finishing successfully proves that the panel created a backup, not that your website can be recovered. Before relying on a WordPress backup, confirm its site and date, check the archive components, preserve another private copy and test restoration on an isolated site.

This guide uses a real full backup from our AdminsForum lab: aaPanel 8.0.6, WordPress 7.1.3 and a root-installed WP Toolkit site. We verified the archive and compression checks on 12 October 2026. It is a verification walkthrough, not a claim that a completed restore was proven.

1. Create a current full backup
Open WP Toolkit, find the correct domain and click its Backup / Restore entry. Check that the configured backup type includes both files and database, then start the backup and wait for the job to finish.

Our task displayed 1 success, 0 failed. If yours fails, investigate that job before testing restoration. See the backup creation walkthrough for the initial panel steps.
   

2. Identify the exact archive
In the backup list, check the domain, backup time, file size, backup type and storage location. Do not select an older archive just because it is first in a downloaded folder.

Our selected entry was:
  • File: wp.adminslab.com_20261012_153210.zip
  • Size displayed by aaPanel: 41.13 MB
  • Type: Full Backup
  • Storage: Local Server
   

The panel's displayed backup time can use a different timezone from a timestamp embedded in the filename. Record the exact filename and check the selected site's identity. The warning Subsites not included also matters: a backup of the parent site is not proof that every separate subsite has been captured.

3. Preserve a private copy
Keep the original archive while you investigate. We made a second private copy and confirmed its SHA-256 matched the original. That second copy was on the same lab VPS: it protects against accidentally changing the original during testing, but not against losing the server.

For disaster recovery, keep a verified copy in separate storage or on another machine. Do not put backups in a public website directory, attach SQL dumps to support posts, or share archive contents that include wp-config.php or database credentials.

4. Check the archive without restoring it
Our full-backup ZIP contained meta.json, database.sql.gz and files.zip. We checked the outer ZIP, decompressed the SQL gzip, tested the nested files ZIP and confirmed wp-config.php was included.

The following read-only example was also tested against this archive. Open the aaPanel Terminal and change the p = Path(...) line to your actual backup file before running it. It needs Python 3 and its standard library; it does not extract files into your website, import SQL or modify the backup.

Code:
python3 - <<'PY' from pathlib import Path import gzip, io, json, zipfile p = Path('/www/backup/wordpress/wp.adminslab.com_20261012_153210.zip') if not p.is_file():     raise SystemExit('STOP: backup file not found') with zipfile.ZipFile(p) as archive:     if archive.testzip() is not None:         raise SystemExit('STOP: outer ZIP integrity failed')     required = {'meta.json', 'database.sql.gz', 'files.zip'}     if not required.issubset(archive.namelist()):         raise SystemExit('STOP: expected full-backup components missing')     meta = json.loads(archive.read('meta.json'))     print('Backup domain:', meta.get('domain'))     print('Backup site root:', meta.get('site_path'))     sql = gzip.decompress(archive.read('database.sql.gz'))     if not sql:         raise SystemExit('STOP: SQL data is empty')     print('SQL compression and non-empty data: PASS')     with zipfile.ZipFile(io.BytesIO(archive.read('files.zip'))) as files:         if files.testzip() is not None:             raise SystemExit('STOP: nested files ZIP integrity failed')         if not any(n.endswith('wp-config.php') for n in files.namelist()):             raise SystemExit('STOP: wp-config.php missing')     print('Files ZIP integrity and wp-config.php presence: PASS') print('Integrity checks finished. A restore test is still required.') PY

This example matches the archive layout observed in our aaPanel version. A different backup format needs a different check; a missing component should be investigated rather than renamed to make the script pass. It loads the compressed components into memory, so for large backups use an appropriate streaming/offline verification process instead of copying this small-lab example blindly.


Read the result carefully:
  • The domain and site root should describe the website you intended to back up.
  • ZIP integrity checks detect archive corruption; they do not prove the application data is complete or safe.
  • Successful SQL gzip decompression and non-empty data do not prove that the SQL will import successfully or contain every required table.
  • wp-config.php being present confirms inclusion of that file, not that its database settings match the restore target.

5. Test recovery on an isolated site
Use a disposable staging environment and preserve its current state before overwriting it. Keep production traffic, outgoing email and scheduled jobs out of the recovery test so a copied website does not send duplicate messages or run live integrations.

Record something that must be recovered from the backup: for example an existing test file's contents, a draft's content, an uploaded image and a harmless database setting. Make a controlled change after the backup, then perform the staging restore through the appropriate restore workflow.

Afterward, independently check both files and database. Open the restored homepage and a deep page, sign in to WordPress, inspect media and confirm the chosen pre-backup state returned. A page loading alone is not enough.

A caution from our own test
In a separate restore test on this lab, WP Toolkit returned a success response, but a changed backed-up file and a disposable database marker remained afterward. We did not count that as a verified recovery. We have not established the cause or claimed that the result applies to other servers or versions. The disposable markers were removed and our private backup was preserved.

Extra files created after a backup can also remain in an overwrite-style restore. Their presence alone is not decisive: check an existing backed-up file and a database value as well.

If any check fails
  • Stop before overwriting production or deleting older backups.
  • Confirm the intended backup filename, domain, site root and database target.
  • Review the backup/restore task result and relevant errors; redact credentials before sharing diagnostics.
  • Keep the original archive and try recovery in an isolated environment before relying on it.

What this walkthrough verified
The full backup completed, archive checks passed, SQL gzip data decompressed, the nested files ZIP contained wp-config.php, and a matching private safety copy was kept. Successful end-to-end recovery was not verified; that remains a separate requirement.

Reference: aaPanel WP Toolkit documentation. Screenshots are original AdminsForum lab captures.
DEV 10-12-2026, 04:36 PM Read thread
aaPanel PHP & Extensions Guides

Check PHP OPcache in aaPanel: CLI vs PHP-FPM

Quick answer
An OPcache result from command-line PHP does not necessarily describe your website. Check the PHP version assigned to the site, confirm Zend OPcache is available, and inspect that version's PHP-FPM configuration separately. In our lab, CLI opcode caching was disabled while the PHP-FPM configuration reported it enabled.

Tested on 12 October 2026 with aaPanel 8.0.6 and PHP 8.5.11. OPcache was already available; no extension installation or performance-setting change was needed.

What OPcache does
OPcache keeps compiled PHP bytecode so PHP does not need to parse and compile the same scripts on every request. It is separate from a full-page cache or a Redis-backed WordPress object cache. Finding OPcache does not prove those other caches are configured.

1. Check the PHP version your website uses
Open the website's PHP version setting in aaPanel. For a WP Toolkit site, use WP Toolkit → Modify → PHP version. Our WordPress site uses PHP 8.5, so the commands below deliberately use the 85 installation directory.

Open App Store → Installed → PHP-8.5 → Setting → Service. The panel shows the executable for that version:
Code:
/www/server/php/85/bin/php
   

Do not rely on a bare php command unless you know which version it points to. A website using PHP 8.4 can have different extensions and settings from a PHP 8.5 command-line installation. Replace 85 with your actual aaPanel version directory when following this guide.

2. Check extension availability in the PHP manager
Click phpinfo in the same PHP manager. In our panel, the Basic Information section showed version 8.5.11 and the Buffer section showed Zend OPcache → Yes.
   

This confirms availability in that PHP installation. It is not a measurement of cache hit rate on your live website. Our Install extensions list did not offer a separate OPcache Install row, so there was no reason to search for another package or reinstall PHP.

3. Compare CLI and PHP-FPM settings
In the aaPanel Terminal, these read-only commands show selected configuration fields. They do not save settings or restart services. They use awk to filter the otherwise lengthy PHP information output.

Command-line PHP:
Code:
/www/server/php/85/bin/php -i | awk '/^(PHP Version =>|Server API =>|Loaded Configuration File =>|Opcode Caching =>|opcache.enable =>|opcache.enable_cli =>)/ {print}'
Look for Server API, Loaded Configuration File, Opcode Caching, opcache.enable and opcache.enable_cli.

PHP-FPM configuration:
Code:
/www/server/php/85/sbin/php-fpm -i | awk '/^(PHP Version =>|Server API =>|Loaded Configuration File =>|Opcode Caching =>|opcache.enable =>|opcache.enable_cli =>|opcache.memory_consumption =>|opcache.validate_timestamps =>|opcache.revalidate_freq =>|opcache.max_accelerated_files =>)/ {print}'
The php-fpm -i command inspects the FPM executable and its loaded configuration. It does not send a web request to your site's running worker pool. Per-pool overrides or application restrictions may still affect that site, so this is a configuration check rather than live traffic monitoring.

Our results:
  • CLI used /www/server/php/85/etc/php-cli.ini. Opcode Caching was Disabled, with opcache.enable_cli Off.
  • FPM used /www/server/php/85/etc/php.ini. Opcode Caching was Up and Running, with opcache.enable On.
  • The FPM settings reported 128 MB for OPcache memory, 10,000 maximum accelerated files, timestamp validation On and a 2-second revalidation interval.
   

The screenshot uses an equivalent filtered read-only check; we also ran the exact command examples above. These numbers describe our lab, not a tuning prescription for every server.

4. Interpret the result before changing anything
  • Zend OPcache Yes, CLI caching Disabled: this can be normal when opcache.enable_cli is Off. It does not by itself mean website caching is off.
  • FPM configuration shows opcache.enable On: OPcache is enabled in that configuration. Check the actual application through an authenticated monitoring method if you need hit-rate or memory-usage data.
  • Wrong PHP version or configuration file: return to the site's PHP version setting and use the matching binary.
  • OPcache unavailable: inspect the extension/build options for your PHP version. Do not paste an opcache.so path copied from a different server or PHP version.

Why we did not increase the cache memory
The lab already had OPcache enabled, and we had no workload evidence of a full cache. A larger memory allocation consumes server memory and is not automatically faster. Measure actual application workload before tuning.

Keep timestamp validation appropriate to your deployment process. Turning it off without a reliable cache reset/reload process can leave old PHP code in use after an update. Do not copy old options such as opcache.fast_shutdown into modern PHP settings; PHP removed that directive in 7.2.

Do not leave a public phpinfo page behind
The authenticated panel summary and filtered terminal checks were enough for this guide. We did not publish a phpinfo.php file or install a public cache dashboard. Detailed diagnostics can expose configuration information, so use an authenticated method for ongoing monitoring.

What was verified
The panel reported Zend OPcache available, CLI and FPM loaded different configuration files, and the FPM configuration reported caching enabled. We did not benchmark speed, measure the live worker pool's hit rate or test disabling/re-enabling OPcache.

References: PHP OPcache installation and PHP OPcache configuration. Screenshots are original AdminsForum lab captures.
DEV 10-12-2026, 04:32 PM Read thread
aaPanel WordPress Guides

Set WordPress Permalinks in aaPanel and Check Nginx Rewrite Rules

Quick answer
For a new WordPress website, open Settings → Permalinks, choose Post name and click Save Changes. Then open an actual published post. On Nginx, the site also needs a WordPress routing rule so URLs such as /hello-world/ reach index.php.

This walkthrough was tested on our isolated AdminsForum lab on 12 October 2026: aaPanel 8.0.6, Nginx 1.30.5, PHP 8.5 and WordPress 7.1.3. We changed Plain to Post name and opened the resulting published post successfully. The required rewrite rule was already present; we inspected it rather than replacing a working configuration.

Before you start
  • WordPress must already be installed and accessible over HTTPS. See our WP Toolkit installation guide.
  • Sign in as a WordPress administrator. The aaPanel account and WordPress account are separate.
  • Have a current files-and-database backup. See our backup guide.
  • For an established site, plan redirects from existing URLs before changing the structure. Do this on staging first; existing bookmarks and external links can depend on the old URLs.

1. Open the permalink settings
In the WordPress dashboard, expand Settings and click Permalinks. Our fresh installation used Plain, which creates a URL such as https://example.com/?p=123.

Choose Post name for the /sample-post/ structure. The Custom Structure field should show
Code:
/%postname%/
Do not enter the whole domain in that field. Leave Category base and Tag base alone unless you are deliberately changing archive URLs.

The screenshot shows the resulting saved configuration: marker 1 identifies Permalinks, marker 2 identifies Post name and marker 3 identifies the confirmation message.
   

2. Save and check the confirmation
Scroll to the bottom and click Save Changes. Wait for Permalink structure updated. Reload this settings page and confirm Post name remains selected. Selecting the radio button without saving does not update the site.
   

3. Check the Nginx routing in aaPanel
For a site created through WP Toolkit, go to WP Toolkit → your website → Modify → Config → URL rewrite. For a manually created PHP site, open that website's configuration under Website and look for URL rewrite.

Our root-installed WordPress site used this working rule:
Code:
location / {     try_files $uri $uri/ /index.php?$args; } rewrite /wp-admin$ $scheme://$host$uri/ permanent;
The try_files line serves real files/directories first and sends other requests to WordPress's index.php, preserving the query string. The wp-admin rule adds the trailing slash to that administration URL.


Keep an already working rule. If yours is missing and pretty URLs return 404, first save a copy of the existing rule, then use the WordPress template offered by your aaPanel installation for the correct web server and site layout. Review it before saving. Do not paste a second location / block into a configuration that already has one. A WordPress installation in a subdirectory needs rules for that layout; the root-site example above is not a universal replacement.

Nginx does not read Apache .htaccess rules. If you run Apache or OpenLiteSpeed, use the configuration appropriate to that server rather than pasting this Nginx block. This tutorial tested Nginx only.

4. Test real content, not just the homepage
Open the public homepage and click the title of a published post. In our lab, Hello world! changed to
Code:
https://wp.adminslab.com/hello-world/
and opened with its content and comments intact.
   

Also open a published page, such as Sample Page, directly from the navigation. Test in a logged-out/private window and refresh a deep URL directly. A working homepage alone does not prove that rewritten URLs work.

If you get a 404
  • Homepage works, every pretty URL fails: check the web-server rewrite rule and whether it belongs to the same domain/site root you changed.
  • Only one URL fails: check its actual slug, publication status and copied URL. A draft page is not a public page.
  • Changes look stale: clear any relevant page cache/CDN cache, then retest the exact URL.
  • The panel refuses the configuration: restore the saved rule and inspect the error; do not repeatedly add duplicate blocks.
For a new test site, selecting Plain again and saving can help distinguish a rewrite problem from an application problem. On a live site, use your rollback plan so a second URL change does not add confusion.

Does this guarantee better Google rankings?
No. Readable URLs help visitors understand links, but rankings still depend on useful content, indexing and the rest of the site. Avoid repeated permalink changes just to chase SEO.

Our verified result
Post name saved successfully; /hello-world/ opened the published post; the Nginx WordPress rule was visible in aaPanel. We did not simulate a broken rule or test an Apache/OpenLiteSpeed migration in this walkthrough.

Reference: WordPress permalink documentation. Screenshots are original AdminsForum lab captures.
DEV 10-12-2026, 04:25 PM Read thread
aaPanel PHP & Extensions Guides

Install PHP Imagick in aaPanel and Verify WordPress Detects It

How do you install Imagick for WordPress on aaPanel?
Confirm the PHP version used by your website. In aaPanel’s App Store, open that PHP version’s Setting → Install extensions and install the row named imagemagick. Wait for compilation to complete, then verify WordPress Site Health → Info → Server reports the Imagick library as available.

We tested this on aaPanel 8.0.6 Free Edition with PHP 8.5.11 and WordPress 7.1.3. The panel installed Imagick 3.8.1. WordPress detected it, and a separate command-line test created a 64 × 64 image, resized it to 32 × 32 and encoded a PNG successfully.

Imagick and ImageMagick are related but different names
ImageMagick is the underlying image-processing library/toolset. Imagick is the PHP extension that exposes its functionality to PHP applications. Our aaPanel extension row was named imagemagick, while WordPress referred to the missing PHP module as imagick. Installing the operating system’s command-line image tool alone is not proof that the website’s PHP runtime has its extension loaded.

1. Confirm the WordPress warning
Open WordPress → Tools → Site Health, let the checks finish and expand the missing-module recommendation. After our earlier EXIF installation, the remaining optional-module warning named imagick.

   
The remaining Imagick warning before installation.

Optional-module advice is different from a fatal website error. Install the extension for a clear requirement and verify it afterward; do not assume every warning needs a broad server reconfiguration.

2. Check the website’s PHP version
Use Site Health → Info → Server to read the actual PHP version, or verify the site’s PHP selection in aaPanel. Our site used PHP 8.5.11. The server also had PHP 8.4, so we deliberately selected the 8.5 manager.

Take a current backup and choose an appropriate maintenance period on a live server. A PHP extension installation may reload or restart that PHP version’s service and affect other sites using it.

3. Install the matching extension
In aaPanel select App Store → Installed. Find PHP-8.5 for this example and choose Setting. Open Install extensions.

Locate imagemagick, described in our list as Imagick High Performance Graphics Library. Click Install in that row and confirm Install【imagemagick】 after checking the PHP version and extension name.

The row displayed Installing while the job ran. Compilation takes time; do not submit duplicate installs or judge success from a pending status. Read the installation task/log if it fails or stops progressing.

4. Confirm the installed state
After the job finished, we reopened the PHP manager and extension list. The imagemagick row offered Uninstall, showing that the installed module was recognised by the panel.

   
The refreshed PHP 8.5 extension list after installation.

If a refresh briefly leaves the table blank, reopen the manager after the task has completed. Do not treat an empty table as proof of either success or failure.

5. Verify WordPress uses it
Return to WordPress Site Health and let the checks complete. In our test, the missing-module recommendation disappeared. We then opened Info → Server and checked Is the Imagick library available?. It reported Yes.

   
WordPress’s own runtime reports that Imagick is available on PHP 8.5.11.

A command-line check alone is not enough if CLI and the website use different PHP configurations. WordPress’s result confirms availability to the website. Our remaining recommendations concerned inactive plugins/themes; this installation does not claim to fix unrelated maintenance findings.

6. Verify a basic image operation
We also ran a small private command-line test with the exact aaPanel PHP binary. It reported EXIF loaded, Imagick loaded and extension version 3.8.1. It created and resized a test image, then produced a non-empty PNG blob.

   
Our functional test returned 32 × 32 pixels and 160 PNG bytes.

For administrators who want a basic version-specific availability check:
Code:
/www/server/php/85/bin/php -r 'echo extension_loaded("imagick") ? "Imagick loaded " : "Imagick missing ";'
Use the correct path for your installed PHP version. The test was performed privately in the terminal; we did not leave a public phpinfo or diagnostic script on the website.

A small PNG test does not prove that every image type, large upload, PDF delegate or animation workflow works. Verify the formats and operations your application actually needs.

Troubleshooting
  • Installed in panel but WordPress still says missing: compare the website’s selected PHP version and loaded configuration with the version you changed.
  • Compilation fails: inspect the actual build error, dependencies, memory/disk availability and source connectivity before retrying.
  • Imagick loads but a format fails: review support and policy for that specific operation. Do not broadly disable ImageMagick security policies just to suppress an error.
  • WordPress image upload still fails: check the upload limit, file type, permissions and exact application error. Imagick availability does not resolve every media problem.

Verified outcome
The panel recognised imagemagick as installed, WordPress reported Imagick available and the private image resize/PNG test passed. EXIF stayed loaded. No other PHP version was changed, and no public diagnostic endpoint was created.

References: PHP Imagick manual, our EXIF guide and our Site Health guide. Screenshots and tests are from the AdminsForum lab.
DEV 10-12-2026, 03:33 PM Read thread
aaPanel WordPress Guides

Set a WordPress Featured Image on an aaPanel Website

How do you set a featured image in WordPress?
Open the page or post editor, select the Page or Post settings tab and click Set featured image. Choose an image from Media Library, confirm the selection, then save the content and preview it. Where it appears depends on the theme and template.

We tested this on the draft page created in our page-and-preview walkthrough. The aaPanel-hosted lab runs WordPress 7.1.3 with the Twenty Twenty-Five theme. The image selection persisted after reloading the editor and appeared in the draft preview.

Featured image versus an Image block
A featured image is associated with the page or post as a whole. Themes may display it in a header, article card or another template location. An Image block places a picture at a specific position inside the content.

Selecting a featured image does not automatically insert an Image block into your paragraph. It also does not guarantee that your SEO plugin will use it as the social-sharing image. Review the theme and any SEO/sharing settings separately.

1. Open the content editor
In WordPress choose Pages → All Pages or Posts → All Posts, then Edit the correct item. We used our saved About-this-website draft rather than changing a published page.

If the settings sidebar is closed, use Settings in the editor’s top bar. Select the Page or Post tab instead of Block. In our page editor the sidebar offered Set featured image.

2. Choose an existing image
Click Set featured image. The Featured image dialog offers Upload files and Media Library. We chose Media Library because the demonstration image was already uploaded.

Select the exact image. Check its title, thumbnail and attachment information before confirming. If your library is large, use Search media and the date/type filters to locate the intended item.

   
Our selected AdminsForum image in the Featured image dialog.

For uploading a new item, follow our WordPress media-upload guide. Review screenshots for private information before uploading, and only publish images you are allowed to use.

3. Set the featured image
Click Set featured image in the dialog. The dialog closes and the editor sidebar should show a thumbnail plus Replace and Remove controls.

Our image already had useful alternative text saved in Media Library. Review image descriptions for the context in which the picture is used. Avoid using a keyword list as alternative text.

4. Save and verify persistence
Click Save draft when editing a draft. Wait for the save to finish. For existing public content the save control may differ; review what action it will perform before submitting.

Reload or reopen the editor after saving. We verified that the selected image remained associated with the draft after the editor reloaded.

   
The saved editor shows the featured image and keeps the page status as Draft.

An image visible immediately after selection is not proof that it was saved. Confirm the saved state and reopen the editor when you need to be certain.

5. Preview the page in its theme
Use View → Preview in new tab. Inspect where the theme places the image, how it scales and whether the crop is suitable for the page. Check the layout on relevant screen sizes before publishing.

   
Our Twenty Twenty-Five draft preview displayed the selected featured image.

Other themes or templates may not display a featured image in the same location—or may not display it at all. If it is saved but absent from the page, inspect the template before assuming the upload failed.

The preview is not the same as publishing. Our demonstration page stayed a draft. The uploaded image itself already had a direct file URL; draft content should not be treated as private file storage.

6. Replace or remove the association
The sidebar exposes Replace and Remove controls. Replace lets you choose another featured image. Remove clears its association with this item; it is different from deleting the file from Media Library.

We did not test those removal actions in this walkthrough. Before deleting a media file, check whether other pages use it. Deleting the shared file can affect more than one content item.

Troubleshooting
  • No Set featured image control: confirm that the document settings tab is selected, and check whether your theme/content type supports featured images.
  • Selection disappears after reload: inspect whether the save completed, whether the session expired and whether the editor reported an error.
  • Image saved but not shown in preview: review the theme’s page/post template and cache behavior.
  • Image crop is unsuitable: choose artwork that fits the template’s display area and inspect the actual preview before publication.
  • Social preview still uses another image: check your SEO/sharing configuration separately; featured-image selection alone does not verify Open Graph output.

Verified result
We selected an existing media item, assigned it as the featured image, saved the draft, verified the selection after reloading and confirmed the image in the theme preview. We did not publish the lab page, replace/delete the attachment or verify social-sharing metadata for that WordPress page.

Screenshots and results are from our own AdminsForum lab.
DEV 10-12-2026, 12:50 PM Read thread