



Quick answer
aaPanel's Multi-WebServer Hosting can run Nginx, Apache and OpenLiteSpeed on the same server, with a per-website engine choice. Enable it through the Nginx manager, wait for all services to run, then change one test website's Web Server setting and verify the application before switching anything else.
This is a tested installation walkthrough, not just a list of options. On our isolated Ubuntu 22.04 lab with aaPanel 8.0.6, we enabled the feature, brought all three services to Running, switched a WordPress site from Nginx to Nginx + Apache, opened its content/dashboard/media, and used Rollback to return to Nginx. The original Nginx installation remained 1.30.5 and the WordPress site used PHP 8.5.
1. Prepare a backup and a return path
This is a server-wide service change. On a production machine, back up the files, databases and relevant configuration for every affected website, and arrange a maintenance window. A provider snapshot is useful, but it does not replace a verified recovery plan.
Our disposable lab had a current full WordPress backup and private copies of the vhost, Nginx and PHP configuration plus the panel database. The Nginx configuration test passed before installation. See how to create a WordPress backup and how to verify what that backup proves.
Review custom master/vhost configuration before enabling the feature. The panel warns about manually modified service configuration and ports. Preserve the aaPanel marker comments and do not blindly uninstall a working web server to get past a warning. Resolve custom configuration compatibility in a lab first.
2. Open Multi-WebServer Hosting
Open the Nginx manager. In our lab, we reached it from WP Toolkit → the Nginx service button. You can also open the installed Nginx settings from App Store. On the manager's Service page, find Multi-WebServer Hosting and turn it on.
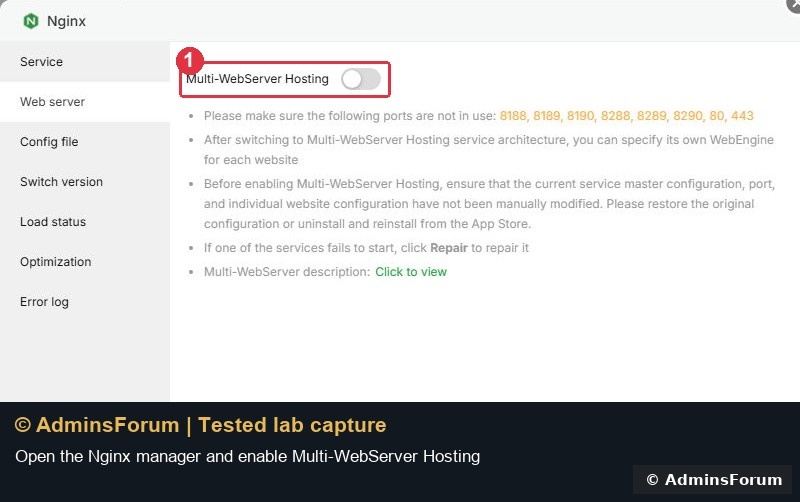
Before doing so, inspect port conflicts. Our target backend ports were unused, while the existing Nginx service correctly owned the public HTTP/HTTPS listeners. Record which process owns a port rather than treating a list of numbers as a reason to stop everything.
3. Review the installer and wait for completion
The panel opened Enable multiple services with Apache and OpenLiteSpeed choices and Quick install/Compiled methods. We used Quick install from aaPanel's official installer and clicked Confirm. The screenshot shows the OpenLiteSpeed selector expanded.
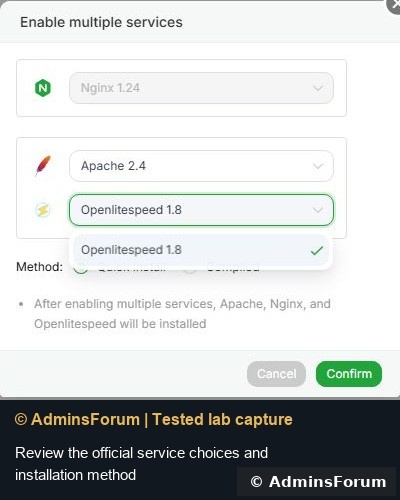
The disabled Nginx selector displayed a default label in this build; our already installed Nginx remained 1.30.5. Check actual installed versions afterward rather than assuming every label in an installer dialog is the resulting installed version.
The Messages Box queued Install[apache-2.4] and Install[openlitespeed-1.8]. Wait until the queue finishes. Do not keep clicking Confirm or restart the panel merely because a download takes time.
4. Confirm service health
After the queue finished, our panel initially showed Apache stopped. We used the Apache row's Repair action, then reopened the manager. All three services showed Running. Nginx and Apache configuration tests passed, and the expected backend listeners were present.
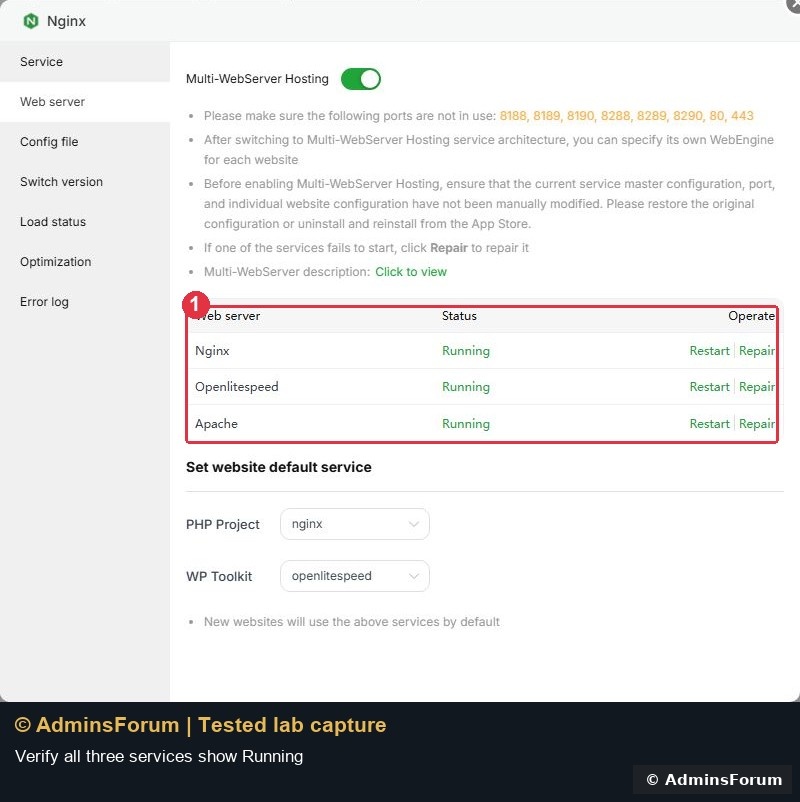
If a service remains stopped, inspect the installation result, configuration test and relevant error log before retrying. A green Multi-WebServer switch by itself is not proof that every service started.
The panel also displayed defaults for new websites: PHP Project used nginx, while WP Toolkit used openlitespeed. These defaults are different from the engine already used by an existing website. We kept the existing WordPress site's engine unchanged until the deliberate test below.
Keep backend ports private
In our lab, Nginx remained the public front end on HTTP/HTTPS. Apache listened on its backend ports and OpenLiteSpeed had separate backend/admin listeners. Before installation, we preserved UFW rules and added restrictive rules for 7080/tcp, 8188:8190/tcp and 8288:8290/tcp. After installation, those deny rules remained in effect for IPv4 and IPv6; the existing SSH, panel and HTTP/HTTPS rules were retained.
Do not expose backend or administration ports merely because they appear in an architecture diagram. If you deliberately need remote backend access, design access restrictions for that purpose. Our test only needed local proxy-to-backend connections.
5. Switch one compatible test website
Open WP Toolkit → your website → Modify → Web Server. The same type of per-site setting is available from a PHP website's configuration.
Confirm the current engine first. Our site showed Current: Nginx. Choose Nginx + Apache from Web Server and click Save. Read the Switching Services confirmation: the application must support Apache, original engine configuration can change, rewrite compatibility matters and subdirectory bindings may need attention.
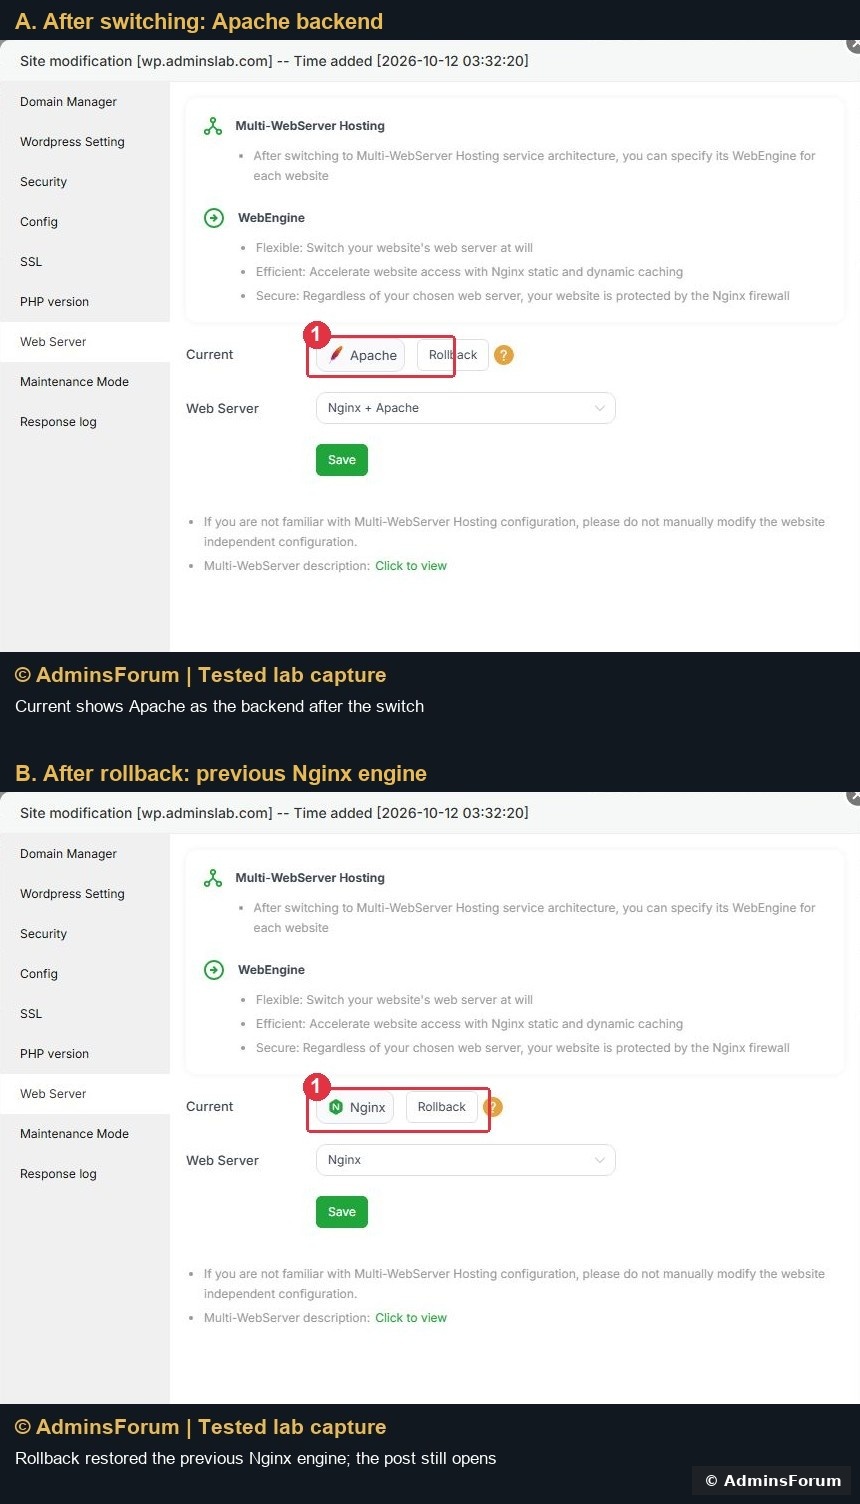
We tested a root-installed WordPress site with its backup already preserved. After confirming, Current showed Apache, while the selection showed Nginx + Apache. The Current badge names the backend; Nginx remains in front in this mode.
The combined capture below shows A: the Apache backend after switching, and B: the Nginx result after the rollback tested in step 7.
For an application that relies on special rewrite rules, Apache modules, a custom proxy or a subdirectory, test that layout before applying the change to live traffic. Installing the server does not automatically establish that every application's rules are compatible.
6. Test more than the homepage
After switching, we opened: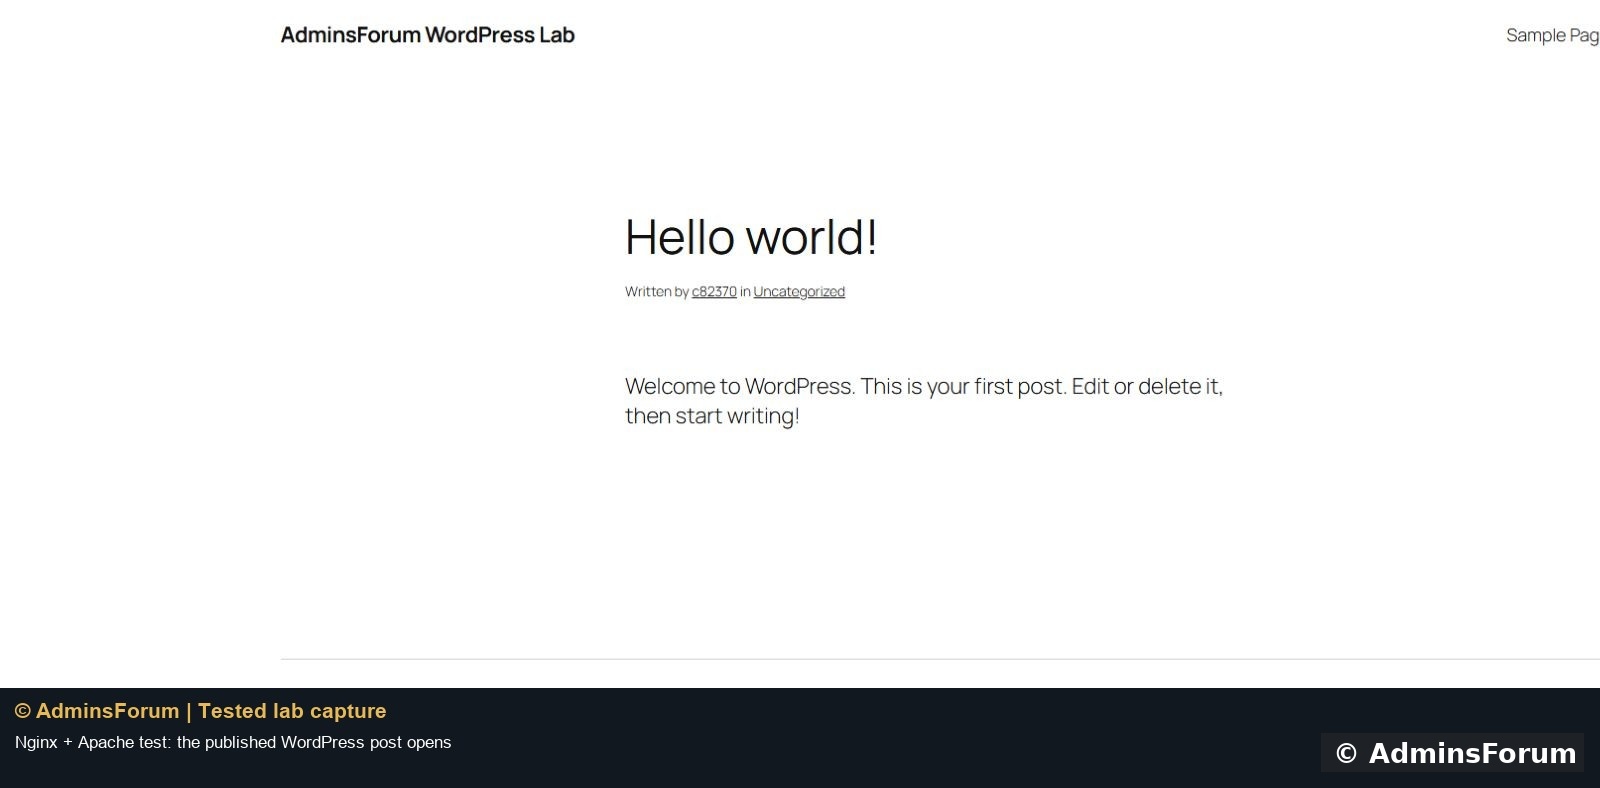
The main lab website and Roundcube login page also loaded after the global installation. Loading webmail is an HTTP check; it does not prove SMTP delivery or every mail function was retested.
On your own site, also test a logged-out session, forms, application logs and important workflows. Keep secrets out of diagnostic screenshots. A successful public homepage is not a complete compatibility test.
7. Test rollback before relying on it
In the same website's Web Server setting, click Rollback and read the confirmation asking whether to return to the previous service. We confirmed it and the site's Current badge returned to Nginx. The /hello-world/ post still opened afterward.
This changed the website back to its previous engine; it did not disable the server-wide Multi-WebServer feature or perform a files/database backup restore. The lower half of the switch-and-rollback screenshot above shows the completed rollback result.
PHP on OpenLiteSpeed is a separate setup
We tested the Nginx + Apache path in this walkthrough. OpenLiteSpeed uses lsphp rather than the normal aaPanel PHP-FPM installation. Before switching a website to the OpenLiteSpeed backend, check its actual PHP version and extensions in the OpenLiteSpeed manager. Extensions installed for /www/server/php/85 are not proof that the separate lsphp runtime has them.
What we verified
All three services ran; Nginx and Apache configuration checks passed; backend/admin firewall restrictions remained; WordPress content, dashboard and an uploaded image worked on the Apache backend; native rollback returned that site to Nginx and its post still loaded. We did not switch the site to OpenLiteSpeed or run performance benchmarks in this guide.
Reference: aaPanel Multi-WebServer documentation. All screenshots are original AdminsForum lab captures.
aaPanel's Multi-WebServer Hosting can run Nginx, Apache and OpenLiteSpeed on the same server, with a per-website engine choice. Enable it through the Nginx manager, wait for all services to run, then change one test website's Web Server setting and verify the application before switching anything else.
This is a tested installation walkthrough, not just a list of options. On our isolated Ubuntu 22.04 lab with aaPanel 8.0.6, we enabled the feature, brought all three services to Running, switched a WordPress site from Nginx to Nginx + Apache, opened its content/dashboard/media, and used Rollback to return to Nginx. The original Nginx installation remained 1.30.5 and the WordPress site used PHP 8.5.
1. Prepare a backup and a return path
This is a server-wide service change. On a production machine, back up the files, databases and relevant configuration for every affected website, and arrange a maintenance window. A provider snapshot is useful, but it does not replace a verified recovery plan.
Our disposable lab had a current full WordPress backup and private copies of the vhost, Nginx and PHP configuration plus the panel database. The Nginx configuration test passed before installation. See how to create a WordPress backup and how to verify what that backup proves.
Review custom master/vhost configuration before enabling the feature. The panel warns about manually modified service configuration and ports. Preserve the aaPanel marker comments and do not blindly uninstall a working web server to get past a warning. Resolve custom configuration compatibility in a lab first.
2. Open Multi-WebServer Hosting
Open the Nginx manager. In our lab, we reached it from WP Toolkit → the Nginx service button. You can also open the installed Nginx settings from App Store. On the manager's Service page, find Multi-WebServer Hosting and turn it on.
Before doing so, inspect port conflicts. Our target backend ports were unused, while the existing Nginx service correctly owned the public HTTP/HTTPS listeners. Record which process owns a port rather than treating a list of numbers as a reason to stop everything.
3. Review the installer and wait for completion
The panel opened Enable multiple services with Apache and OpenLiteSpeed choices and Quick install/Compiled methods. We used Quick install from aaPanel's official installer and clicked Confirm. The screenshot shows the OpenLiteSpeed selector expanded.
The disabled Nginx selector displayed a default label in this build; our already installed Nginx remained 1.30.5. Check actual installed versions afterward rather than assuming every label in an installer dialog is the resulting installed version.
The Messages Box queued Install[apache-2.4] and Install[openlitespeed-1.8]. Wait until the queue finishes. Do not keep clicking Confirm or restart the panel merely because a download takes time.
4. Confirm service health
After the queue finished, our panel initially showed Apache stopped. We used the Apache row's Repair action, then reopened the manager. All three services showed Running. Nginx and Apache configuration tests passed, and the expected backend listeners were present.
If a service remains stopped, inspect the installation result, configuration test and relevant error log before retrying. A green Multi-WebServer switch by itself is not proof that every service started.
The panel also displayed defaults for new websites: PHP Project used nginx, while WP Toolkit used openlitespeed. These defaults are different from the engine already used by an existing website. We kept the existing WordPress site's engine unchanged until the deliberate test below.
Keep backend ports private
In our lab, Nginx remained the public front end on HTTP/HTTPS. Apache listened on its backend ports and OpenLiteSpeed had separate backend/admin listeners. Before installation, we preserved UFW rules and added restrictive rules for 7080/tcp, 8188:8190/tcp and 8288:8290/tcp. After installation, those deny rules remained in effect for IPv4 and IPv6; the existing SSH, panel and HTTP/HTTPS rules were retained.
Do not expose backend or administration ports merely because they appear in an architecture diagram. If you deliberately need remote backend access, design access restrictions for that purpose. Our test only needed local proxy-to-backend connections.
5. Switch one compatible test website
Open WP Toolkit → your website → Modify → Web Server. The same type of per-site setting is available from a PHP website's configuration.
Confirm the current engine first. Our site showed Current: Nginx. Choose Nginx + Apache from Web Server and click Save. Read the Switching Services confirmation: the application must support Apache, original engine configuration can change, rewrite compatibility matters and subdirectory bindings may need attention.
We tested a root-installed WordPress site with its backup already preserved. After confirming, Current showed Apache, while the selection showed Nginx + Apache. The Current badge names the backend; Nginx remains in front in this mode.
The combined capture below shows A: the Apache backend after switching, and B: the Nginx result after the rollback tested in step 7.
For an application that relies on special rewrite rules, Apache modules, a custom proxy or a subdirectory, test that layout before applying the change to live traffic. Installing the server does not automatically establish that every application's rules are compatible.
6. Test more than the homepage
After switching, we opened:
- The published WordPress post at /hello-world/.
- The published Sample Page using its readable URL.
- The WordPress administration dashboard with the existing session.
- An uploaded JPEG, which loaded at its original 1912-pixel width.
The main lab website and Roundcube login page also loaded after the global installation. Loading webmail is an HTTP check; it does not prove SMTP delivery or every mail function was retested.
On your own site, also test a logged-out session, forms, application logs and important workflows. Keep secrets out of diagnostic screenshots. A successful public homepage is not a complete compatibility test.
7. Test rollback before relying on it
In the same website's Web Server setting, click Rollback and read the confirmation asking whether to return to the previous service. We confirmed it and the site's Current badge returned to Nginx. The /hello-world/ post still opened afterward.
This changed the website back to its previous engine; it did not disable the server-wide Multi-WebServer feature or perform a files/database backup restore. The lower half of the switch-and-rollback screenshot above shows the completed rollback result.
PHP on OpenLiteSpeed is a separate setup
We tested the Nginx + Apache path in this walkthrough. OpenLiteSpeed uses lsphp rather than the normal aaPanel PHP-FPM installation. Before switching a website to the OpenLiteSpeed backend, check its actual PHP version and extensions in the OpenLiteSpeed manager. Extensions installed for /www/server/php/85 are not proof that the separate lsphp runtime has them.
What we verified
All three services ran; Nginx and Apache configuration checks passed; backend/admin firewall restrictions remained; WordPress content, dashboard and an uploaded image worked on the Apache backend; native rollback returned that site to Nginx and its post still loaded. We did not switch the site to OpenLiteSpeed or run performance benchmarks in this guide.
Reference: aaPanel Multi-WebServer documentation. All screenshots are original AdminsForum lab captures.