



10-12-2026, 06:56 PM
Quick answer
In aaPanel WP Toolkit, open the website's Modify → Web Server page, select Nginx + Openlitespeed and save the switch. Then check the actual WordPress PHP SAPI, a published post, a page and a fresh upload. Keep a verified return path: the panel's Current badge alone does not prove that the running website has changed engines.
We tested this on our isolated Ubuntu 22.04 lab with aaPanel 8.0.6, Nginx 1.30.5, OpenLiteSpeed 1.8.5 and PHP 8.5.11 on 12 October 2026. We also tested native Rollback and the follow-up Nginx reload needed in this installation.
1. Prepare the installation and backup
Enable and verify Multi-WebServer Hosting first. Follow the installation guide rather than uninstalling a working Nginx server. Confirm Nginx and OpenLiteSpeed are running.
Preserve website files, database and web-server/PHP configuration. Our lab had a current full WP Toolkit archive plus a private configuration copy. A backup archive's existence is not proof that its restore function works; see the backup verification guide. On a live site, use a maintenance window and a tested recovery plan.
Record the original engine and PHP version. Our original engine was Nginx. Keep internal backend and OpenLiteSpeed administration ports private; this walkthrough does not require exposing them publicly.
2. Check the separate OpenLiteSpeed PHP runtime
OpenLiteSpeed uses lsphp, separate from aaPanel's regular PHP-FPM installation. A PHP extension installed for PHP-FPM may be missing from lsphp. Follow the lsphp runtime checks and install application requirements in the correct version.
We installed and functionally tested Imagick for lsphp 8.5 before switching. See the Imagick walkthrough. Avoid changing PHP major versions and web-server engines together on a production website; separate changes make failures easier to diagnose.
3. Select and save the website's engine
Open WP Toolkit, find the intended domain and click Modify. Choose Web Server in its side menu. Wait for the saved website configuration to load before reading the selector; a temporary form value during loading is not the saved engine.
Choose Nginx + Openlitespeed, confirm the selector shows that choice, and click Save. Review the Switching Services confirmation, then Confirm. Wait for the operation to finish. Reopen or refresh the modification view if necessary.
Our saved view showed Current: Openlitespeed and Web Server: Nginx + Openlitespeed.
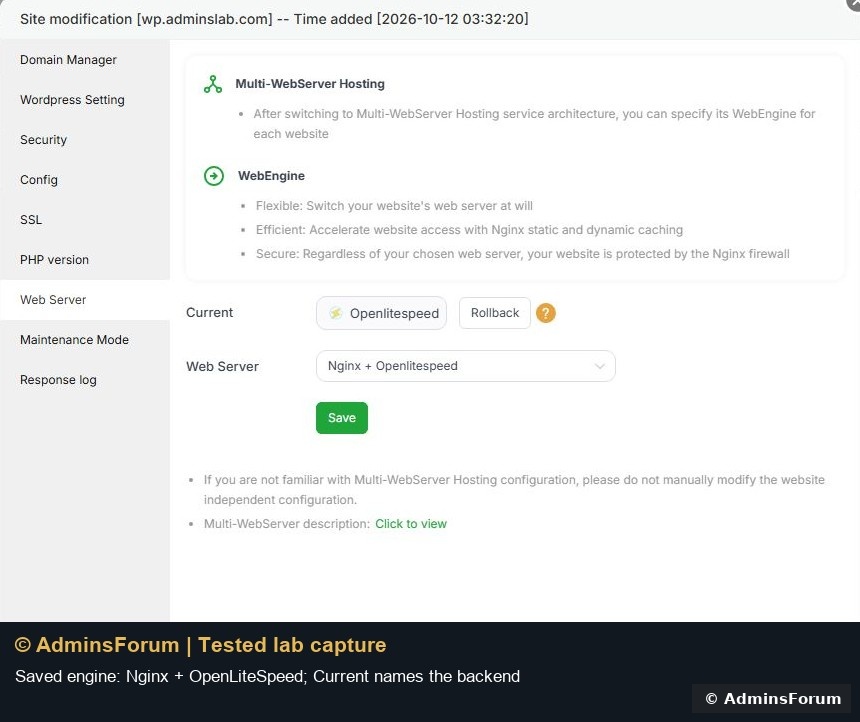
Nginx remains the public front end in this architecture. Seeing Server: nginx in an HTTP response does not by itself disprove an OpenLiteSpeed backend.
4. Verify the application-side runtime
Sign in to WordPress and open Tools → Site Health → Info. Expand Server. Our actual request reported Web server: LiteSpeed, PHP version: 8.5.11, PHP SAPI: litespeed and Imagick: Yes.
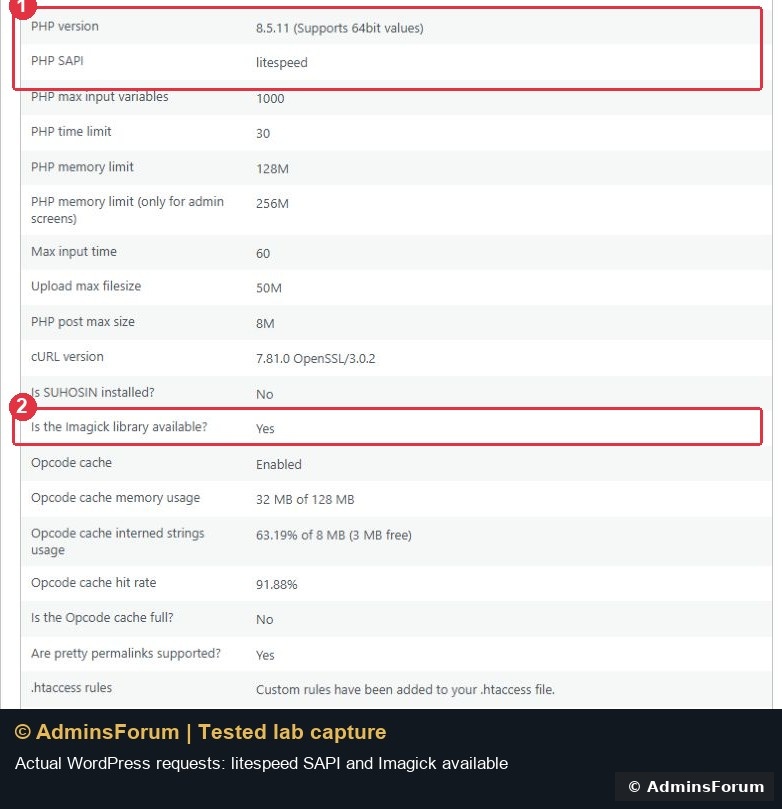
Check upload_max_filesize and post_max_size as well. The effective upload limit can be lower than either value shown elsewhere. Our OpenLiteSpeed WordPress upload page allowed 8 MB because post_max_size was 8M, although upload_max_filesize was 50M. We did not change these limits during the engine test.
5. Test the website's normal workflows
Open the homepage, a published post and a standalone page over HTTPS. We opened /hello-world/ and /sample-page/ successfully with Post name permalinks. Check for a complete rendered page, not only a successful connection.
Next, open Media → Add Media File and upload a small original test image. We uploaded an 800 × 554 branded JPEG, saved its alternative text/title, then opened the public HTTPS image successfully. This tests a fresh upload rather than only an old cached image.
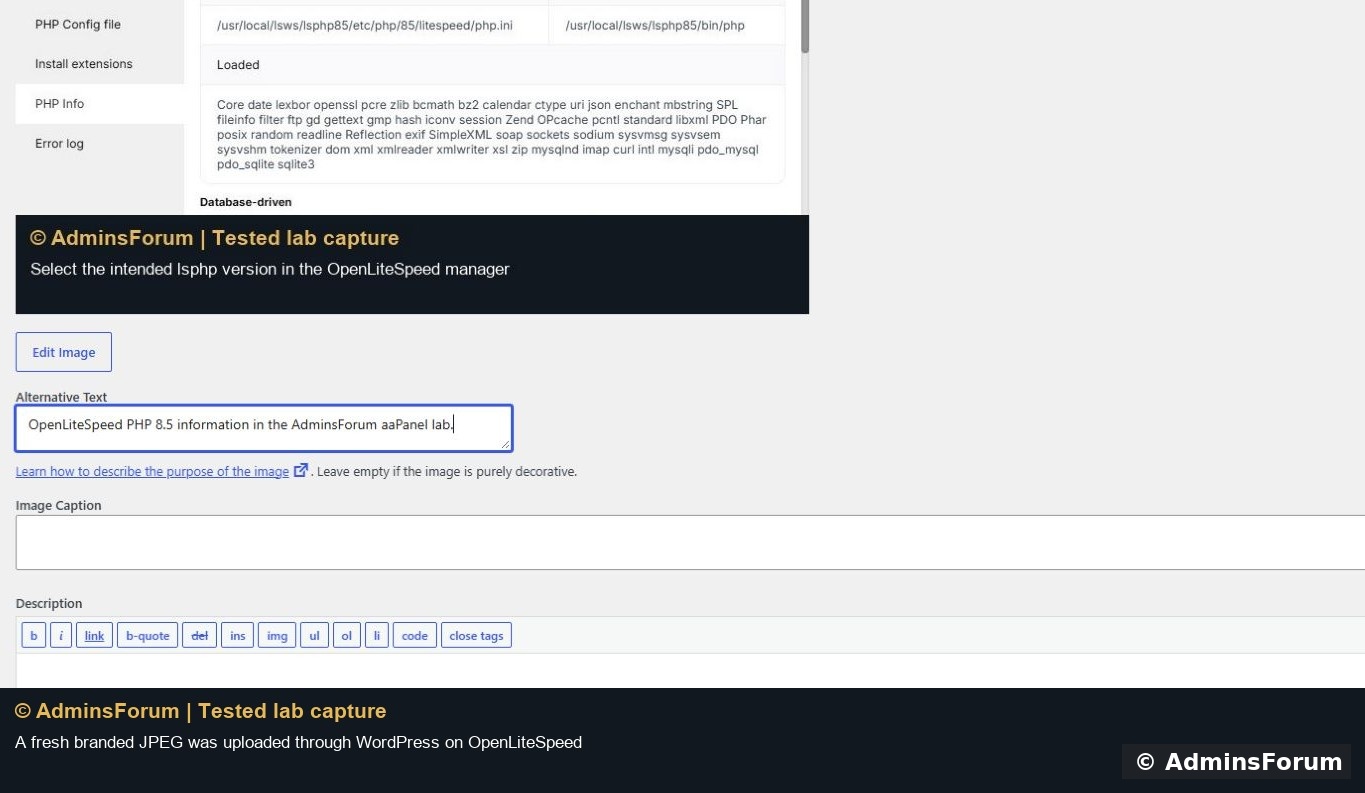
Also open the dashboard and relevant application settings. For a shop or member site, separately test login, cart/checkout and private pages before deploying this change.
6. Test return to the original engine
Before returning to Nginx, we turned LiteSpeed Cache's Enable Cache OFF and deactivated the test plugin. Keep the old configuration and backup; do not remove OpenLiteSpeed just to switch one site back.
Reopen WP Toolkit → Modify → Web Server, click Rollback and confirm the return to the previous service. Our panel then showed Current: Nginx and selected Nginx.
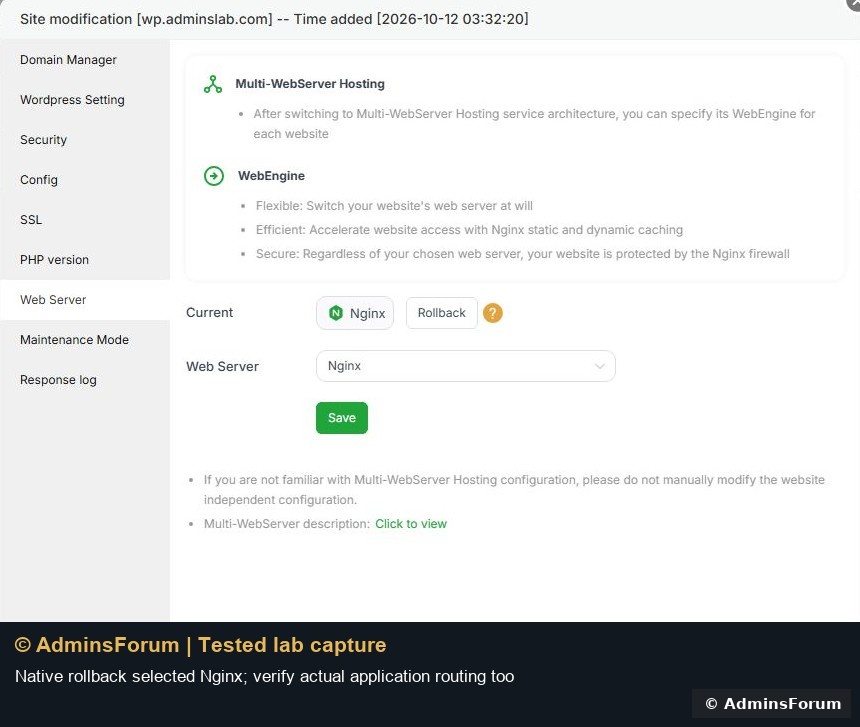
Important result from our lab: the panel badge changed before WordPress stopped reporting the LiteSpeed handler. We checked the restored Nginx routing and ran its configuration test successfully. We then used App Store → installed Nginx → Setting → Service → Reload and confirmed the reload. This applies the valid configuration without stopping the server. If a configuration test fails, fix it before reloading; do not repeatedly restart services or overwrite custom rules blindly.
After a fresh Site Health request, WordPress reported nginx/1.30.5 and PHP SAPI: fpm-fcgi. Imagick remained available. The screenshot below shows the restored PHP-FPM handler.
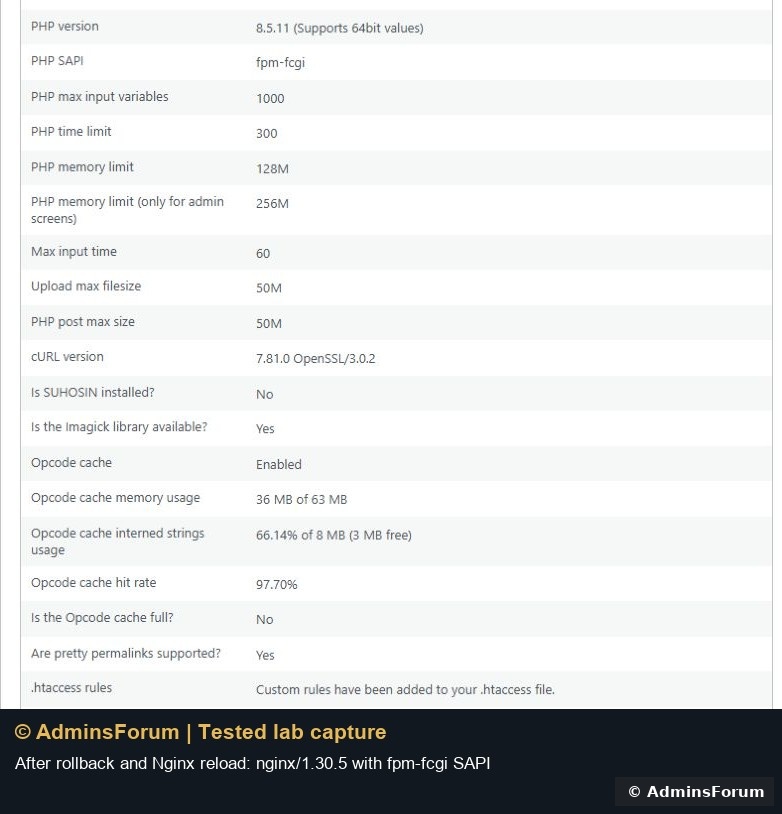
We reopened the published post, Sample Page and uploaded HTTPS image successfully. This is the evidence for a working return path, beyond a panel success message.
If a check fails
Our verified result
WordPress content, dashboard and a fresh image upload worked on OpenLiteSpeed. Native Rollback followed by a validated Nginx reload restored PHP-FPM, and the content/media checks passed again. The lab is left on Nginx with the test cache plugin inactive. This is a functionality test, not a performance benchmark.
Reference: aaPanel Multi-WebServer Hosting documentation. All screenshots are original © AdminsForum lab captures.
In aaPanel WP Toolkit, open the website's Modify → Web Server page, select Nginx + Openlitespeed and save the switch. Then check the actual WordPress PHP SAPI, a published post, a page and a fresh upload. Keep a verified return path: the panel's Current badge alone does not prove that the running website has changed engines.
We tested this on our isolated Ubuntu 22.04 lab with aaPanel 8.0.6, Nginx 1.30.5, OpenLiteSpeed 1.8.5 and PHP 8.5.11 on 12 October 2026. We also tested native Rollback and the follow-up Nginx reload needed in this installation.
1. Prepare the installation and backup
Enable and verify Multi-WebServer Hosting first. Follow the installation guide rather than uninstalling a working Nginx server. Confirm Nginx and OpenLiteSpeed are running.
Preserve website files, database and web-server/PHP configuration. Our lab had a current full WP Toolkit archive plus a private configuration copy. A backup archive's existence is not proof that its restore function works; see the backup verification guide. On a live site, use a maintenance window and a tested recovery plan.
Record the original engine and PHP version. Our original engine was Nginx. Keep internal backend and OpenLiteSpeed administration ports private; this walkthrough does not require exposing them publicly.
2. Check the separate OpenLiteSpeed PHP runtime
OpenLiteSpeed uses lsphp, separate from aaPanel's regular PHP-FPM installation. A PHP extension installed for PHP-FPM may be missing from lsphp. Follow the lsphp runtime checks and install application requirements in the correct version.
We installed and functionally tested Imagick for lsphp 8.5 before switching. See the Imagick walkthrough. Avoid changing PHP major versions and web-server engines together on a production website; separate changes make failures easier to diagnose.
3. Select and save the website's engine
Open WP Toolkit, find the intended domain and click Modify. Choose Web Server in its side menu. Wait for the saved website configuration to load before reading the selector; a temporary form value during loading is not the saved engine.
Choose Nginx + Openlitespeed, confirm the selector shows that choice, and click Save. Review the Switching Services confirmation, then Confirm. Wait for the operation to finish. Reopen or refresh the modification view if necessary.
Our saved view showed Current: Openlitespeed and Web Server: Nginx + Openlitespeed.
Nginx remains the public front end in this architecture. Seeing Server: nginx in an HTTP response does not by itself disprove an OpenLiteSpeed backend.
4. Verify the application-side runtime
Sign in to WordPress and open Tools → Site Health → Info. Expand Server. Our actual request reported Web server: LiteSpeed, PHP version: 8.5.11, PHP SAPI: litespeed and Imagick: Yes.
Check upload_max_filesize and post_max_size as well. The effective upload limit can be lower than either value shown elsewhere. Our OpenLiteSpeed WordPress upload page allowed 8 MB because post_max_size was 8M, although upload_max_filesize was 50M. We did not change these limits during the engine test.
5. Test the website's normal workflows
Open the homepage, a published post and a standalone page over HTTPS. We opened /hello-world/ and /sample-page/ successfully with Post name permalinks. Check for a complete rendered page, not only a successful connection.
Next, open Media → Add Media File and upload a small original test image. We uploaded an 800 × 554 branded JPEG, saved its alternative text/title, then opened the public HTTPS image successfully. This tests a fresh upload rather than only an old cached image.
Also open the dashboard and relevant application settings. For a shop or member site, separately test login, cart/checkout and private pages before deploying this change.
6. Test return to the original engine
Before returning to Nginx, we turned LiteSpeed Cache's Enable Cache OFF and deactivated the test plugin. Keep the old configuration and backup; do not remove OpenLiteSpeed just to switch one site back.
Reopen WP Toolkit → Modify → Web Server, click Rollback and confirm the return to the previous service. Our panel then showed Current: Nginx and selected Nginx.
Important result from our lab: the panel badge changed before WordPress stopped reporting the LiteSpeed handler. We checked the restored Nginx routing and ran its configuration test successfully. We then used App Store → installed Nginx → Setting → Service → Reload and confirmed the reload. This applies the valid configuration without stopping the server. If a configuration test fails, fix it before reloading; do not repeatedly restart services or overwrite custom rules blindly.
After a fresh Site Health request, WordPress reported nginx/1.30.5 and PHP SAPI: fpm-fcgi. Imagick remained available. The screenshot below shows the restored PHP-FPM handler.
We reopened the published post, Sample Page and uploaded HTTPS image successfully. This is the evidence for a working return path, beyond a panel success message.
If a check fails
- 502/503: inspect the selected backend's service state, PHP version/handler and corresponding error log.
- Post URLs fail while the homepage works: inspect the selected engine's rewrite configuration; do not replace rules for the wrong engine.
- Extensions disappear: compare lsphp and PHP-FPM installations and the actual application SAPI.
- Rollback badge changes but the handler does not: inspect routing and configuration validity, then reload the relevant service and make a fresh request.
Our verified result
WordPress content, dashboard and a fresh image upload worked on OpenLiteSpeed. Native Rollback followed by a validated Nginx reload restored PHP-FPM, and the content/media checks passed again. The lab is left on Nginx with the test cache plugin inactive. This is a functionality test, not a performance benchmark.
Reference: aaPanel Multi-WebServer Hosting documentation. All screenshots are original © AdminsForum lab captures.