AdminsForum

Paste the error. Find the fix.

Step-by-step guides and community answers for Linux servers, VPS and hosting control panels.

New threads

The latest guides and questions from every forum.

aaPanel WordPress Guides

Create and Preview a WordPress Page on an aaPanel Website

How do you create a WordPress page without publishing it immediately?
Open Pages → Add Page, enter a title, add your content blocks and choose Save draft. Use View → Preview in new tab to see the page in the website’s theme. Previewing a draft does not publish it to visitors.

We tested this workflow on wp.adminslab.com, our aaPanel-hosted WordPress 7.1.3 lab. We saved a real draft page and confirmed its title and paragraph rendered in the Twenty Twenty-Five theme. The test page remains a draft.

1. Choose a page rather than a post
Sign in to WordPress. Pages are useful for content such as About or Contact pages. Posts are usually used for dated articles and a blog feed. For this demonstration choose Pages → Add Page.

The editor can offer starter patterns. In our test, a Choose a pattern dialog appeared. We used its Close button to start with a blank page. You can choose a pattern when it suits your design, but it is not required for adding basic content.
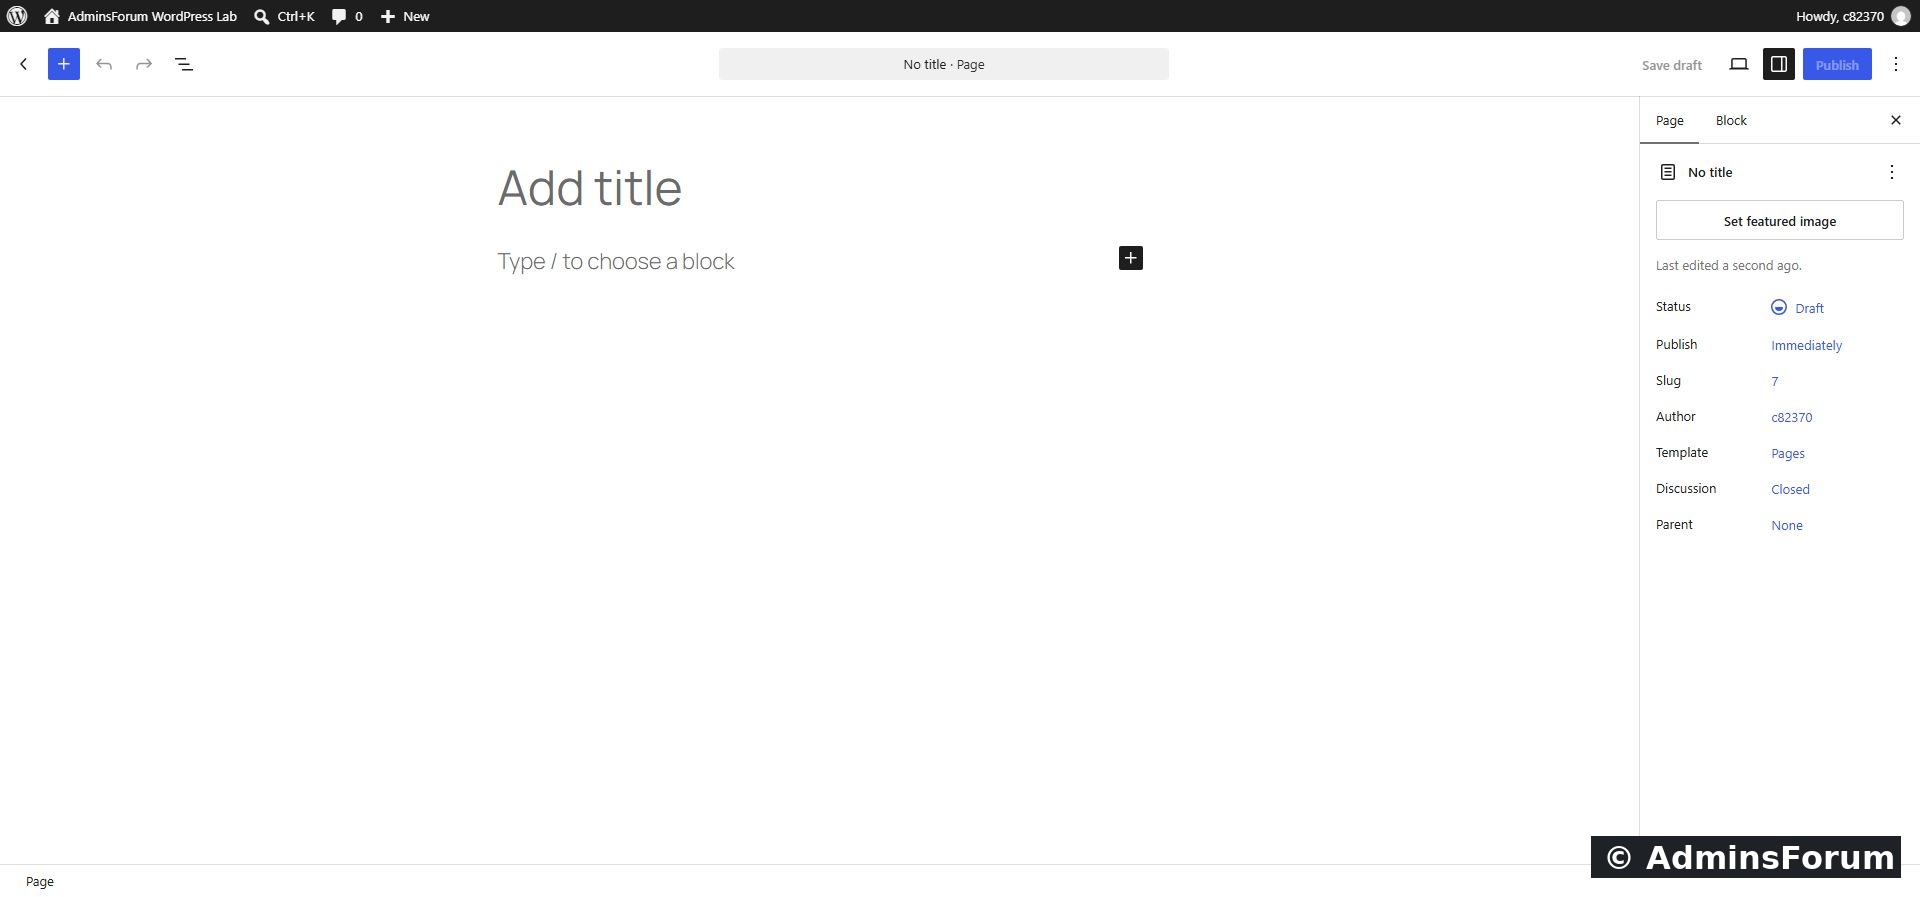
   
The blank page editor before adding our title and paragraph.

2. Enter a clear page title
Click Add title and type the name of the page. We used AdminsForum Lab — About this website. Use a title that describes what visitors will find rather than an unexplained placeholder.

The title becomes part of the page content and helps identify it in your administrator page list. Do not confuse it with an independently configured SEO title or meta description supplied by an SEO plugin.

3. Add the first content block
Click Type / to choose a block or Add default block beneath the title. The editor creates a Paragraph block. Write a short introduction.

Our demonstration paragraph explains that the website is an AdminsForum tutorial lab used to test aaPanel and WordPress workflows. We kept the example simple so the saved result could be verified without extra plugins or design changes.

You can add more blocks later. Use headings to divide substantial content, and an Image block for pictures. A page made of one giant paragraph is harder to read and maintain than a few purposeful sections.

4. Save the draft
Click Save draft in the top bar. Wait for the operation to finish. Our editor displayed Draft saved.
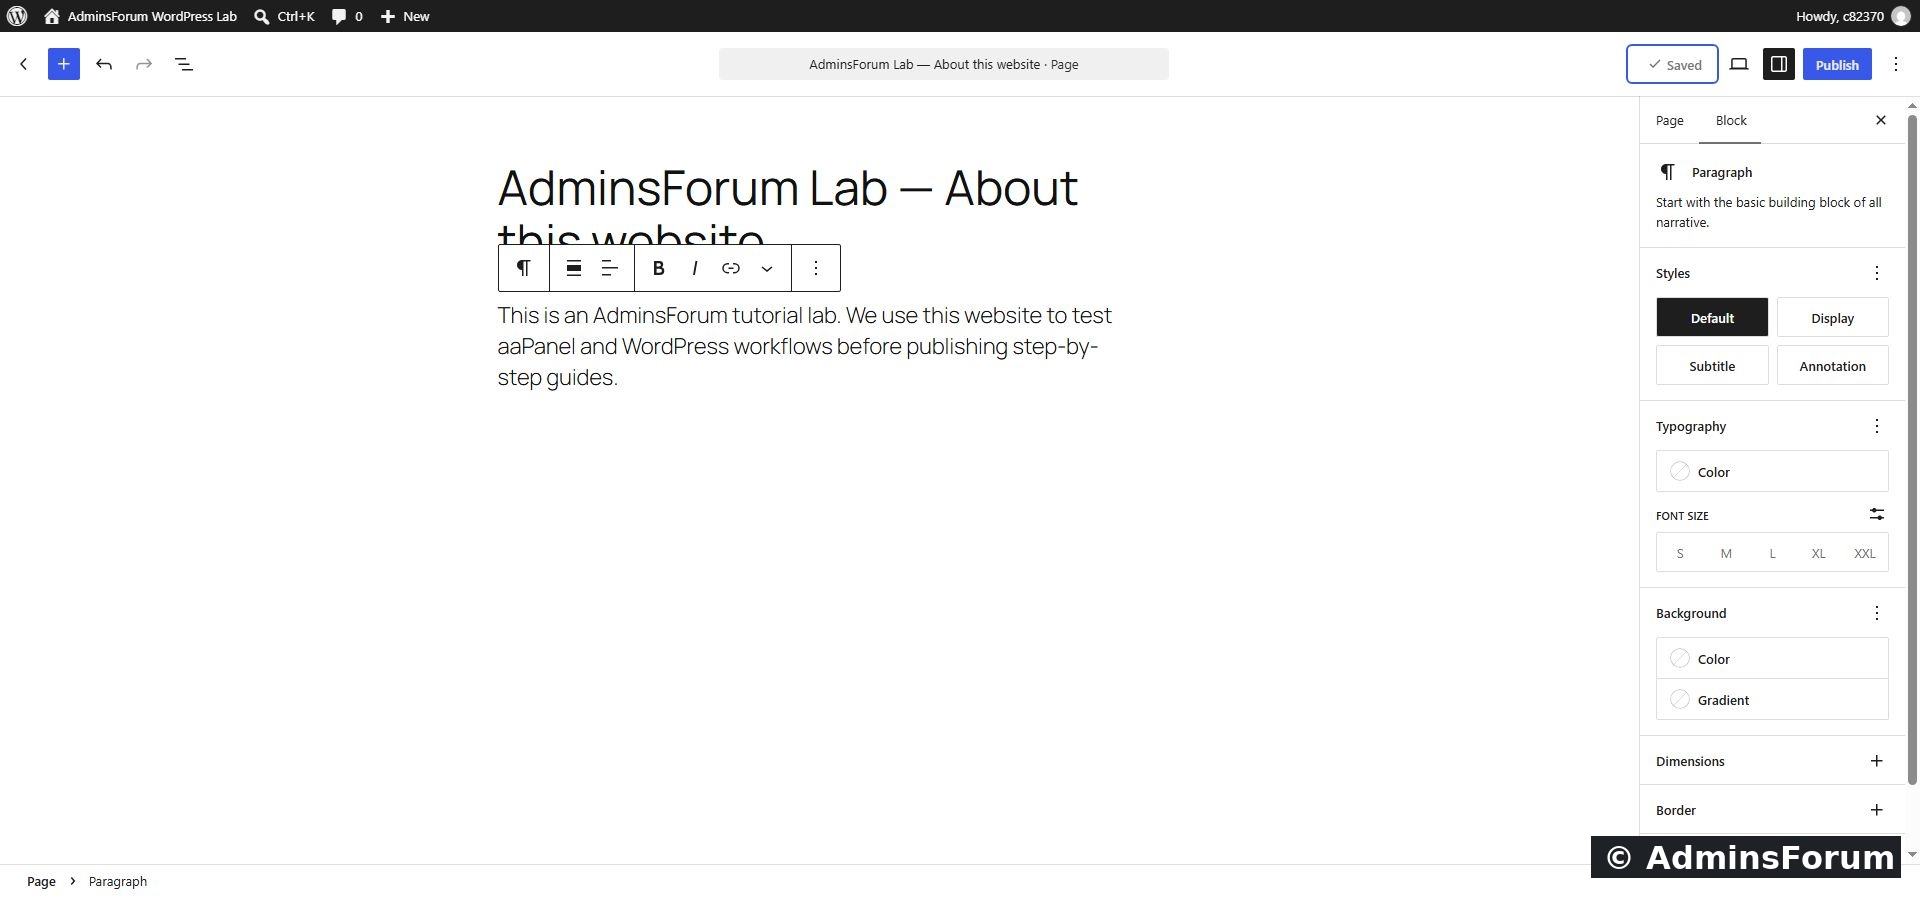
   
Our saved draft contains a title and paragraph. The page has not been published.

Do not rely on having text visible in the editor as proof that it was saved. Confirm the saved state before closing the tab. The Publish button is a separate action, and we did not use it in this test.

5. Open the website preview
Click View in the editor’s top bar. The menu in our version offers desktop, tablet and mobile preview options, plus Preview in new tab. Choose Preview in new tab and wait for the page to render.
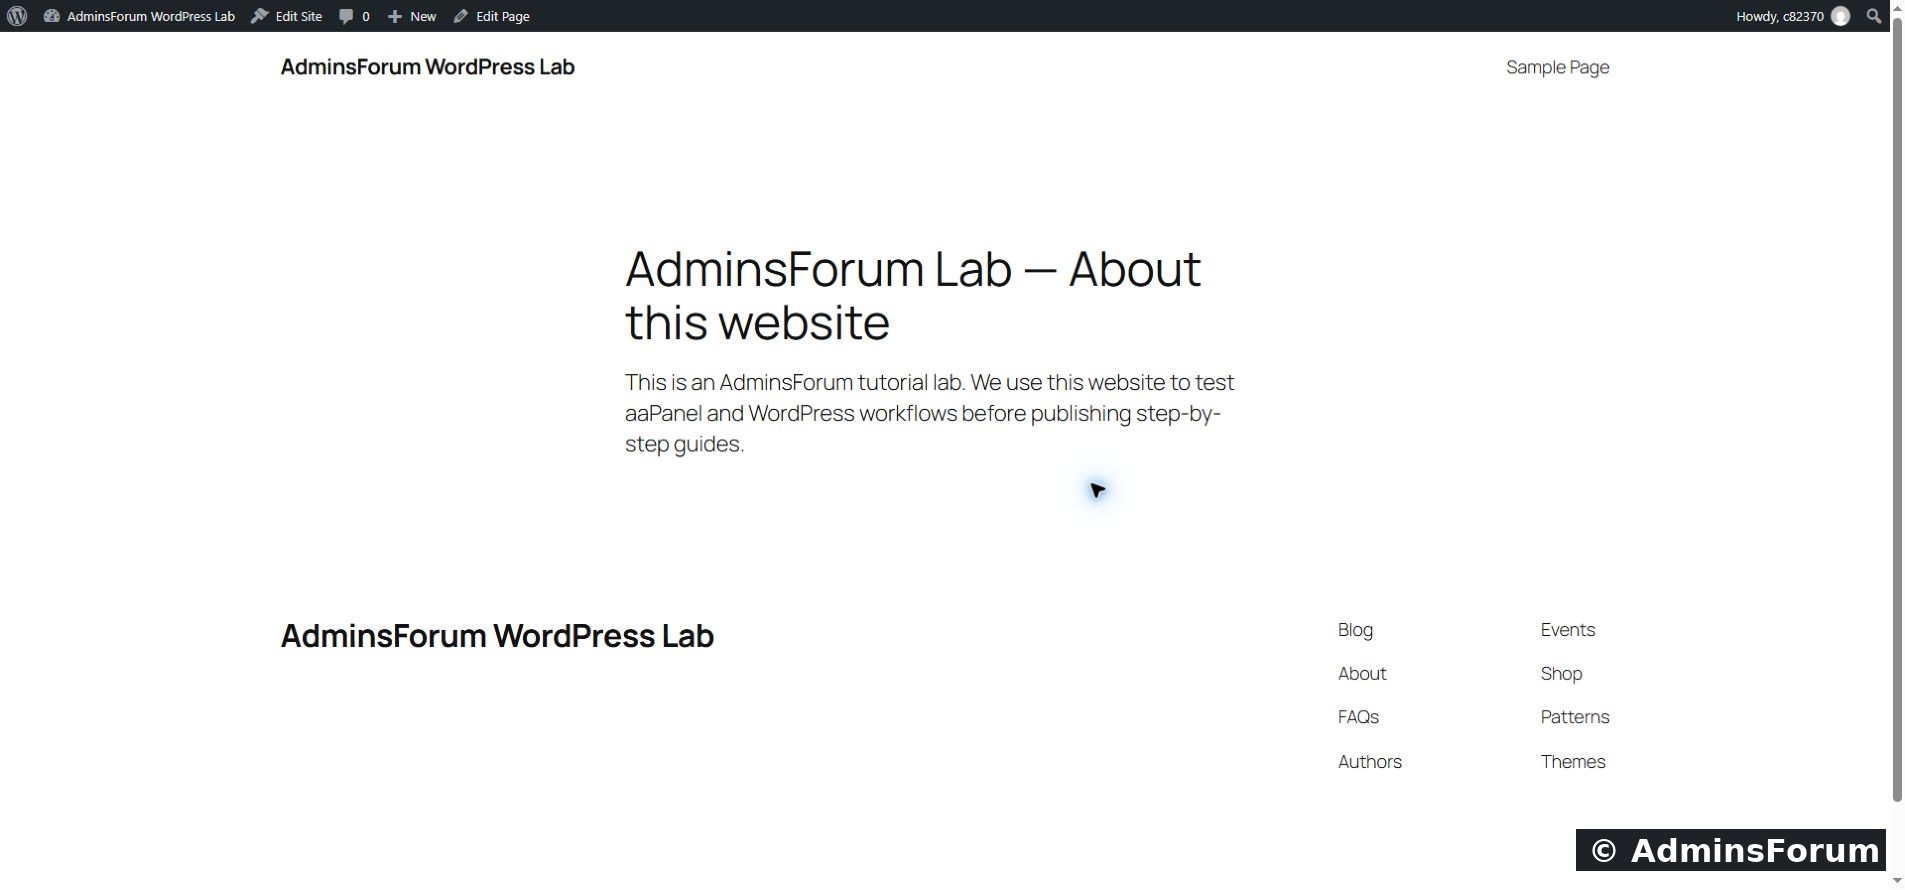
   
The draft preview rendered our title and paragraph in the website’s actual theme.

Check the wording, spacing and page structure. Review the layout on the screen sizes relevant to your visitors. A preview is a useful check, but it does not prove that navigation menus, forms or every device configuration will work.

The preview may require your logged-in session. Do not treat its address as the permanent public page URL or share URLs containing private preview tokens unnecessarily.

6. Return to editing
Go back to the editor tab, adjust the content and save again when needed. Preview the new version rather than relying on an older open preview tab.

A draft can remain unfinished while you gather content or review the design. Saving it does not automatically put it in the site’s header menu or make it the homepage. Menu placement and homepage selection are separate tasks.

7. Prepare for publication when the page is ready
Before publishing a real page, check its content, links, image descriptions, visibility and intended URL. Remove placeholder text and verify any promised contact details or functionality.

WordPress’s Publish controls allow you to review the publication settings. Publishing, scheduling or changing visibility should match your intended audience. This guide stops at a saved, previewed draft because that is the workflow we tested; it does not claim a public page was published.

Troubleshooting
  • The pattern dialog covers the editor: choose a suitable pattern or close the dialog to start blank.
  • Save draft fails: preserve your text, check the error and session, and confirm whether the REST request or server response failed before continuing.
  • Preview shows old content: save the current draft, reopen or refresh its preview and check whether you are viewing the correct page.
  • The page is not in navigation: a draft is not public navigation content. Even after publication, menu/homepage placement may need separate configuration.
  • Editor labels differ: WordPress versions and themes can change the interface. Match the action—save, view or publish—rather than blindly clicking the same screen position.

Verified result
We created the lab page, saved its title and paragraph as a draft and confirmed its preview rendered in the original Twenty Twenty-Five theme. We did not publish it, change the homepage or edit navigation menus.

Screenshots and results are from the AdminsForum lab.
DEV 10-12-2026, 12:48 PM Read thread
aaPanel WordPress Guides

Upload Images to WordPress on an aaPanel Website

How do you upload an image to WordPress on aaPanel?
Use WordPress → Media → Add Media File, select your image and wait for the upload to finish. Open Edit to add a meaningful title, alternative text and caption, then save and verify the file URL. You do not need to open aaPanel’s file manager for an ordinary WordPress media upload.

We tested this on our aaPanel-hosted wp.adminslab.com website running WordPress 7.1.3 and PHP 8.5.11. The JPEG upload, attachment details and direct HTTPS image URL were verified.

1. Prepare the image
Use an image you have permission to publish. Give it a clear filename before uploading and choose dimensions appropriate for its purpose. Avoid uploading camera originals when a smaller image will do. Review screenshots for passwords, tokens, private messages and other information that should not become public.

For this demonstration we used our own AdminsForum-branded Site Health screenshot. A copyright mark identifies the source; it does not prevent someone from copying the file.

2. Open the uploader
Sign in to your WordPress administrator dashboard and select Media → Add Media File. Our screen offered Select Files and displayed a 50 MB maximum upload size.

   
WordPress’s upload screen on our lab. Your server may have a different limit.

The number is a maximum, not a target image size. Small, appropriately sized images usually transfer more efficiently than large originals. If your file exceeds the limit, optimize it first or review the website’s PHP configuration rather than assuming WordPress is broken.

3. Select and upload the file
Click Select Files and choose your image. Wait for the upload to complete. Do not close the tab while progress is running or retry repeatedly before the original operation finishes.

   
Our uploaded file appears with Edit and Copy URL to clipboard actions.

If the normal uploader fails, the screen also offers a browser uploader. That is an alternative upload interface, not a way to bypass server limits or file-type restrictions.

4. Add useful attachment details
Click Edit next to the uploaded file. On Edit Media, review:
  • Title: a useful name for finding the item in the library.
  • Alternative Text: a concise description of what the image communicates. Avoid repeating a list of keywords.
  • Image Caption: explanatory text that can be displayed with the image when the content layout uses a caption.
  • Description: optional additional attachment information.

We set a readable title, described the visible Site Health result in Alternative Text and added a short lab caption. Then we clicked Update.

   
Saved attachment details, file type, size, dimensions and File URL.

Alternative text should match the image’s purpose in its eventual context. The interface notes that purely decorative images can have empty alternative text. A filename alone is often a poor description.

Changing the media title does not automatically rename the uploaded file. Our filename remained unchanged after saving the title and caption.

5. Verify the actual file
Review File URL and open it in a browser tab. Our JPG loaded successfully over HTTPS at its WordPress uploads URL. The attachment reported 1912 × 893 pixels and 72 KB. These are our example’s values, not recommended dimensions for every image.

The file URL is different from an attachment-page permalink. The file URL points to the image itself; the attachment page may be a website page about that media item.

Do not upload confidential files on the assumption that a draft post makes them private. In our test, the direct media URL was accessible. Use a suitable private-storage method for material that should not be public.

6. Use the image in content
Uploading adds the image to Media Library; it does not automatically place it inside every page. In a WordPress page or post, add an Image block and choose the item from Media Library. Check its alternative text, displayed size and caption in that context, then preview the page.

This walkthrough verified the upload and attachment details. Inserting the image into a page and publishing that page are separate content-editing steps.

Troubleshooting
  • File too large: compare the file with the maximum shown, reduce its size where appropriate and confirm the PHP version/configuration serving the site before changing limits.
  • File type rejected: use a supported image format. Do not enable unrestricted uploads as a shortcut.
  • Upload succeeds but image does not load: inspect the exact file URL, permissions and server response. Check cache or mixed-content issues without disabling HTTPS protections.
  • A thumbnail looks different: WordPress may create smaller image sizes. Review the size selected in the content block and compare it with the original.

Verified result
Our image uploaded successfully, the title/alternative text/caption saved, and the direct HTTPS image loaded. No upload-limit setting, security restriction or server permission was changed. The demonstration file remains in the lab Media Library.

Screenshots and results are from our own AdminsForum test website.
DEV 10-12-2026, 12:46 PM Read thread
aaPanel PHP & Extensions Guides

Install PHP EXIF in aaPanel and Fix the WordPress Warning

How do you fix the missing EXIF warning in WordPress on aaPanel?
Confirm the website’s PHP version, open that version’s settings in aaPanel’s App Store, choose Install extensions and install exif. Wait for the task to finish, then run WordPress Site Health again. Installing EXIF for a different PHP version will not necessarily fix the website’s warning.

We tested this on wp.adminslab.com with aaPanel 8.0.6 Free Edition and PHP 8.5.11. WordPress initially reported missing EXIF and Imagick. After installing EXIF for PHP 8.5, the EXIF warning disappeared. The separate Imagick warning remained.

What is EXIF?
EXIF is a PHP extension for reading image metadata, commonly from JPEG and TIFF photographs. It is different from Imagick, which provides image-processing functionality. Adding EXIF does not automatically install Imagick or solve every image-upload problem.

1. Confirm the original warning
In WordPress choose Tools → Site Health. Wait for the checks to finish. Expand One or more recommended modules are missing and read the exact names shown.

   
Our original report listed both optional modules: exif and imagick.

If EXIF is not listed, do not install it simply because this guide uses it. Identify the actual missing component first. An optional-module recommendation is different from a fatal website error.

2. Identify the PHP version serving the website
Open Site Health → Info → Server and read PHP version. Our website reported 8.5.11 with the fpm-fcgi interface.

You can also inspect the website’s PHP selection in aaPanel. On a server with PHP 8.4 and 8.5, each version has its own configuration and extensions. The default terminal command named php may use another version, so it is not sufficient evidence for the website’s runtime.

3. Open the matching PHP manager
In aaPanel choose App Store, then Installed. Find the PHP version used by your website. We opened Setting in the PHP-8.5 row.

In the php-8.5Manage window choose Install extensions. Check the version in the window heading before making changes.

   
The Install extensions section in our PHP 8.5 manager. Locate exif in this list or use the extension search field.

Plan the operation during a suitable maintenance period on a live server: extension changes can reload or restart the PHP service used by other websites on that version. Have a current backup and avoid running several extension installations at once.

4. Install exif
Find exif. Our row described it as for reading picture EXIF information and offered Install. Use the extension-name search field if necessary and allow the table to update.

Click Install in the exif row. The panel displayed Install【exif】 with a confirmation asking whether to install it. Confirm after checking the module and PHP version.

The action changed to Pending install... while the task was queued or running. This is progress information, not proof of completion. Wait for the job to finish rather than submitting duplicate installs.

If the list becomes blank while refreshing, reopen the PHP manager after the operation finishes and inspect it again. Do not assume an empty table means the module failed or that PHP itself was removed.

5. Verify through the website
Return to WordPress → Tools → Site Health and let the checks complete. Expand the missing-module finding again.

   
After our installation, WordPress listed only imagick. The EXIF warning was gone.

The overall recommendation can remain because another module is still missing. Read the expanded details rather than expecting the entire heading to disappear after fixing one item.

Our aaPanel session expired when we reloaded the extension manager after installation, so we did not capture a final installed-state panel row. The website’s new Site Health result verified that EXIF was no longer reported as missing. We did not test reading metadata from a sample photograph in this walkthrough.

Optional terminal check
For the exact aaPanel PHP version used in this example, an administrator can check:
Code:
/www/server/php/85/bin/php -r 'echo extension_loaded("exif") ? "EXIF loaded " : "EXIF missing ";'
Replace the version-specific path if your website uses another PHP version. This checks command-line PHP; verify the website too because CLI and PHP-FPM configuration can differ. This optional command was not run as part of our current browser test.

Troubleshooting
  • Warning remains: confirm the website’s PHP version, review the installation result and check whether the relevant PHP service loaded the extension.
  • Task fails: read the installation log and exact error before retrying. Check resources and package/source connectivity without weakening security settings.
  • Panel says installed but website says missing: compare the PHP version and configuration used by the actual website. Plan a reload of the correct service only if needed.
  • Only Imagick remains: that is a separate module. EXIF installation is not intended to clear the Imagick warning.

Verified outcome
We installed EXIF through the PHP 8.5 extension manager and confirmed that WordPress stopped reporting it as missing. No other PHP version was changed. Imagick installation and functional photo-metadata testing are separate tasks.

References: PHP EXIF manual and our WordPress Site Health walkthrough. Screenshots are from the AdminsForum lab.
DEV 10-12-2026, 12:37 PM Read thread
aaPanel WordPress Guides

Check WordPress Site Health on an aaPanel Website

How do you check WordPress Site Health on aaPanel?
Sign in to WordPress and choose Tools → Site Health. Wait for the checks to finish, open each finding to read its details, then use Info to inspect the site’s actual configuration. You do not need to install a separate health-check plugin to use this built-in screen.

We inspected our wp.adminslab.com test website, hosted through aaPanel 8.0.6 Free Edition. This guide shows actual findings from WordPress 7.1.3 on PHP 8.5.11. Your report can differ according to your server, plugins and recent activity.

1. Open Site Health and wait for the result
Use your normal WordPress administrator login. In the left menu choose Tools → Site Health. You can also reach the screen from a dashboard Site Health link if it is displayed.

The page initially showed Results are still loading in our session. Wait until checks finish before judging the report. Some tests depend on requests that take longer than the initial page load.

   
Our finished Status screen: Good, with four recommended improvements.

2. Read the findings rather than just the summary label
Open the Status tab. Review any critical issues first, followed by recommended improvements. A Good label does not mean that every possible problem has been ruled out or that the website has passed a complete security audit.

Our report showed:
  • You should remove inactive plugins.
  • You should remove inactive themes.
  • One or more recommended modules are missing.
  • A scheduled event is late.

We had just completed plugin and theme demonstrations, so the inactive items were expected on this lab. For a real website, review which items are still needed, preserve any required parent/fallback theme and back up before removal. Do not delete components purely to change a score.

3. Expand a finding to see the specific cause
Click a recommendation’s heading. We opened One or more recommended modules are missing. It identified exif and imagick as optional modules that were absent or disabled.

   
The expanded finding identifies the exact optional PHP modules.

That message does not say PHP itself is missing. It concerns extensions available to the PHP environment running this website. Installing an extension for another PHP version will not necessarily resolve the warning.

If you plan to change extensions in aaPanel, first confirm the website’s PHP version, read the extension requirements and prepare for the relevant PHP service reload/restart. Verify the result through WordPress afterward. We did not install EXIF or Imagick during this diagnostic walkthrough.

4. Inspect the late scheduled-event warning separately
A late event deserves its own investigation. Expand the item and record the event name and any explanation shown. Check whether the warning persists and whether the affected application task is completing.

Do not immediately add a server cron job or disable WordPress’s scheduler simply because a warning appears. Review the existing scheduler configuration first so you avoid duplicate or conflicting jobs. This guide did not diagnose or fix the event on the lab and did not create a new cron task.

5. Use Info to check real configuration details
Choose Info at the top. It contains expandable sections such as WordPress, themes, plugins, Media Handling, Server, Database and Filesystem Permissions.

   
The Info tab groups technical details into sections. Open only the section relevant to your question.

We opened Server and confirmed that the website was using PHP 8.5.11 with fpm-fcgi and nginx/1.30.5. These values come from WordPress’s runtime and are useful when aaPanel has several PHP versions installed.

The same section reported upload and memory limits. Read them before requesting a change: an administrator-screen memory allowance can differ from the general PHP memory limit. The Info page reports configuration; it does not apply new settings itself.

6. Gather a useful support question
For help, include the exact expanded error, WordPress version, the website’s PHP version, the affected component and what changed before the issue started. Add the relevant screenshot rather than an unexplained Good or Needs improvement label.

The Copy site info to clipboard control can collect a broader report, but review it before sharing. Configuration exports may contain server paths, database identifiers, usernames or details you do not need to publish. Share the smallest relevant excerpt and remove credentials, tokens and private information. We did not post a full configuration export.

For WordPress-specific questions, use WordPress Support. For an extension issue, PHP & Extensions Support is the more focused section.

7. Recheck after making a separate fix
Change one relevant item at a time, then return to Site Health and let the tests complete. Also test the actual feature that was failing. A warning disappearing does not replace a functional check of uploads, email, forms or scheduled tasks.

Keep a note of the before/after finding and the exact change. This makes later troubleshooting easier than applying several unrelated settings and losing track of which one helped.

What we verified
We opened Status, waited for completion, expanded the optional-module warning and inspected Info → Server. The lab reported Good with four recommendations. We did not remove plugins/themes, install optional modules or resolve the scheduled-event warning in this guide.

Source: WordPress Site Health documentation. Screenshots and runtime findings are from our AdminsForum lab.
DEV 10-12-2026, 05:36 AM Read thread
aaPanel WordPress Guides

Check WordPress Updates on an aaPanel Website

How do you check WordPress updates on an aaPanel website?
Sign in to WordPress and open Dashboard → Updates. Use Check again to refresh the status, then review WordPress core, plugins and themes separately. aaPanel’s WP Toolkit also shows the installed WordPress version, but the WordPress dashboard provides a useful check of the application’s own update status.

Our lab runs WordPress 7.1.3 on aaPanel 8.0.6 Free Edition with PHP 8.5. We checked both interfaces. Core, plugins and themes were already up to date, so this walkthrough verifies the checking process. It does not claim that an upgrade was performed.

1. Confirm the website in WP Toolkit
Open aaPanel → WP Toolkit and find the correct domain. Click the WordPress version in the Quick action area to open Wordpress Setting → Base setup.

Our Status message displayed WordPress 7.1.3 is already the latest version. Wait for the data to load: the fields can briefly show dashes while aaPanel retrieves the site information.

   
The installed version and status reported by WP Toolkit. The new-password field is empty; checking updates does not require changing your password.

Do not click Generate or fill Reset password just to check a version. The Upgrade control relates to WordPress; aaPanel’s separate Upgrade now button relates to the hosting panel. PHP and the web server have their own updates too. These are different components and should not be changed together without a plan.

2. Open WordPress’s Updates screen
Sign in using your normal WordPress administrator login. If you followed our test-site setup, the dashboard is at your domain followed by /wp-admin/. Use the correct login path if you previously customized it.

In WordPress, choose Dashboard → Updates. Review Current version and the timestamp beside Last checked. Click Check again to request a fresh status check, then wait for the page to return.

   
Our dashboard after checking: core, plugins and themes are all up to date.

3. Read each section separately
  • WordPress: shows the installed core version and whether a newer release is offered.
  • Plugins: shows plugin updates separately from the core.
  • Themes: shows theme updates separately from plugin updates.

In our session, all three sections reported current software. That is a valid result: no update action is necessary just to complete a tutorial.

The Re-install version button is not an upgrade to a newer version. It replaces core files with the same release and is not a routine step after every update check. We did not use it.

4. Prepare before applying an offered update
Before changing a live site, save a complete files-and-database backup and confirm a recovery plan. Follow our WP Toolkit backup guide. Keep a verified copy off the server and test recovery separately.

Record the current core, plugin, theme and PHP versions. Review the release notes and compatibility requirements for the specific changes. Test them on staging where practical and pick a quiet time for a live-site update.

On sites with orders, registrations or frequent content changes, coordinate the maintenance window so recovery from an older backup does not unexpectedly discard newer data. A successful archive creation alone is not proof of a successful restoration.

5. When an update is available
Use the action shown for the specific component on Dashboard → Updates. Follow its prompts and allow it to finish. Avoid starting several overlapping operations or repeatedly pressing an update button because progress is slow.

Afterward, confirm the reported version and check the public homepage, administrator login and important functionality. Test forms, checkout or member features if your site uses them. Clear relevant caches when needed and examine errors before treating the work as complete.

Our lab had no pending update, so these are preparation and verification instructions rather than a tested upgrade result. We did not downgrade the lab to manufacture an update scenario.

6. Review automatic updates without changing them accidentally
Read the policy displayed on the Updates page. Our site stated that it is kept current with each new WordPress version. The page offered a link to switch to maintenance/security releases only. We left the existing policy unchanged.

Core automatic updates and plugin/theme Auto update switches are separate preferences. Know which one you are changing, how backups will be retained and how failures will be noticed. A manual screenshot of today’s status does not prove future scheduled updates will run successfully.

Maintenance mode in Free Edition
Our aaPanel Maintenance Mode screen displayed This feature is only available for Pro. Do not assume the built-in panel maintenance page is available in Free Edition. We did not buy Pro or enable that feature. Plan an appropriate maintenance approach for your website before a change that could interrupt visitors.

Troubleshooting
  • Check again returns an error: record the message and inspect site/server connectivity and logs. Do not disable SSL verification as a shortcut.
  • The dashboard requests connection credentials: investigate the installation’s file ownership and update method before supplying credentials or changing permissions.
  • Update failed or site is unavailable: stop further changes, preserve the error and consult the official failed-update guidance. Recover using a known backup when appropriate.
  • Panel and dashboard disagree: refresh both, confirm they refer to the same installation and compare the actual version rather than a cached label.

Verified result
We refreshed the WordPress Updates page and confirmed core, plugins and themes were current. No upgrade, reinstallation, automatic-update preference change or maintenance-mode activation was performed.

References: WordPress update documentation and aaPanel WP Toolkit documentation. Screenshots are from our own AdminsForum lab.
DEV 10-12-2026, 05:33 AM Read thread
aaPanel WordPress Guides

Install and Change WordPress Themes in aaPanel WP Toolkit

How do you change a WordPress theme in aaPanel?
In WP Toolkit, click the WordPress version beside your domain, open the Theme tab, install the theme you want and turn on its Active switch. Then check the public website. Keep the previous theme installed so you can switch back if the new design is unsuitable.

We tested this on wp.adminslab.com with aaPanel 8.0.6 Free Edition, WordPress 7.1.3 and PHP 8.5. We installed Twenty Twenty-Two 2.2, activated it, checked its homepage and switched back to the original Twenty Twenty-Five 1.5 theme. Installation and switching worked without purchasing Pro.

Before starting
  • Make a fresh files-and-database backup. Follow our WP Toolkit backup guide and retain a verified copy outside the server.
  • Test on staging before changing a live business website. Theme changes can affect navigation, templates, typography, widgets and plugin integrations.
  • Record your current theme name. Keep it installed during the test.
  • Check the candidate theme’s official source, author, maintenance and compatibility. Avoid installing a theme merely because its preview looks attractive.

1. Open the Theme tab
Choose WP Toolkit in aaPanel. Find the correct website and click the WordPress version button in its Quick action area. In the Site modification window, choose Theme beside Base setup, Plugin and Utils.

   
Our original theme list. Twenty Twenty-Five was active; other installed themes were inactive.

The table separates Active from Auto update. Active controls which theme supplies your website’s design. Auto update is a separate update preference. Installing a theme does not mean it becomes active.

2. Find and install a theme
Click Install in the Theme tab. Enter the theme’s name in the search field and press Enter. Our panel’s theme search field was labelled Please enter plugin name, even though the window was for themes. Check that you opened Theme before searching.

We searched for Twenty Twenty-Two and chose the result from the WordPress team. Review the Name, Author, WP and PHP columns; similar names can refer to different products. Requirements shown in the list do not prove compatibility with every plugin or customization on your website.

   
The exact theme and author in our search result.

Click Install in the correct row once and wait for completion. Close the installation window, keeping the underlying theme manager open. Confirm that the theme appears in the installed list. In our test it appeared as Twenty Twenty-Two 2.2.

3. Activate the new theme
In the new theme’s row, turn on the Active switch. Wait for the operation to finish. Confirm that the new theme is active and the previous one is inactive. WordPress uses one active theme for the site.

   
Twenty Twenty-Two is active after the switch; the other themes are inactive.

Do not switch off your only active theme first. Activate its replacement instead. The panel can display an “At least 1 theme is active” message if you attempt to disable the active theme without a replacement.

4. Check the actual website
Open the public HTTPS address and refresh the page. Check the homepage, a post, important pages, navigation, mobile layout, images and forms. A successful switch in the panel does not mean the new design meets your needs.

   
Our lab homepage after activation. The design changed and the sample content still loaded over HTTPS.

For a block theme, further design work happens in WordPress’s Site Editor. Switching themes alone does not build menus, layouts or a complete business website. Theme-specific customizations may need adjustment.

5. Switch back to the previous theme
Return to the Theme tab and activate your previous theme using its Active switch. Wait, check the states and refresh the public website again.

During our test, we refreshed the panel and reopened the theme list before the return switch persisted. If a switch or warning looks inconsistent, reopen the list and verify the actual state instead of repeatedly clicking it. We confirmed Twenty Twenty-Five active again and the original Blog homepage restored. Twenty Twenty-Two remains installed but inactive.

Switching back is useful for a design test, but it is not a complete recovery method for every theme. A theme or associated plugin may change settings or data; a reliable backup is still necessary.

6. Understand update and removal controls
We left Auto update off during this demonstration and did not test an automatic update. Review your maintenance and monitoring plan before enabling it. The panel warns against enabling automatic theme/plugin updates while its maintenance mode is enabled.

Uninstall is different from switching themes. Review the consequences and take a backup before removing anything. Preserve an appropriate fallback theme, and avoid deleting a parent theme required by a child theme. We did not uninstall themes in this walkthrough.

Troubleshooting
  • Design looks unchanged: verify the Active state, refresh the public page and check whether browser/server caching is showing an older response.
  • Installation fails: read the error and check available disk space, source connectivity and permissions. Do not broadly weaken file permissions as a shortcut.
  • Layout or feature breaks: switch back to the previous theme, inspect logs and test the conflict on staging.
  • Search field says plugin: our tested theme dialog uses that placeholder. Confirm the Theme tab is selected; do not assume you are in the plugin manager.

Final check
You should know which theme is active, have tested the public website and have a clear way to return to the previous configuration. Our installation, activation, homepage check and switch-back were tested. Automatic updates, uninstalling and full backup restoration were not tested here.

Source: aaPanel WP Toolkit documentation. Screenshots and theme-switch results are from our own AdminsForum lab.
DEV 10-12-2026, 05:32 AM Read thread
aaPanel WordPress Guides

Install and Manage WordPress Plugins in aaPanel WP Toolkit

How do you install a WordPress plugin through aaPanel?
Open WP Toolkit, click the WordPress version beside your site, select Plugin, then click Install. Search for the exact plugin, check its author and requirements, and install it. Return to the list and enable its Active switch when you are ready to use it.

We tested installation, activation and deactivation on wp.adminslab.com using aaPanel 8.0.6 Free Edition, WordPress 7.1.3 and PHP 8.5. The example is Hello Dolly by Matt Mullenweg. It is a simple demonstration plugin, not a required component for hosting a website.

Before changing plugins
  • Confirm that you selected the correct website in WP Toolkit.
  • Take a fresh backup of files and the database. See Back Up WordPress with aaPanel WP Toolkit. Keep a verified off-server copy for recovery.
  • For a live website, test changes on staging first and choose a quiet maintenance period.
  • Check the plugin’s official listing, recent maintenance, WordPress/PHP compatibility and author. A similar name does not mean it is the same plugin.

1. Find the plugin manager
In aaPanel’s left menu choose WP Toolkit. Locate your domain. In the Quick action area, click its WordPress version button. Our button displayed 7.1.3; yours may show a different version.

The Site modification window opens with Wordpress Setting selected. Choose the Plugin tab alongside Base setup, Theme and Utils.

   
The Plugin tab before our installation. Existing plugins have separate Active and Auto update switches.

2. Understand the two switches
Active controls whether WordPress runs the plugin. An installed plugin can remain inactive.
Auto update controls automatic plugin updates. It is a separate setting: enabling it does not activate a plugin, and activating a plugin does not automatically enable it.

Do not turn on every switch together. Know which setting you are changing and verify it afterward. The panel also warns against enabling automatic plugin/theme updates while its maintenance mode is enabled.

3. Search for a plugin
Click Install. In Install Plugins, enter the plugin name in Please enter plugin name and press Enter. Wait for results to load; the table can briefly show placeholders.

For our demonstration, we searched for Hello Dolly and selected the row with Matt Mullenweg as author. Other similarly named plugins appeared, so we checked the author rather than choosing a random search result.

   
Search results include Name, Desc, Author, WP, PHP, Rating and an Install action. Verify the exact row before proceeding.

The WP and PHP columns are useful requirements information, but do not assume they mean the plugin was tested on your exact installed versions. Review the official WordPress.org listing too. A blank value or dash is not a compatibility guarantee.

4. Install and confirm the result
Click Install in the chosen plugin’s row once. Wait while the panel displays Installing, please wait. Our operation then reported Installation Success.

Close the Install Plugins window using its top-right close control. Keep the underlying Site modification window open. The new plugin should now appear in the Plugin list.

   
Hello Dolly 1.7.2 appears in the installed list. Both switches were initially off in our test.

Installation and activation are different steps. In our lab, the plugin was installed but inactive. Do not assume that a success message means its functionality is already running.

5. Activate the plugin
Find the newly installed plugin’s row. Turn on the switch in the Active column. Wait for the operation to finish and confirm the switch stays on.

   
Our activation test: Active is on while Auto update remains off.

Now open your website and its WordPress dashboard. Test the feature you installed and the pages it might affect. For example, a form plugin needs a form submission test; a caching plugin needs a check of pages and logged-in behavior. Our homepage remained accessible after Hello Dolly activation. That basic check does not establish compatibility for every plugin or feature.

Some plugins need additional configuration, an API key or an account inside WordPress. Activation alone does not complete those separate setup steps.

6. Deactivate without uninstalling
To stop a plugin, turn off its Active switch and confirm it stays off. We tested this and left Hello Dolly installed but inactive on the lab site. Its Auto update switch was left off throughout.

Deactivation is different from Uninstall. Uninstall can remove files and, depending on the plugin, stored settings or data. Back up and review the plugin’s removal behavior before using it. We did not test uninstalling or automatic updates in this walkthrough.

If something goes wrong
  • Search results stay blank: wait for loading to finish, check the panel session and retry a precise name. Investigate server access to the plugin source if searches consistently fail.
  • Installation fails: read the error, check disk space and file permissions, and verify that PHP can access the required resources. Avoid changing ownership broadly without understanding the error.
  • Activation breaks a feature: switch that plugin off, check the website again and inspect the relevant WordPress/PHP logs. Do not update several unrelated plugins while isolating the problem.
  • An edition upgrade prompt appears: use normal WordPress dashboard access where appropriate. Our Plugin install and Active switches worked in Free Edition; password-free Login was separately Pro-gated in the earlier installation test.

Finished checklist
  • Correct website and exact plugin author checked.
  • Backup prepared before changes.
  • Installation success confirmed by the plugin appearing in the list.
  • Active state checked separately from Auto update.
  • Website and affected functionality tested.
  • Unneeded demonstration plugin left inactive.

References: aaPanel WP Toolkit documentation and Hello Dolly on WordPress.org. Screenshots and installation/activation results are from our AdminsForum lab.
DEV 10-12-2026, 05:06 AM Read thread
aaPanel WordPress Guides

Back Up WordPress with aaPanel WP Toolkit

How do you back up WordPress in aaPanel WP Toolkit?
Open WP Toolkit, select the website’s Backup link, confirm Full Backup and the storage destination, then click Backup. Wait for a successful result and verify that an archive appears before making website changes.

This walkthrough uses our HTTPS test site, wp.adminslab.com, on aaPanel 8.0.6 Free Edition. We created a real backup and checked its archive on the server. A successful backup job is not the same as a tested restoration.

Before you begin
  • Your WordPress site must already appear in WP Toolkit. If it does not, follow Install WordPress with aaPanel WP Toolkit first.
  • Have enough free disk space for the backup. Large uploads folders can make archives much larger than our example.
  • Avoid updating plugins, importing content or accepting important changes while the backup is running. A quiet period makes the files and database easier to keep consistent.
  • Check which site you selected. Our lab has other websites, so we verified the domain before starting.

1. Open the website’s backup window
Sign in to aaPanel and choose WP Toolkit in the left menu. Find the correct WordPress domain. Click the Backup link or backup count in its row. A site without a previous backup may show 0 Backup.

The window contains Backup / Restore and Schedule & Remote Storage. For this guide, stay on Backup / Restore. This is a manual backup; it does not require creating a recurring task.

   
The backup window before our first backup. Check the selected backup type and destination before clicking Backup.

2. Check the backup type and destination
Our window displayed Full Backup to Local Server. If yours is different, use click here to configure and inspect the available choices before starting. Do not assume that a files-only or database-only backup can recover the whole website.

Local Server means the copy remains on the same VPS. It is useful before a plugin update, but it will not protect you if the VPS and its disk are lost. Keep an additional copy outside that server.

The panel also states Subsites not included. If you run WordPress Multisite, do not treat this walkthrough as a complete multisite recovery procedure. Verify the coverage and use a backup method appropriate to your network.

3. Run the backup and wait for completion
Click Backup once. Leave the operation running until aaPanel reports the result. A large site can take longer than this small installation. Do not repeatedly click Backup because the first job is still working.

Our result was 1 success, 0 failed. The table then showed a 35.28 MB archive, marked Full Backup with Local Server storage. Your filename, timestamp and size will differ.

   
Our completed backup. The successful task result and archive row are both visible.

4. Verify the backup before relying on it
Check that the table contains a new archive with the expected time, a non-zero size and the intended storage location. A missing or unexpectedly small archive needs investigation.

We also inspected the server archive in /www/backup/wordpress/. Its ZIP integrity check passed. It contained meta.json, database.sql.gz and files.zip. The nested website archive contained wp-config.php. These checks confirm that our job produced an archive with database and website-file components; they do not prove that a restoration will succeed.

For administrators comfortable with the terminal, a read-only ZIP check is:
Code:
unzip -t /www/backup/wordpress/YOUR-BACKUP-FILENAME.zip
Replace the filename with your actual archive. Do not paste a guessed filename or publish the contents of wp-config.php: it contains database credentials.

5. Keep a copy outside the VPS
The archive row includes Download. Download it to a trusted device, confirm the file arrived and keep it in private backup storage. Check the downloaded copy’s integrity too. A backup can include credentials, private uploads and user data, so do not place it in a public website folder or attach it to a support thread.

Test limitation: our browser download did not complete during this session. The server archive and its integrity were verified, but a downloaded copy was not. Do not count an attempted download as an off-server backup.

The Schedule & Remote Storage tab is a separate workflow. Before depending on a remote destination, confirm its availability in your edition, credentials, retained copies and recovery access. This guide did not configure remote storage or a schedule.

6. Understand Restore before clicking it
The archive row also has Restore. Restoration can replace current website files and database content with an older state. That can remove changes made since the backup, including posts, orders or user registrations.

Before restoring:
  • Make a fresh backup of the current state and keep it outside the server.
  • Confirm the domain and exact archive date.
  • Use a staging site or maintenance window where possible.
  • Read the restore confirmation carefully and verify which data it will replace.
After a restore, check the homepage, WordPress login, important pages, media, forms, plugins and HTTPS. This walkthrough did not perform a restore; a dedicated recovery test is still needed before claiming the backup is recovery-tested.

Troubleshooting
Backup fails: read the task result, check disk space and inspect the relevant panel logs. Fix the reported cause before retrying.
Archive is missing: confirm the storage destination and refresh the backup list after the job finishes. Do not assume an older file is the new backup.
Download fails: check your panel session and browser downloads. Keep the server archive intact while resolving access; do not delete it just because downloading failed.
The website changed after the backup: take another copy before maintenance. An older archive cannot contain newer changes.

Final checklist
  • Correct WordPress domain selected.
  • Backup type and destination reviewed.
  • Task completed successfully and archive exists.
  • Archive integrity checked.
  • Private off-server copy obtained and verified before relying on it for server-loss recovery.
  • Restoration tested separately before calling the backup recovery-tested.

Source: aaPanel WP Toolkit documentation. Screenshots and the backup result are from our own AdminsForum lab.
DEV 10-12-2026, 04:36 AM Read thread
aaPanel WordPress Guides

Install WordPress with aaPanel WP Toolkit (Free Edition)

Quick answer
Point your domain's A record to the VPS, open WP Toolkit → Add Wordpress, enter the domain, website title and administrator email, choose PHP and WordPress versions, and confirm installation. Check HTTPS and log in at /wp-admin. On our Free Edition lab, password-free login opened a Pro upgrade prompt; normal WordPress login worked.

Tested result
We created a separate website at wp.adminslab.com using aaPanel 8.0.6 Free Edition, Nginx, PHP 8.5 and WordPress 7.1.3. The homepage loaded over HTTPS, HTTP redirected to HTTPS, and normal login reached the authenticated WordPress dashboard. The existing manually installed WordPress site was kept separate.

Before starting
  • A working aaPanel installation with a web server, compatible PHP and MySQL/MariaDB.
  • A domain or subdomain you control, pointing to the VPS.
  • Access to DNS settings and aaPanel. Sign in to your aaPanel vendor account if the Toolkit requires it.
  • An administrator email address you can use for the website.
  • A fresh site location. Do not reuse an existing website directory without a verified backup and migration plan.
This guide creates a new WordPress website. For an existing site, use an appropriate import or migration workflow instead of creating over it.

1. Add the domain's DNS record
We used a separate subdomain so the demonstration did not replace our existing site. In Cloudflare → DNS → Records, we added an A record with name wp and the lab VPS address, using DNS only for the initial setup. Use your own server address, not the lab address.

Wait for the domain to resolve to the intended server before applying for SSL. Avoid adding an unrelated AAAA record pointing elsewhere. If you use Cloudflare proxying, review certificate validation and your SSL mode deliberately rather than assuming a certificate is already installed at the origin.

For the DNS setup workflow, see the Cloudflare guides in the Cloudflare section.

2. Open WP Toolkit
In aaPanel's left menu, click WP Toolkit. Use Local Manage for a site hosted on this server, then click Add Wordpress. Select Create site in the dialog.

3. Fill the new-site form
  • Domain: enter the website hostname, such as wp.yourdomain.com.
  • Apply for SSL: keep this checked when DNS and validation access are ready.
  • Website Title: the public WordPress site title; ours was AdminsForum WordPress Lab.
  • Email: the website administrator email.
  • PHP version: choose an installed version compatible with WordPress and the plugins you intend to use.
  • WP version: review the version offered rather than assuming every server shows the same number.
  • Language: choose the installation language.

   
AdminsForum lab: the new-site form. The private credential fields are not shown.

Our lab selected PHP 8.5 and WordPress 7.1.3. These are the versions actually used for this test, not a promise that future Toolkit releases show the same choices.

4. Review More settings and keep credentials private
Expand More settings when you need to inspect the administrator account, database options, table prefix, cache or subdirectory. WP Toolkit generated strong initial credentials in our test; we retained them instead of enabling weak passwords.

Record the generated username and password privately. The completed installation can show them in its result dialog. Do not include that dialog, database passwords or login tokens in tutorial screenshots. Use a password manager or another secure record for your real site.

We left the subdirectory field empty because this was a separate hostname. Installing into a subdirectory changes the expected website and login URLs. Review the cache option too, especially before later adding an application-level cache plugin.

5. Confirm and wait for completion
Click Confirm once. Wait for website creation and initialization; avoid repeating the action while it is working. The site appeared in Local Manage, and its SSL column progressed from initialization to a certificate lifetime indicator.

   
AdminsForum lab: the installed website in WP Toolkit, with WordPress/PHP versions and SSL status.

If creation fails, investigate the site's Log and panel run logs before retrying. Check for an existing domain/directory, missing runtime, database connection error or certificate-validation failure. Do not delete an existing website merely to dismiss an installation error.

6. Verify the public website and HTTPS
Open the site in a browser. Confirm the title and expected WordPress homepage. Check the HTTPS address loads without a certificate warning. In our test, opening HTTP redirected to HTTPS and displayed the new site.

   
AdminsForum lab: the new WordPress homepage served over HTTPS.

If WordPress loads but SSL did not finish, inspect the SSL status separately. Check DNS, validation accessibility and the certificate's domain. Do not work around a browser certificate warning and call that a successful SSL test.

7. Log in normally on Free Edition
Open your site's /wp-admin address. Enter the generated WordPress username and password and click Log In. Our normal login reached the WordPress dashboard.

   
AdminsForum lab: authenticated WordPress dashboard after a successful normal login.

WP Toolkit's Login menu offered both Password-free login and Login. On this Free Edition lab, Password-free login opened a Pro upgrade prompt. We did not purchase an upgrade or claim that feature worked. Normal WordPress login was sufficient to complete the test.

8. Check the first settings and make a backup
Review Settings → General for the title and administrator email. Review Permalinks, update availability and Site Health. Treat any update or plugin installation as a separate operation to check and back up beforehand.

Before building the site further, make a backup and verify what it contains. A WordPress recovery plan needs both website files and the database. See the website backup schedule guide and database backup schedule guide. WP Toolkit's own backup workflow will be covered separately.

Common problems
  • Domain cannot be validated: confirm the DNS record and the actual origin serving the hostname.
  • PHP choice missing: install a supported runtime first and re-open the form.
  • Initialization remains incomplete: read the site and panel logs; do not repeatedly create duplicate sites.
  • Password-free login asks for Pro: use normal WordPress login on Free Edition.
  • A 502 error: check the assigned PHP runtime, its service status and the web-server/PHP connection.
  • Login fails: verify the hostname and saved WordPress credentials. The aaPanel panel password is not the WordPress account password.

Completion checklist
  • Domain resolves to the correct VPS.
  • New site appears in WP Toolkit.
  • Expected WordPress and PHP versions selected.
  • Homepage loads and HTTPS is valid.
  • Normal WordPress login reaches the dashboard.
  • Private credentials kept out of public screenshots.
  • Files/database backup and update plan prepared.

Reference: aaPanel official WP Toolkit Local Manage documentation.
DEV 10-12-2026, 03:40 AM Read thread
aaPanel PHP & Extensions Guides

Understand PHP-FPM Settings in aaPanel

Quick answer
Open App Store → Installed → the PHP version your site uses → Setting → Optimization. Review the process mode and worker limits before changing them. More PHP workers do not automatically mean a faster website: they must fit available memory and the workload.

What was verified
We inspected PHP 8.5's Optimization screen in the AdminsForum aaPanel 8.0.6 lab and ran the version-specific PHP-FPM configuration test successfully. We did not change the worker settings or run a performance benchmark. The values in the screenshot describe the lab, not a universal recommended setup.

1. Select the right runtime
Check your website's PHP version in Website settings. Then open that same version in App Store → Installed. Different installed PHP versions can have separate PHP-FPM services and worker pools. Count their combined memory demands when sizing the server.

2. Open Optimization and record current values
Choose Optimization in the PHP manager. Before making a change, record Connection, Information, Running mode, max_children and the startup/spare-worker settings. Save a copy of the relevant configuration through your normal backup process too.

   
AdminsForum lab: the PHP-FPM settings screen. The displayed preset and numbers are not a benchmarked recommendation for other servers.

The lab used a UNIX socket and Dynamic mode. Its displayed worker values were max_children=50, start_servers=5, min_spare_servers=5 and max_spare_servers=20. We retained these settings for the inspection.

3. Understand the worker controls
  • max_children: the worker limit. It constrains how many PHP requests can be handled simultaneously.
  • start_servers: workers created initially in Dynamic mode.
  • min_spare_servers: desired minimum number of idle workers in Dynamic mode.
  • max_spare_servers: desired maximum number of idle workers in Dynamic mode.
Idle workers and busy workers are different. A site with a few long-running requests can exhaust its available workers despite a modest visitor count.

4. Understand the process modes
  • Static: maintains a fixed worker count.
  • Dynamic: adjusts worker numbers using startup and spare-worker settings, within max_children.
  • On-demand: creates workers when requests need them.
Choose a mode from the workload and memory constraints, not from its name alone. A change can affect responsiveness and resource use; compare actual behavior before and afterward. The lab's current mode was inspected, rather than switching modes to claim an unmeasured improvement.

5. Plan a realistic memory budget
Reserve RAM for the operating system, database, web server, panel, mail services and other processes first. Only the remaining budget can be assigned to PHP workers.

For illustration, if you reserve 1 GB for a PHP pool and measure representative busy workers at about 80 MB each, 1024 ÷ 80 is roughly 12 workers before extra headroom. Those numbers are a calculation example, not measurements from this lab. Real worker memory depends on your application, plugins and requests. Measure under representative activity and leave room for larger requests.

The PHP memory_limit setting controls a script's permitted memory; it is not the same as the total resident memory of each FPM process. Avoid multiplying a generic per-worker estimate by a large worker count and calling it guaranteed safe. Also include other active PHP versions and pools.

6. Keep the web-server connection aligned
The lab used the local UNIX socket /tmp/php-cgi-85.sock. Do not change the connection address simply while experimenting with worker limits: the web server must point to the matching PHP-FPM endpoint, or requests can fail with 502 errors. Keep FastCGI endpoints private.

See the Nginx 502 troubleshooting guide if the site fails after switching PHP versions.

7. Validate before reloading
If you decide a change is justified, change one aspect at a time and use Save. On this PHP 8.5 installation, the read-only configuration test is:
Code:
/www/server/php/85/sbin/php-fpm -t
Our lab returned that its php-fpm.conf test was successful. The version-specific path matters; use the executable belonging to the runtime you changed. This checks configuration validity, not website performance or memory capacity.

If validation fails, correct the error or restore the recorded configuration before reloading. When valid, use Service → Reload and confirm the service is On. Then test the website. We verified the existing configuration but did not apply a tuning change in this walkthrough.

8. Compare the same workload
Watch CPU, memory, response time, errors and PHP-FPM logs while repeating a representative workload. A quiet homepage request is not a load test. Use aaPanel monitoring to compare the same period of activity.

If the pool reaches max_children, investigate slow PHP requests and database queries as well as capacity. Adding workers can increase simultaneous database work and make an already overloaded server slower. If memory pressure worsens after a change, restore the previous settings and review the budget.

When to roll back
If errors, swapping, service failures or response times worsen, return to your recorded values. Save, validate and reload the correct runtime. Do not keep stacking unrelated changes while trying to diagnose one issue.

Completion checklist
  • Website PHP version and corresponding PHP-FPM service identified.
  • Original settings and configuration preserved.
  • Worker budget includes other services and PHP versions.
  • Connection endpoint kept aligned with the web server.
  • Configuration validation passes before reload.
  • Any change is compared against the same workload and has a rollback plan.

Reference: PHP official FPM configuration manual.
DEV 10-12-2026, 03:18 AM Read thread