



10-24-2026, 08:16 AM
(This post was last modified: 2 hours ago by JAY.
Edit Reason: Added the course video
)
CyberPanel First Steps After Install: Secure the Admin Account, 2FA, Port and SSH
A new CyberPanel server is reachable by the whole internet on port 8090 from the minute the install finishes, and bots start trying passwords within hours. These first steps take about ten minutes and close the obvious doors. Haven't installed yet? See how to install CyberPanel on Ubuntu 24.04.
Watch it: Part 3 of the CyberPanel course, Dashboard & Panel Tour
This is Part 3 of 10 in our free CyberPanel Full Course. The written steps below go into more detail.
Step 1: Fix the admin account and turn on 2FA
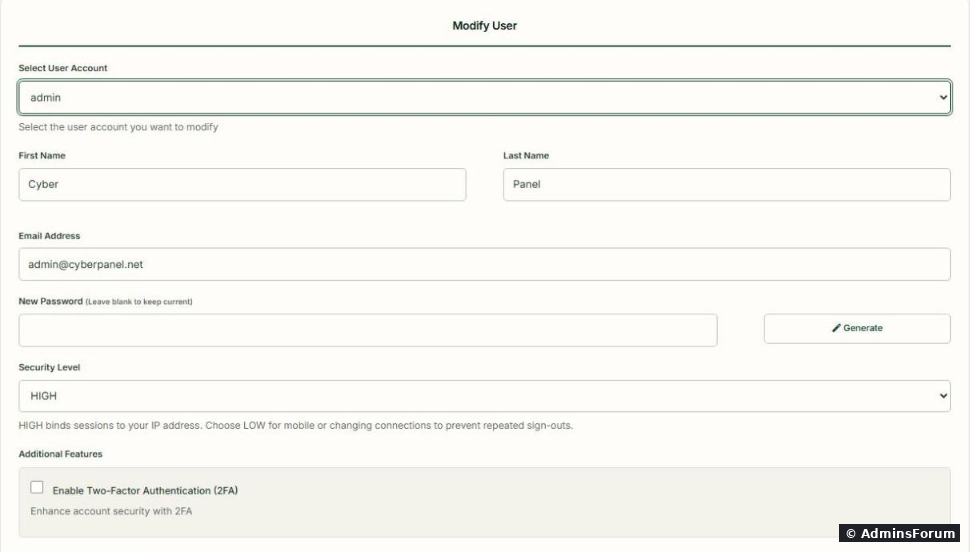
Open Users & Plans > Modify User and pick admin. Everything for the admin account is on this one page:
Step 2: Decide on the panel port
Under Server > Change Port you can move the panel away from 8090. A different port doesn't make the panel secure by itself, but it cuts down the noise from bots that only scan 8090. If you change it:
Step 3: Harden SSH
Security > Secure SSH has two tabs:
Keep your current SSH session open until the new port works.
Step 4: Check for updates
Settings > Version Management shows your current version and the latest one. Keep the operating system patched too:
Details in how to update CyberPanel safely.
Step 5: Make the first backup plan
Snapshots from your VPS provider are the easiest safety net: take one now, while the server is clean. Once you have sites, set up CyberPanel's own backups too.
Checklist
More CyberPanel guides
Tested on CyberPanel 3.0 (build 8, OpenLiteSpeed edition) on Ubuntu 24.04, October 2026. Menu names can change slightly between versions.
A new CyberPanel server is reachable by the whole internet on port 8090 from the minute the install finishes, and bots start trying passwords within hours. These first steps take about ten minutes and close the obvious doors. Haven't installed yet? See how to install CyberPanel on Ubuntu 24.04.
Watch it: Part 3 of the CyberPanel course, Dashboard & Panel Tour
This is Part 3 of 10 in our free CyberPanel Full Course. The written steps below go into more detail.
Step 1: Fix the admin account and turn on 2FA
Open Users & Plans > Modify User and pick admin. Everything for the admin account is on this one page:
- First Name / Last Name / Email Address: the defaults are "Cyber Panel" and . Put in your own email so notifications reach you.Code:
- New Password: if you used a short or reused password during install, change it here. Generate creates a strong one. Don't reuse your root password.
- Security Level: HIGH ties your login session to your IP address, so a stolen session cookie is useless elsewhere. If your IP changes a lot (mobile, some VPNs) and you keep getting logged out, choose LOW.
- Enable Two-Factor Authentication (2FA): tick it, scan the QR code with an authenticator app (Google Authenticator, Aegis, 1Password, Bitwarden...) or type the key manually, then Save Changes. From now on login needs your password and a 6-digit code.
Step 2: Decide on the panel port
Under Server > Change Port you can move the panel away from 8090. A different port doesn't make the panel secure by itself, but it cuts down the noise from bots that only scan 8090. If you change it:
- First add a firewall rule for the new port (Security > Firewall, see the firewall guide) and open it in your provider's cloud firewall.
- Then change the port and log in at .Code:
https://YOUR-IP:NEWPORT
Step 3: Harden SSH
Security > Secure SSH has two tabs:
- Basic Settings: SSH Port and Permit Root Login. As the page warns: before you turn off root login, create another user with sudo rights and test that you can log in with it.
- SSH Keys: paste your public key (orCode:
ssh-ed25519 ...) and Save Key. Test key login in a new terminal before you rely on it. The full tested walkthrough, including how to switch password login off (and why aCode:ssh-rsa ...config file does nothing on Ubuntu), is in SSH key login and disabling passwords.Code:99-
Code:
firewall-cmd --permanent --add-port=2222/tcp && firewall-cmd --reloadStep 4: Check for updates
Settings > Version Management shows your current version and the latest one. Keep the operating system patched too:
Code:
apt update && apt -y upgradeStep 5: Make the first backup plan
Snapshots from your VPS provider are the easiest safety net: take one now, while the server is clean. Once you have sites, set up CyberPanel's own backups too.
Checklist
- Admin email changed, strong unique password, 2FA on and tested.
- Panel port allowed only where you need it.
- SSH key login working; root password login off (after testing a sudo user).
- System and panel up to date; a provider snapshot taken.
More CyberPanel guides
- Fail2ban brute-force protection
- Change PHP version per website
- Git deployment from GitHub
- SSH key login, passwords off
- Create a website
- Issue SSL and fix failed certificates
- Subdomains, addon domains and aliases
- Rewrite rules, force HTTPS, HSTS
- Install WordPress with LiteSpeed Cache
- Cron jobs and a real WP-Cron
- Redis object cache for WordPress
- Databases and phpMyAdmin
- Email, DKIM, SPF and DMARC
- Email forwarding, catch-all, plus-addressing
- Mail queue, spam senders, blacklists
- CyberPanel DNS vs Cloudflare
- Packages and website limits
- Deploy Laravel on CyberPanel
- WordPress staging (clone) fixes
- Backups: create, restore, schedule
- File Manager and FTP
- Reset the admin password from SSH
- Log files and config locations
- Check and restart services
- ModSecurity + OWASP rules (fix)
- CLI cheat sheet
- Install CyberPanel on Ubuntu 24.04
- Firewall explained
- Install PHP extensions
- Change PHP settings (php.ini)
- Update CyberPanel safely
- Server Error (500) after a fresh install
- Packages, users and ACLs
- Upgrade CyberPanel safely
- Real visitor IPs behind Cloudflare
- Docker apps on your domain with SSL
- Import a large SQL file over SSH
- Remote MySQL access for one IP
- Move WordPress to CyberPanel by hand
- Fix "Error establishing a database connection"
- Fix PHP2Shell (CVE-2026-109618/109619)
- Run your own nameservers (PowerDNS)
- CyberPanel on a small VPS: RAM tuning
Tested on CyberPanel 3.0 (build 8, OpenLiteSpeed edition) on Ubuntu 24.04, October 2026. Menu names can change slightly between versions.