



Redis Object Cache for WordPress on CyberPanel With LiteSpeed Cache
Page cache (LiteSpeed Cache) serves finished pages to visitors. It doesn't help logged-in users, WooCommerce carts, or the admin area, where every page still runs dozens of database queries. An object cache keeps the results of those queries in memory, so WordPress asks MySQL less often. On CyberPanel the pieces are already on the server; you only have to connect them. We did it on our test site and checked every step.
Step 1: Check Redis is installed and running
CyberPanel 3.0 installed Redis for us during setup. Check yours:
We got , and Redis 7.0.15. If you get "command not found", install it with and start it with .
Make sure it only listens on the server itself:
Ours showed and only ( in ). Never open port 6379 to the internet.
Step 2: Check the PHP extension
WordPress talks to Redis through the PHP redis extension, and it has to be loaded in the PHP version your site uses:
We found for all five installed versions (8.1 to 8.5). If yours is missing, install it from Server > PHP > Install Extensions; see installing PHP extensions in CyberPanel.
Step 3: Turn on Object Cache in LiteSpeed Cache
In WordPress admin open LiteSpeed Cache > Cache > Object. Set Object Cache to ON, Method to Redis, Host, Port , and save. Leave username and password empty unless you set a Redis password.
Watch the defaults. Before we changed anything, LiteSpeed Cache was set to Memcached on port:
If you only flip the ON switch, it talks to Memcached, not Redis. On CyberPanel that is LiteSpeed's own service, which was running on our server too. That works as well, but it isn't what you meant to set up.
We switched it on from SSH with WP-CLI. Each command answers with the saved value, and LiteSpeed Cache writes the drop-in file right away:
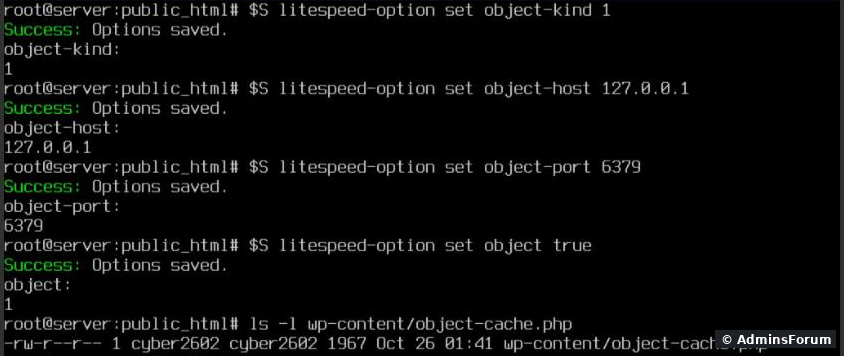
Replace with the site's Linux user (ours is ; find yours with ). The file appeared at once. No WP-CLI yet? See our WordPress install guide.
Step 4: Prove it works
Before: printed . After one page load it printed 39.
Load a few pages and look at the Redis hit counter, then cap the memory:
We saw and : two out of three lookups were answered from memory instead of MySQL. The hits climb as the site gets traffic.
Step 5: Give Redis a memory limit
Out of the box ours had, which means no limit. On a small VPS a busy cache can grow until the server starts swapping. Set a cap and let Redis drop the least-used keys when it's full:
saves both lines into , so they survive a restart. 128 to 256 MB is plenty for a few normal WordPress sites.
Several sites on one server
LiteSpeed Cache puts a long per-site prefix in front of every key, so two sites don't read each other's entries. But clearing the cache is wider than one site. We put a test key in Redis database 5, then ran:
Database 0 dropped from 39 keys to 5 (rebuilt on the next request); the key in database 5 survived. A flush clears the whole database number the site uses, so sites sharing database 0 wipe each other's cache every time one of them purges. Give each site its own Redis Database ID (0 to 15) in LiteSpeed Cache > Cache > Object, or with:
We moved our site to database 2; after one page load showed the 39 keys there.
For the same reason, don't run on a shared server: it empties every site's cache at once.
Also know that Redis on CyberPanel has no password by default ( printed for us). Anything running on the server can read the cache. That's fine on a server that only hosts your own sites. If you host other people, set a password ( in , then the same password in LiteSpeed Cache).
Common problems
More CyberPanel guides
Tested on CyberPanel 3.0 (build 8, OpenLiteSpeed edition) on Ubuntu 24.04, October 2026. Menu names can change slightly between versions.
Page cache (LiteSpeed Cache) serves finished pages to visitors. It doesn't help logged-in users, WooCommerce carts, or the admin area, where every page still runs dozens of database queries. An object cache keeps the results of those queries in memory, so WordPress asks MySQL less often. On CyberPanel the pieces are already on the server; you only have to connect them. We did it on our test site and checked every step.
Step 1: Check Redis is installed and running
CyberPanel 3.0 installed Redis for us during setup. Check yours:
Code:
systemctl is-active redis-server
redis-cli ping
redis-server --versionCode:
activeCode:
PONGCode:
apt install -y redis-serverCode:
systemctl enable --now redis-serverMake sure it only listens on the server itself:
Code:
ss -ltnp | grep 6379Code:
127.0.0.1:6379Code:
[::1]:6379Code:
bind 127.0.0.1 -::1Code:
/etc/redis/redis.confStep 2: Check the PHP extension
WordPress talks to Redis through the PHP redis extension, and it has to be loaded in the PHP version your site uses:
Code:
ls /usr/local/lsws/lsphp*/etc/php/*/mods-available/ | grep redisCode:
50-redis.iniStep 3: Turn on Object Cache in LiteSpeed Cache
In WordPress admin open LiteSpeed Cache > Cache > Object. Set Object Cache to ON, Method to Redis, Host
Code:
127.0.0.1Code:
6379Watch the defaults. Before we changed anything, LiteSpeed Cache was set to Memcached on port
Code:
11211Code:
wp litespeed-option get object-kind   -> 0   (0 = Memcached, 1 = Redis)
wp litespeed-option get object-port -> 11211Code:
lsmcdWe switched it on from SSH with WP-CLI. Each command answers with the saved value, and LiteSpeed Cache writes the drop-in file right away:
Code:
cd /home/yourdomain.com/public_html
sudo -u SITEUSER wp litespeed-option set object-kind 1
sudo -u SITEUSER wp litespeed-option set object-host 127.0.0.1
sudo -u SITEUSER wp litespeed-option set object-port 6379
sudo -u SITEUSER wp litespeed-option set object trueCode:
SITEUSERCode:
cyber2602Code:
stat -c %U .Code:
wp-content/object-cache.phpStep 4: Prove it works
Before:
Code:
redis-cli dbsizeLoad a few pages and look at the Redis hit counter, then cap the memory:
Code:
# redis-cli info stats | grep keyspace
keyspace_hits:105
keyspace_misses:45
# redis-cli config set maxmemory 256mb
OK
# redis-cli config set maxmemory-policy allkeys-lru
OK
# redis-cli config rewrite
OK
# grep -E '^maxmemory' /etc/redis/redis.conf
maxmemory 256mb
maxmemory-policy allkeys-lru
Code:
for i in 1 2 3; do curl -sk -o /dev/null https://yourdomain.com/?nc=$i; done
redis-cli info stats | grep keyspaceCode:
keyspace_hits:105Code:
keyspace_misses:45Step 5: Give Redis a memory limit
Out of the box ours had
Code:
maxmemory_human:0BCode:
redis-cli config set maxmemory 256mb
redis-cli config set maxmemory-policy allkeys-lru
redis-cli config rewrite
Code:
config rewriteCode:
/etc/redis/redis.confSeveral sites on one server
LiteSpeed Cache puts a long per-site prefix in front of every key, so two sites don't read each other's entries. But clearing the cache is wider than one site. We put a test key in Redis database 5, then ran:
Code:
sudo -u cyber2602 wp cache flush
redis-cli dbsize; redis-cli -n 5 dbsizeCode:
sudo -u SITEUSER wp litespeed-option set object-db_id 2Code:
redis-cli -n 2 dbsizeFor the same reason, don't run
Code:
redis-cli flushallAlso know that Redis on CyberPanel has no password by default (
Code:
grep -c ^requirepass /etc/redis/redis.confCode:
requirepassCode:
redis.confCommon problems
- Object cache not working (dbsize stays 0): Redis is stopped () or the method is still Memcached. CheckCode:
systemctl restart redis-server.Code:wp litespeed-option get object-kind
- LiteSpeed Cache says the Redis extension is missing: the extension isn't loaded in the PHP version this site uses. Install it, then restart PHP with .Code:
killall lsphp
- Site shows old content after an edit: purge from the LiteSpeed Cache toolbar or run as the site user.Code:
wp cache flush
- Everything got slower: rare, but it happens when Redis is out of memory and constantly evicting. Check and raiseCode:
redis-cli info memory | grep human.Code:maxmemory
- Want to turn it off: , or the switch in LiteSpeed Cache. If you ever remove the plugin and pages break, check for a leftoverCode:
wp litespeed-option set object falseand delete it.Code:wp-content/object-cache.php
More CyberPanel guides
- Fail2ban brute-force protection
- Change PHP version per website
- Git deployment from GitHub
- SSH key login, passwords off
- Create a website
- Issue SSL and fix failed certificates
- Subdomains, addon domains and aliases
- Rewrite rules, force HTTPS, HSTS
- Install WordPress with LiteSpeed Cache
- Cron jobs and a real WP-Cron
- Databases and phpMyAdmin
- Email, DKIM, SPF and DMARC
- Email forwarding, catch-all, plus-addressing
- Mail queue, spam senders, blacklists
- CyberPanel DNS vs Cloudflare
- Packages and website limits
- Deploy Laravel on CyberPanel
- WordPress staging (clone) fixes
- Backups: create, restore, schedule
- File Manager and FTP
- Reset the admin password from SSH
- Log files and config locations
- Check and restart services
- First steps after install
- ModSecurity + OWASP rules (fix)
- CLI cheat sheet
- Install CyberPanel on Ubuntu 24.04
- Firewall explained
- Install PHP extensions
- Change PHP settings (php.ini)
- Update CyberPanel safely
- Server Error (500) after a fresh install
- Packages, users and ACLs
- Upgrade CyberPanel safely
- Real visitor IPs behind Cloudflare
- Docker apps on your domain with SSL
- Import a large SQL file over SSH
- Remote MySQL access for one IP
- Move WordPress to CyberPanel by hand
- Fix "Error establishing a database connection"
- Fix PHP2Shell (CVE-2026-109618/109619)
- Run your own nameservers (PowerDNS)
- CyberPanel on a small VPS: RAM tuning
Tested on CyberPanel 3.0 (build 8, OpenLiteSpeed edition) on Ubuntu 24.04, October 2026. Menu names can change slightly between versions.