



Move a WordPress Site to CyberPanel by Hand: Files, Database, New URL (Tested)
Migration plugins are fine for small sites, but they fail on big ones, time out, or want a paid version. The manual way always works: copy the files, copy the database, then tell WordPress where it lives now. We moved a WordPress 7.1 site to a fresh website on CyberPanel 3.0 (OpenLiteSpeed, MariaDB, Ubuntu 24.04) and at the same time changed its domain, from to . In our lab the "old server" was the same machine, but every step is the one you'd use between two servers.
Three things went wrong that the usual tutorials don't mention: the new copy quietly used the old database, the archive changed the permissions of public_html, and LiteSpeed Cache kept serving the old domain after the URL change.
What you need
Step 1: Export on the old server
In the WordPress folder (where is):
Export on the old server:
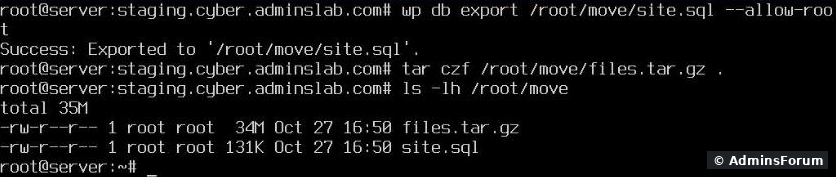
No WP-CLI on the old host? Use, or the export button of its phpMyAdmin. Then copy both files to the new server:
Step 2: Prepare the website on CyberPanel
Step 3: Extract the files and import the database
(The is CyberPanel's placeholder page; WordPress doesn't need it. For big databases or import errors, see our guide on importing large SQL files over SSH.)
Extracting and importing on CyberPanel:
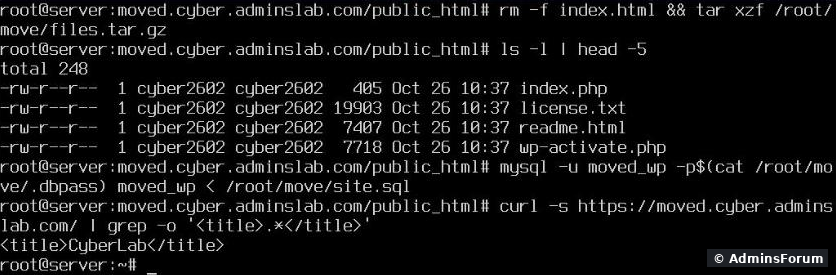
The site loaded right away, with its normal title. Don't celebrate yet:
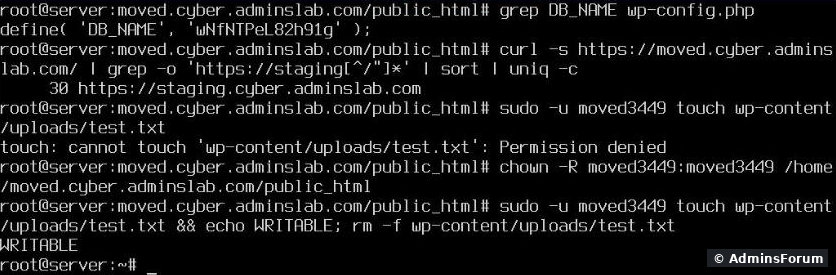
Still the old database, old links, and the wrong file owner:
Step 4: Fix the owner and permissions
After that the website user could write again (see above). But look at itself. Because our archive contained the folder , extracting it replaced CyberPanel's permissions on with the ones from the old server:
What the archive did to public_html:
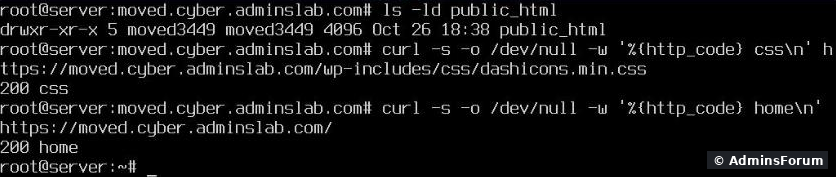
(755) means every user on the server can read the folder, including with the database password. CyberPanel creates it as with group , so only the site user and the web server get in. Put that back:
Back to CyberPanel's default:

Static files (CSS) still answered with 200 afterwards, so the web server could still read everything.
Step 5: New database details and the new URL
Run WP-CLI as the website's user (), so the files it changes keep the right owner:
If the domain changes too, replace it everywhere in the database. Don't do this with a text editor on the SQL file: WordPress stores some settings as serialized PHP data, and changing the length of a URL inside it breaks them. handles that:
New database details, then the URL change:
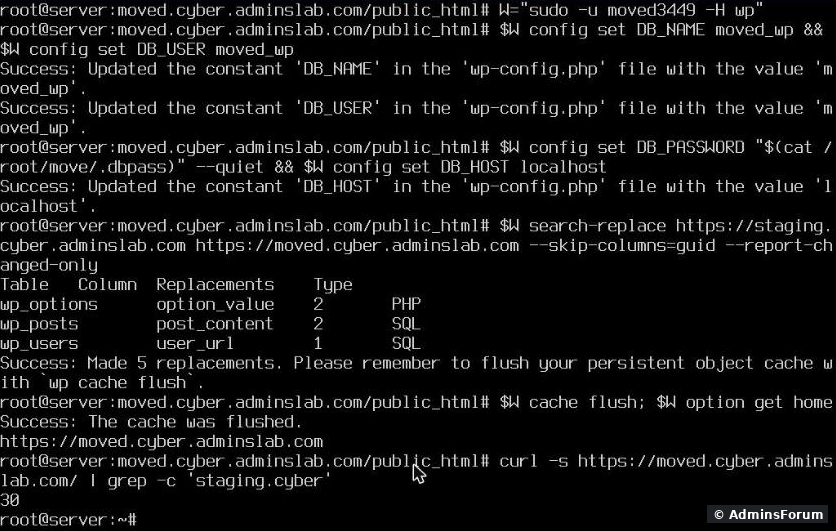
5 replacements in our small test site; a real site has hundreds or thousands. leaves the post IDs for feed readers alone. Moving to the same domain? Skip the search-replace.
Step 6: Clear LiteSpeed Cache (the old domain was still there)
After all that, the homepage still had 30 links to the old domain. The response header said: OpenLiteSpeed served a page the LiteSpeed Cache plugin had stored before the move. Purge it:
The old page came from the cache:
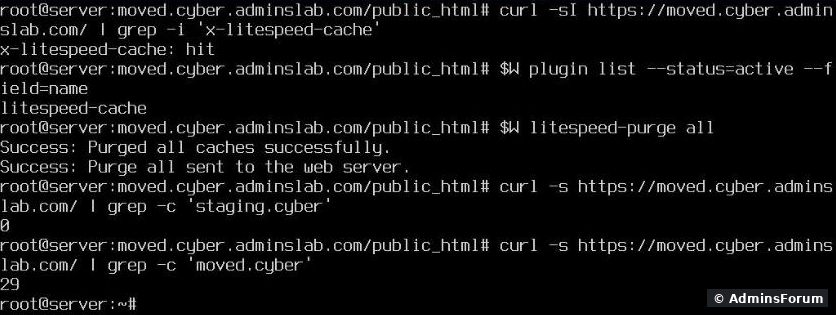
0 old links, 29 new ones. Any other cache plugin (WP Rocket, W3 Total Cache) or a CDN like Cloudflare needs the same purge.
Step 7: Go live
Quick fixes
More CyberPanel guides
Migration plugins are fine for small sites, but they fail on big ones, time out, or want a paid version. The manual way always works: copy the files, copy the database, then tell WordPress where it lives now. We moved a WordPress 7.1 site to a fresh website on CyberPanel 3.0 (OpenLiteSpeed, MariaDB, Ubuntu 24.04) and at the same time changed its domain, from
Code:
staging.cyber.adminslab.comCode:
moved.cyber.adminslab.comThree things went wrong that the usual tutorials don't mention: the new copy quietly used the old database, the archive changed the permissions of public_html, and LiteSpeed Cache kept serving the old domain after the URL change.
What you need
- SSH access to the old server (or a full files backup and an SQL export from its control panel).
- Root SSH on the CyberPanel server.
- WP-CLI, which CyberPanel installs (; ours: 2.12.0).Code:
wp --version
Step 1: Export on the old server
In the WordPress folder (where
Code:
wp-config.phpCode:
wp db export /root/move/site.sql --allow-root
tar czf /root/move/files.tar.gz .No WP-CLI on the old host? Use
Code:
mysqldump -u DBUSER -p DBNAME > site.sqlCode:
scp /root/move/* root@YOUR-SERVER-IP:/root/move/Step 2: Prepare the website on CyberPanel
- Websites > Create Website with the domain. Same PHP version as the old server, or newer if your plugins support it.
- Databases > Create Database for that website. Note the name, user and password.
- Find the website's Linux user, you need it in Step 4: (ours:Code:
grep extUser /usr/local/lsws/conf/vhosts/DOMAIN/vhost.conf).Code:moved3449
- If the domain already points here: Issue SSL. If not, do it after the DNS change.
Step 3: Extract the files and import the database
Code:
cd /home/moved.cyber.adminslab.com/public_html
rm -f index.html
tar xzf /root/move/files.tar.gz
mysql -u moved_wp -p moved_wp < /root/move/site.sqlCode:
index.htmlExtracting and importing on CyberPanel:
The site loaded right away, with its normal title. Don't celebrate yet:
Still the old database, old links, and the wrong file owner:
- still pointed at the old database. Because our old site was on the same server, that database existed and the new copy happily used it: every edit on the "new" site would have changed the old one. Between two servers you'd see Error establishing a database connection instead.Code:
wp-config.php
- The page still had 30 links to the old domain.
- The files kept the old server's owner (here ), so WordPress, which runs as the website's own user on CyberPanel, couldn't write anything: no uploads, no plugin updates, no cache files.Code:
cyber2602
Step 4: Fix the owner and permissions
Code:
chown -R moved3449:moved3449 /home/moved.cyber.adminslab.com/public_htmlCode:
public_htmlCode:
.Code:
public_htmlWhat the archive did to public_html:
Code:
drwxr-xr-xCode:
wp-config.phpCode:
750Code:
nogroupCode:
chown moved3449:nogroup /home/moved.cyber.adminslab.com/public_html
chmod 750 /home/moved.cyber.adminslab.com/public_htmlStatic files (CSS) still answered with 200 afterwards, so the web server could still read everything.
Step 5: New database details and the new URL
Run WP-CLI as the website's user (
Code:
sudo -u USER -H wpCode:
W="sudo -u moved3449 -H wp"
$W config set DB_NAME moved_wp
$W config set DB_USER moved_wp
$W config set DB_PASSWORD 'YOUR-DB-PASSWORD' --quiet
$W config set DB_HOST localhostCode:
wp search-replaceCode:
$W search-replace https://old-domain.com https://new-domain.com --skip-columns=guid --report-changed-only5 replacements in our small test site; a real site has hundreds or thousands.
Code:
--skip-columns=guidStep 6: Clear LiteSpeed Cache (the old domain was still there)
After all that, the homepage still had 30 links to the old domain. The response header said
Code:
x-litespeed-cache: hitCode:
$W litespeed-purge all0 old links, 29 new ones. Any other cache plugin (WP Rocket, W3 Total Cache) or a CDN like Cloudflare needs the same purge.
Step 7: Go live
- Test before you change DNS: add to the hosts file on your PC, then click through the site and log in to wp-admin.Code:
YOUR-SERVER-IP new-domain.com
- Point the domain's A record to the new server.
- Issue SSL in CyberPanel once DNS has switched (with Cloudflare: DNS only while issuing).
- Re-save Settings > Permalinks once if inner pages show 404.
- Delete on both servers; it holds a full copy of your database.Code:
/root/move
Quick fixes
- Error establishing a database connection: wrong DB name, user, password or host in . See our separate guide on that error.Code:
wp-config.php
- Uploads or updates fail, "Could not create directory": owner not fixed (Step 4).
- Site redirects to the old domain: search-replace missing or cache not purged (Steps 5 and 6).
More CyberPanel guides
- Fail2ban brute-force protection
- Change PHP version per website
- Git deployment from GitHub
- SSH key login, passwords off
- Create a website
- Issue SSL and fix failed certificates
- Subdomains, addon domains and aliases
- Rewrite rules, force HTTPS, HSTS
- Install WordPress with LiteSpeed Cache
- Cron jobs and a real WP-Cron
- Redis object cache for WordPress
- Databases and phpMyAdmin
- Email, DKIM, SPF and DMARC
- Email forwarding, catch-all, plus-addressing
- Mail queue, spam senders, blacklists
- CyberPanel DNS vs Cloudflare
- Packages and website limits
- Deploy Laravel on CyberPanel
- WordPress staging (clone) fixes
- Backups: create, restore, schedule
- File Manager and FTP
- Reset the admin password from SSH
- Log files and config locations
- Check and restart services
- First steps after install
- ModSecurity + OWASP rules (fix)
- CLI cheat sheet
- Install CyberPanel on Ubuntu 24.04
- Firewall explained
- Install PHP extensions
- Change PHP settings (php.ini)
- Update CyberPanel safely
- Server Error (500) after a fresh install
- Packages, users and ACLs
- Upgrade CyberPanel safely
- Real visitor IPs behind Cloudflare
- Docker apps on your domain with SSL
- Import a large SQL file over SSH
- Remote MySQL access for one IP
- Fix "Error establishing a database connection"
- Fix PHP2Shell (CVE-2026-109618/109619)
- Run your own nameservers (PowerDNS)
- CyberPanel on a small VPS: RAM tuning