



How to Change PHP Settings in CyberPanel: Upload Size, Memory Limit and php.ini
"The uploaded file exceeds the upload_max_filesize directive", "Allowed memory size exhausted", a backup import that times out: these are all PHP limits, and in CyberPanel you change them per PHP version.
Step 1: Know your site's PHP version
Settings belong to a PHP version, not to a website. If your site runs PHP 8.3, edit PHP 8.3. You can see and change a site's version under Websites.
Step 2: Change the basic settings
Open Server > PHP Configs. The Basic Settings tab covers the values people change most:
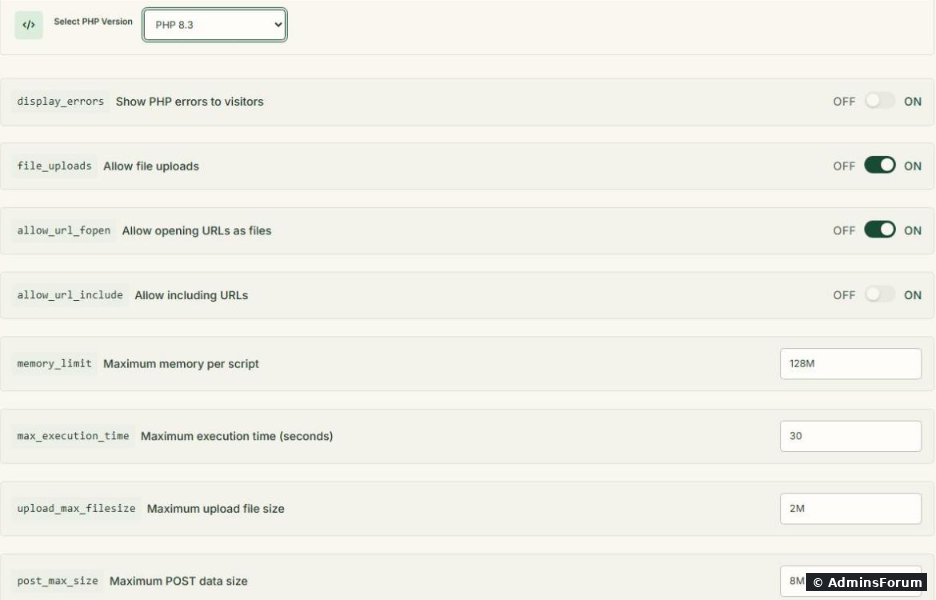
Select the PHP Version. On a fresh install the defaults are small: memory_limit 128M, max_execution_time 30, upload_max_filesize 2M, post_max_size 8M and max_input_time 60. That 2 MB upload limit is why so many first uploads fail. Adjust:
Step 3: The full php.ini (Advanced Editor)
The Advanced Editor tab opens the complete php.ini for the selected version, for settings that aren't on the basic tab (for example, which page builders and big menus often need at ). Edit, Save Changes, Restart PHP.
The same file on disk, for PHP 8.3 on Ubuntu:
After editing by hand: .
Step 4: Check the new value
For what the website really sees, check WordPress Tools > Site Health > Info > Server, or a temporary phpinfo file (delete it afterwards).
Still limited after changing it?
More CyberPanel guides
Tested on CyberPanel 3.0 (build 8, OpenLiteSpeed edition) on Ubuntu 24.04, October 2026. Menu names can change slightly between versions.
"The uploaded file exceeds the upload_max_filesize directive", "Allowed memory size exhausted", a backup import that times out: these are all PHP limits, and in CyberPanel you change them per PHP version.
Step 1: Know your site's PHP version
Settings belong to a PHP version, not to a website. If your site runs PHP 8.3, edit PHP 8.3. You can see and change a site's version under Websites.
Step 2: Change the basic settings
Open Server > PHP Configs. The Basic Settings tab covers the values people change most:
Select the PHP Version. On a fresh install the defaults are small: memory_limit 128M, max_execution_time 30, upload_max_filesize 2M, post_max_size 8M and max_input_time 60. That 2 MB upload limit is why so many first uploads fail. Adjust:
- upload_max_filesize: the biggest single file you can upload. For WordPress media and plugin uploads, orCode:
64Mis plenty.Code:128M
- post_max_size: the whole form submission. Keep it equal to or bigger than upload_max_filesize, or big uploads still fail.
- memory_limit: memory one PHP script may use. suits most WordPress sites; page builders and WooCommerce may wantCode:
256M.Code:512M
- max_execution_time and max_input_time (seconds): raise to for big imports. Don't leave huge values on a busy server.Code:
300
- display_errors: keep Off on live sites, or visitors see paths and errors.
- file_uploads On, allow_url_fopen usually On, allow_url_include always Off (it's a security risk).
Step 3: The full php.ini (Advanced Editor)
The Advanced Editor tab opens the complete php.ini for the selected version, for settings that aren't on the basic tab (for example
Code:
max_input_varsCode:
5000The same file on disk, for PHP 8.3 on Ubuntu:
Code:
/usr/local/lsws/lsphp83/etc/php/8.3/litespeed/php.iniCode:
systemctl restart lswsStep 4: Check the new value
Code:
/usr/local/lsws/lsphp83/bin/php -i | grep -E 'upload_max_filesize|post_max_size|memory_limit'Still limited after changing it?
- Wrong PHP version edited: check the site's version again.
- PHP not restarted: click Restart PHP or restart lsws.
- A .htaccess or .user.ini override in the site folder sets a lower value. Search for it: Code:
grep -ri 'upload_max\|memory_limit' /home/example.com/public_html/.htaccess /home/example.com/public_html/.user.ini 2>/dev/null - WordPress' own limit: in wp-config.php can be lower than PHP's memory_limit.Code:
WP_MEMORY_LIMIT
- Upload still fails above ~100 MB behind Cloudflare: Cloudflare's free plan limits request size to 100 MB.
More CyberPanel guides
- Fail2ban brute-force protection
- Change PHP version per website
- Git deployment from GitHub
- SSH key login, passwords off
- Create a website
- Issue SSL and fix failed certificates
- Subdomains, addon domains and aliases
- Rewrite rules, force HTTPS, HSTS
- Install WordPress with LiteSpeed Cache
- Cron jobs and a real WP-Cron
- Redis object cache for WordPress
- Databases and phpMyAdmin
- Email, DKIM, SPF and DMARC
- Email forwarding, catch-all, plus-addressing
- Mail queue, spam senders, blacklists
- CyberPanel DNS vs Cloudflare
- Packages and website limits
- Deploy Laravel on CyberPanel
- WordPress staging (clone) fixes
- Backups: create, restore, schedule
- File Manager and FTP
- Reset the admin password from SSH
- Log files and config locations
- Check and restart services
- First steps after install
- ModSecurity + OWASP rules (fix)
- CLI cheat sheet
- Install CyberPanel on Ubuntu 24.04
- Firewall explained
- Install PHP extensions
- Update CyberPanel safely
- Server Error (500) after a fresh install
- Packages, users and ACLs
- Upgrade CyberPanel safely
- Real visitor IPs behind Cloudflare
- Docker apps on your domain with SSL
- Import a large SQL file over SSH
- Remote MySQL access for one IP
- Move WordPress to CyberPanel by hand
- Fix "Error establishing a database connection"
- Fix PHP2Shell (CVE-2026-109618/109619)
- Run your own nameservers (PowerDNS)
- CyberPanel on a small VPS: RAM tuning
Tested on CyberPanel 3.0 (build 8, OpenLiteSpeed edition) on Ubuntu 24.04, October 2026. Menu names can change slightly between versions.