



10-24-2026, 11:59 AM
(This post was last modified: 2 hours ago by JAY.
Edit Reason: Added the course video
)
CyberPanel SSL: Issue Let's Encrypt for Your Website and Fix Failed Certificates
CyberPanel gives every website a free Let's Encrypt certificate and renews it automatically. Most of the time you don't do anything: if the domain points to the server when you create the site, it comes up with https straight away. This guide covers checking the certificate, issuing it again by hand, and what to do when it fails.
Watch it: Part 5 of the CyberPanel course, Free Let's Encrypt SSL
This is Part 5 of 10 in our free CyberPanel Full Course. The written steps below go into more detail.
Check the certificate
Open Websites, click your domain to open its workspace, go to the SSL & Domains tab and click Manage SSL. Choose the website and CyberPanel shows the current certificate:
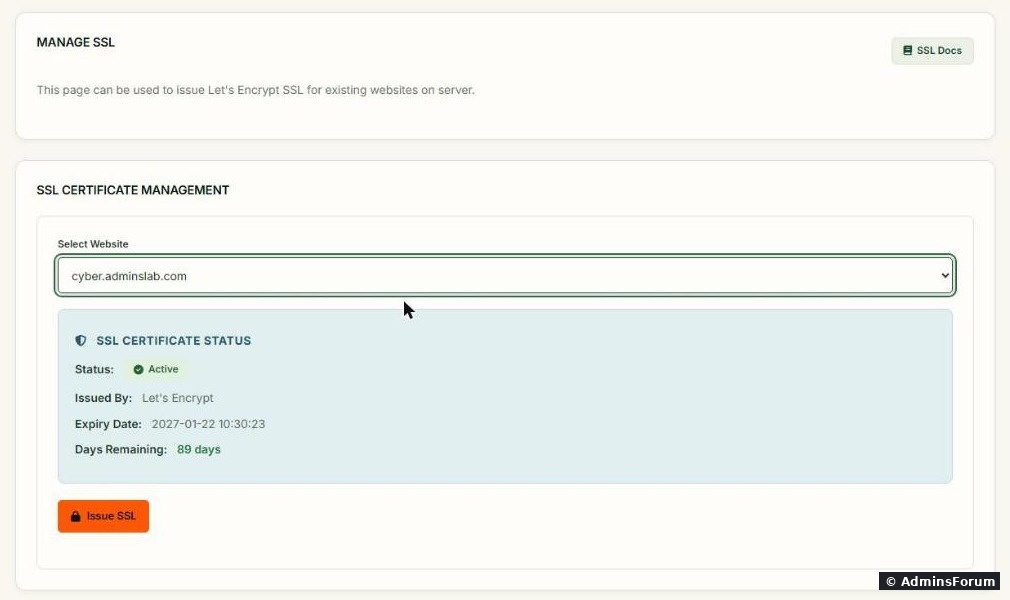
For our test site cyber.adminslab.com: Status Active, issued by Let's Encrypt, expires 2027-01-22, 89 days remaining. Let's Encrypt certificates last 90 days, and CyberPanel renews them before they expire.
The Issue SSL button requests a new certificate for the site. Use it after fixing DNS, after adding a www record or an alias, or when the status isn't Active.
You can also see the certificate from SSH:
Ours printed:
The Subject Alternative Name line lists every name the certificate covers. Ours only has , because we never created a DNS record. That's correct: Let's Encrypt only includes names that resolve to the server.
Before you click Issue SSL
Let's Encrypt checks that you control the domain by fetching a file from it over plain http (port 80). So:
Adding www later
Created the site without a www record? Add the A record for, wait until shows your server IP, then click Issue SSL again. The new certificate covers both names.
Why issuing fails, and the fix and .
Force https
Having a certificate doesn't send visitors to https by itself. For WordPress, set both URLs in Settings > General to https. For any site, you can add this to the top of (OpenLiteSpeed reads it):
Restart the web server after changing .htaccess: .
The panel's own certificate (port 8090)
The panel on port 8090 uses a separate, self-signed certificate after install, which is why your browser warns you. Giving the panel a real certificate on its own hostname is a separate step; we cover it in its own guide.
New site? Start with creating a website in CyberPanel.
More CyberPanel guides
Tested on CyberPanel 3.0 (build 8, OpenLiteSpeed edition) on Ubuntu 24.04, October 2026. Menu names can change slightly between versions.
CyberPanel gives every website a free Let's Encrypt certificate and renews it automatically. Most of the time you don't do anything: if the domain points to the server when you create the site, it comes up with https straight away. This guide covers checking the certificate, issuing it again by hand, and what to do when it fails.
Watch it: Part 5 of the CyberPanel course, Free Let's Encrypt SSL
This is Part 5 of 10 in our free CyberPanel Full Course. The written steps below go into more detail.
Check the certificate
Open Websites, click your domain to open its workspace, go to the SSL & Domains tab and click Manage SSL. Choose the website and CyberPanel shows the current certificate:
For our test site cyber.adminslab.com: Status Active, issued by Let's Encrypt, expires 2027-01-22, 89 days remaining. Let's Encrypt certificates last 90 days, and CyberPanel renews them before they expire.
The Issue SSL button requests a new certificate for the site. Use it after fixing DNS, after adding a www record or an alias, or when the status isn't Active.
You can also see the certificate from SSH:
Code:
echo | openssl s_client -connect cyber.adminslab.com:443 -servername cyber.adminslab.com 2>/dev/null | openssl x509 -noout -issuer -enddate -ext subjectAltNameCode:
issuer=C = US, O = Let's Encrypt, CN = YR2
X509v3 Subject Alternative Name:
    DNS:cyber.adminslab.com
notAfter=Jan 22 10:30:23 2027 GMTCode:
cyber.adminslab.comCode:
www.cyberBefore you click Issue SSL
Let's Encrypt checks that you control the domain by fetching a file from it over plain http (port 80). So:
- The domain (and www, if you want it) must point to this server: Code:
dig +short yourdomain.com - Port 80 must be open in the firewall and at your VPS provider. CyberPanel opens it by default.
- If the domain is on Cloudflare, set the record to DNS only (grey cloud) while issuing. With the orange cloud on, use Cloudflare's SSL mode Full (strict) after the certificate is issued.
- No redirect or rewrite rule in should blockCode:
.htaccess.Code:/.well-known/acme-challenge/
Adding www later
Created the site without a www record? Add the A record for
Code:
wwwCode:
dig +short www.yourdomain.comWhy issuing fails, and the fix
- DNS points elsewhere (old host, parked page, wrong IP): fix the A records and wait for them to update. Most failures are this.
- IPv6 (AAAA) record pointing to the wrong place: Let's Encrypt prefers IPv6 if the record exists. Delete the AAAA record or make it point to this server.
- Cloudflare proxy (orange cloud) during issuing: switch to DNS only, issue, then switch back.
- Port 80 closed at the provider's firewall or in firewalld: see the CyberPanel firewall guide.
- Rate limit: after many failed tries Let's Encrypt blocks new attempts for about an hour (failed validations) or longer (too many certificates for the same names in a week). Fix the cause first, then try once.
- Site shows the old certificate after issuing: restart the web server, , and reload in a private window.Code:
systemctl restart lsws
Code:
/home/cyberpanel/error-logs.txtCode:
/usr/local/lsws/logs/error.logForce https
Having a certificate doesn't send visitors to https by itself. For WordPress, set both URLs in Settings > General to https. For any site, you can add this to the top of
Code:
public_html/.htaccessCode:
RewriteEngine On
RewriteCond %{HTTPS} !=on
RewriteRule ^(.*)$ https://%{HTTP_HOST}/$1 [R=301,L]Code:
systemctl restart lswsThe panel's own certificate (port 8090)
The panel on port 8090 uses a separate, self-signed certificate after install, which is why your browser warns you. Giving the panel a real certificate on its own hostname is a separate step; we cover it in its own guide.
New site? Start with creating a website in CyberPanel.
More CyberPanel guides
- Fail2ban brute-force protection
- Change PHP version per website
- Git deployment from GitHub
- SSH key login, passwords off
- Create a website
- Subdomains, addon domains and aliases
- Rewrite rules, force HTTPS, HSTS
- Install WordPress with LiteSpeed Cache
- Cron jobs and a real WP-Cron
- Redis object cache for WordPress
- Databases and phpMyAdmin
- Email, DKIM, SPF and DMARC
- Email forwarding, catch-all, plus-addressing
- Mail queue, spam senders, blacklists
- CyberPanel DNS vs Cloudflare
- Packages and website limits
- Deploy Laravel on CyberPanel
- WordPress staging (clone) fixes
- Backups: create, restore, schedule
- File Manager and FTP
- Reset the admin password from SSH
- Log files and config locations
- Check and restart services
- First steps after install
- ModSecurity + OWASP rules (fix)
- CLI cheat sheet
- Install CyberPanel on Ubuntu 24.04
- Firewall explained
- Install PHP extensions
- Change PHP settings (php.ini)
- Update CyberPanel safely
- Server Error (500) after a fresh install
- Packages, users and ACLs
- Upgrade CyberPanel safely
- Real visitor IPs behind Cloudflare
- Docker apps on your domain with SSL
- Import a large SQL file over SSH
- Remote MySQL access for one IP
- Move WordPress to CyberPanel by hand
- Fix "Error establishing a database connection"
- Fix PHP2Shell (CVE-2026-109618/109619)
- Run your own nameservers (PowerDNS)
- CyberPanel on a small VPS: RAM tuning
Tested on CyberPanel 3.0 (build 8, OpenLiteSpeed edition) on Ubuntu 24.04, October 2026. Menu names can change slightly between versions.