



10-25-2026, 07:28 PM
(This post was last modified: 2 hours ago by JAY.
Edit Reason: Added the course video
)
CyberPanel Email Setup: Mailbox, DKIM, SPF, DMARC (and a DKIM Signing Bug Fix)
CyberPanel ships a full mail server: Postfix to send and receive, Dovecot for IMAP/POP3, and OpenDKIM to sign outgoing mail. Creating a mailbox takes ten seconds. Getting mail into inboxes instead of spam folders takes DNS records, and on our test server one config fix that CyberPanel didn't do for us.
Watch it: Part 8 of the CyberPanel course, Email Accounts & Webmail
This is Part 8 of 10 in our free CyberPanel Full Course. The written steps below go into more detail.
We set up [email protected] on a fresh CyberPanel 3.0 server. DNS for the domain is at Cloudflare.
Before you start: can your server send mail at all?
Many VPS providers block outgoing port 25 to stop spam. Test it:
Ours printed . If yours is blocked, ask your provider to open it, or send through an SMTP relay. Also set the reverse DNS (PTR) of your server IP to your mail hostname (for example ) in your provider's panel. Big mailbox providers check it.
Step 1: The mail domain and DNS basics
When you create a website with Create Mail Domain ticked, CyberPanel prepares mail for that domain (see creating a website). Then make sure these records exist at your DNS provider:
Step 2: Create the mailbox
Open Email > Create Email, pick the website, type the name before the @ and click Generate for a password:
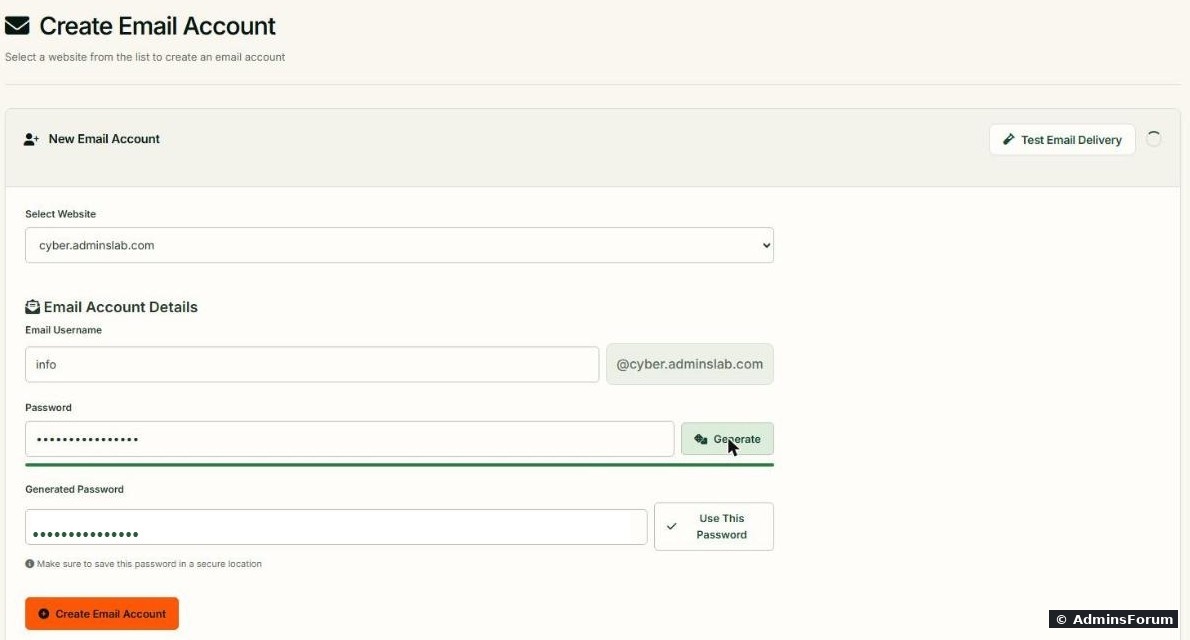
Click Use This Password, save it in your password manager, then Create Email Account. You get the message "Mailbox with username [email protected] has been successfully created". Manage existing mailboxes under Email > Email Accounts; change a password under Email > Change Password.
Step 3: DKIM
DKIM signs every outgoing message with a private key on your server; receivers check the signature with the public key in your DNS. CyberPanel had already created a key for our domain when we created the website.
Open Email > DKIM Manager and pick the website. The right column is the public key you publish in DNS:
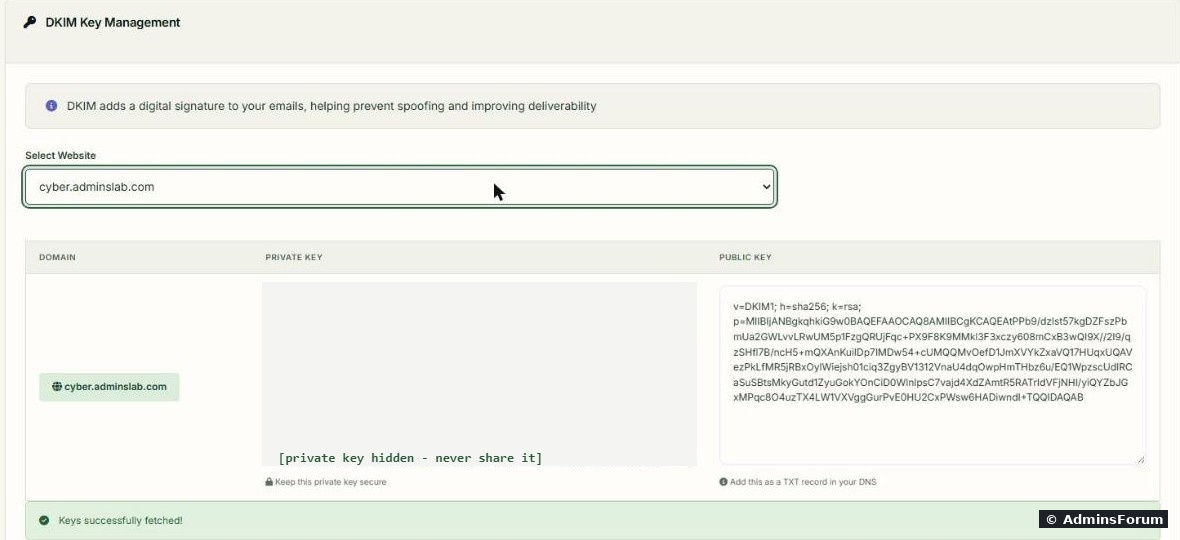
The middle column is the private key. We hid it in the screenshot: never post it or share it.
Add a TXT record at your DNS provider:
Step 4: SPF
SPF lists which servers may send mail for your domain. Add a TXT record on the domain itself:
Here is the SPF record in Cloudflare for our subdomain (Type TXT, Name ):

and allow the server your domain and MX point to. If you also send through another service (Google Workspace, a newsletter tool), add its include, for example . Only one SPF record per name: two records break SPF.
Step 5: DMARC
DMARC tells receivers what to do when SPF/DKIM fail, and sends you reports. Start in monitoring mode:
After a few weeks of clean reports, move to , later .
Check all three from any Linux machine:
Step 6: Check DKIM on the server
Check the DKIM record matches the key on the server:

key OK means the DNS record matches the private key. "key not secure" only means your domain doesn't use DNSSEC; you can ignore it.
Step 7: The bug: mail from the server itself wasn't signed
"key OK" doesn't prove messages are actually signed. We sent a test message from the server:
and checked the log:
Nothing. No "DKIM-Signature field added" line. The reason was in . OpenDKIM signs mail from the hosts in that list (it's used as InternalHosts), and CyberPanel had written only:
No . Everything that sends from the server itself (PHP from WordPress and contact forms, cron jobs, local scripts) went out unsigned. The fix:
After the fix, the log shows every message being signed:

The file says "CyberPanel Generated File", so CyberPanel may rewrite it when you add another mail domain. After adding domains, check it again with .
Step 8: Send a real test
Send a message from the mailbox to a deliverability tester or your own Gmail account, open the original message, and look for SPF: PASS, DKIM: PASS and DMARC: PASS. If one fails, the header usually says why.
Mail apps (Outlook, Thunderbird, phone)). Webmail is under Email > Webmail.
Common problems
More CyberPanel guides
Tested on CyberPanel 3.0 (build 8, OpenLiteSpeed edition) on Ubuntu 24.04, October 2026. Menu names can change slightly between versions.
CyberPanel ships a full mail server: Postfix to send and receive, Dovecot for IMAP/POP3, and OpenDKIM to sign outgoing mail. Creating a mailbox takes ten seconds. Getting mail into inboxes instead of spam folders takes DNS records, and on our test server one config fix that CyberPanel didn't do for us.
Watch it: Part 8 of the CyberPanel course, Email Accounts & Webmail
This is Part 8 of 10 in our free CyberPanel Full Course. The written steps below go into more detail.
We set up [email protected] on a fresh CyberPanel 3.0 server. DNS for the domain is at Cloudflare.
Before you start: can your server send mail at all?
Many VPS providers block outgoing port 25 to stop spam. Test it:
Code:
timeout 6 bash -c '</dev/tcp/gmail-smtp-in.l.google.com/25' && echo PORT25_OPEN || echo PORT25_BLOCKEDCode:
PORT25_OPENCode:
mail.yourdomain.comStep 1: The mail domain and DNS basics
When you create a website with Create Mail Domain ticked, CyberPanel prepares mail for that domain (see creating a website). Then make sure these records exist at your DNS provider:
- A record pointing to your server IP.Code:
mail.yourdomain.com
- MX record for pointing toCode:
yourdomain.com, priority 10.Code:mail.yourdomain.com
Step 2: Create the mailbox
Open Email > Create Email, pick the website, type the name before the @ and click Generate for a password:
Click Use This Password, save it in your password manager, then Create Email Account. You get the message "Mailbox with username [email protected] has been successfully created". Manage existing mailboxes under Email > Email Accounts; change a password under Email > Change Password.
Step 3: DKIM
DKIM signs every outgoing message with a private key on your server; receivers check the signature with the public key in your DNS. CyberPanel had already created a key for our domain when we created the website.
Open Email > DKIM Manager and pick the website. The right column is the public key you publish in DNS:
The middle column is the private key. We hid it in the screenshot: never post it or share it.
Add a TXT record at your DNS provider:
- Name: (for a subdomain like ours:Code:
default._domainkey).Code:default._domainkey.cyberis the selector CyberPanel uses.Code:default
- Content: the whole public key text, starting with . Paste it as one line.Code:
v=DKIM1;
Step 4: SPF
SPF lists which servers may send mail for your domain. Add a TXT record on the domain itself:
Code:
v=spf1 a mx ~allCode:
cyberCode:
aCode:
mxCode:
include:_spf.google.comStep 5: DMARC
DMARC tells receivers what to do when SPF/DKIM fail, and sends you reports. Start in monitoring mode:
Code:
Name: _dmarc   (ours: _dmarc.cyber)
Content: v=DMARC1; p=none; rua=mailto:[email protected]Code:
p=quarantineCode:
p=rejectCheck all three from any Linux machine:
Code:
dig +short TXT cyber.adminslab.com
dig +short TXT _dmarc.cyber.adminslab.com
dig +short TXT default._domainkey.cyber.adminslab.com
Step 6: Check DKIM on the server
Check the DKIM record matches the key on the server:
Code:
opendkim-testkey -d cyber.adminslab.com -s default -vvvStep 7: The bug: mail from the server itself wasn't signed
"key OK" doesn't prove messages are actually signed. We sent a test message from the server:
Code:
apt install -y swaks
swaks -s 127.0.0.1 -f [email protected] -t [email protected]Code:
journalctl -t opendkim --since "-5min" --no-pagerCode:
/etc/opendkim/TrustedHostsCode:
cyber.adminslab.com
localhost.localdomainCode:
127.0.0.1Code:
mail()Code:
printf '127.0.0.1\n::1\n' >> /etc/opendkim/TrustedHosts
systemctl restart opendkimCode:
DKIM-Signature field added (s=default, d=cyber.adminslab.com)Code:
cat /etc/opendkim/TrustedHostsStep 8: Send a real test
Send a message from the mailbox to a deliverability tester or your own Gmail account, open the original message, and look for SPF: PASS, DKIM: PASS and DMARC: PASS. If one fails, the header usually says why.
Mail apps (Outlook, Thunderbird, phone)
- Incoming (IMAP): , port 993, SSL/TLS.Code:
mail.yourdomain.com
- Outgoing (SMTP): , port 587 STARTTLS (or 465 SSL/TLS), with authentication.Code:
mail.yourdomain.com
- Username: the full email address.
Code:
https://YOUR-SERVER-IP:8090/manageSSL/sslForMailServerCommon problems
- Mail lands in spam: check SPF/DKIM/DMARC pass, reverse DNS, and that your server IP isn't on a blocklist. New IPs need some time and low volume to build a reputation.
- Outgoing mail stuck: port 25 blocked by the provider. See the queue with .Code:
postqueue -p
- Can't receive: MX record missing or proxied, or ports 25/587/993 closed. See the CyberPanel firewall guide.
- Mail services stopped: . See checking CyberPanel services.Code:
systemctl is-active postfix dovecot opendkim
- Logs: Ubuntu 24.04 had no on our server. UseCode:
/var/log/mail.log.Code:journalctl -t postfix/smtp -t opendkim -n 50
More CyberPanel guides
- Fail2ban brute-force protection
- Change PHP version per website
- Git deployment from GitHub
- SSH key login, passwords off
- Create a website
- Issue SSL and fix failed certificates
- Subdomains, addon domains and aliases
- Rewrite rules, force HTTPS, HSTS
- Install WordPress with LiteSpeed Cache
- Cron jobs and a real WP-Cron
- Redis object cache for WordPress
- Databases and phpMyAdmin
- Email forwarding, catch-all, plus-addressing
- Mail queue, spam senders, blacklists
- CyberPanel DNS vs Cloudflare
- Packages and website limits
- Deploy Laravel on CyberPanel
- WordPress staging (clone) fixes
- Backups: create, restore, schedule
- File Manager and FTP
- Reset the admin password from SSH
- Log files and config locations
- Check and restart services
- First steps after install
- ModSecurity + OWASP rules (fix)
- CLI cheat sheet
- Install CyberPanel on Ubuntu 24.04
- Firewall explained
- Install PHP extensions
- Change PHP settings (php.ini)
- Update CyberPanel safely
- Server Error (500) after a fresh install
- Packages, users and ACLs
- Upgrade CyberPanel safely
- Real visitor IPs behind Cloudflare
- Docker apps on your domain with SSL
- Import a large SQL file over SSH
- Remote MySQL access for one IP
- Move WordPress to CyberPanel by hand
- Fix "Error establishing a database connection"
- Fix PHP2Shell (CVE-2026-109618/109619)
- Run your own nameservers (PowerDNS)
- CyberPanel on a small VPS: RAM tuning
Tested on CyberPanel 3.0 (build 8, OpenLiteSpeed edition) on Ubuntu 24.04, October 2026. Menu names can change slightly between versions.