



10-24-2026, 11:59 AM
(This post was last modified: 2 hours ago by JAY.
Edit Reason: Added the course video
)
How to Create a Website in CyberPanel: Domain, DNS, PHP Version and First Upload
Creating a website is the first real thing you do in CyberPanel. It takes a minute, but doing the steps in the right order saves you from the most common problem: a site that works on http but never gets its SSL certificate.
Watch it: Part 4 of the CyberPanel course, Create Your First Website
This is Part 4 of 10 in our free CyberPanel Full Course. The written steps below go into more detail.
We created cyber.adminslab.com on a fresh CyberPanel 3.0 server for this guide. Replace it with your own domain.
Step 1: Point the domain to your server first
Do this before you create the website. CyberPanel tries to get a free Let's Encrypt certificate the moment the site is created, and that only works if the domain already resolves to your server.
At your DNS provider (Cloudflare, your registrar, wherever the domain's DNS lives) add:
When it prints your server's IP, you're ready.
Step 2: Create the website
Go to Websites > Create Website. Fill in the form. Here is ours, ready to submit:
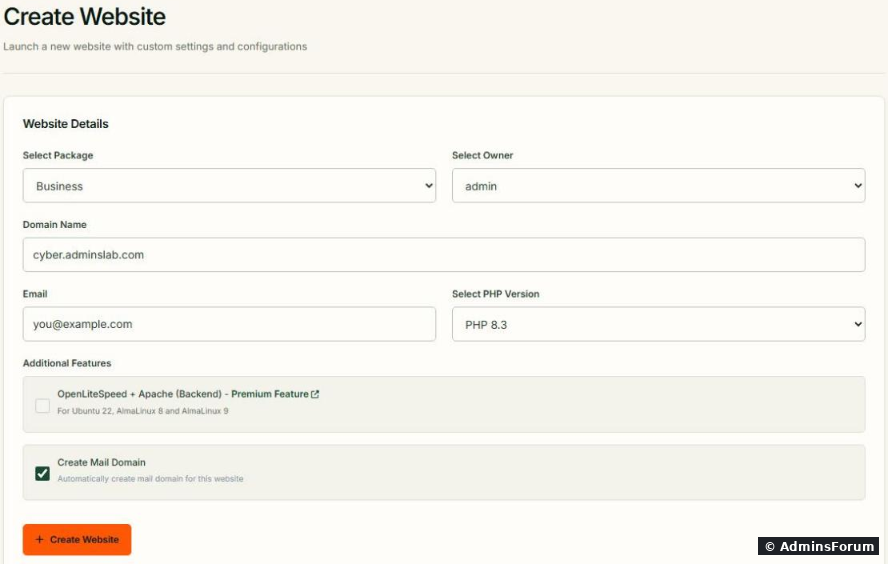
Click Create Website. A progress log runs while CyberPanel creates the Linux user, the folders, the virtual host and the SSL certificate.
Step 3: Check the result
After a few seconds the site shows up under Websites > List Websites:
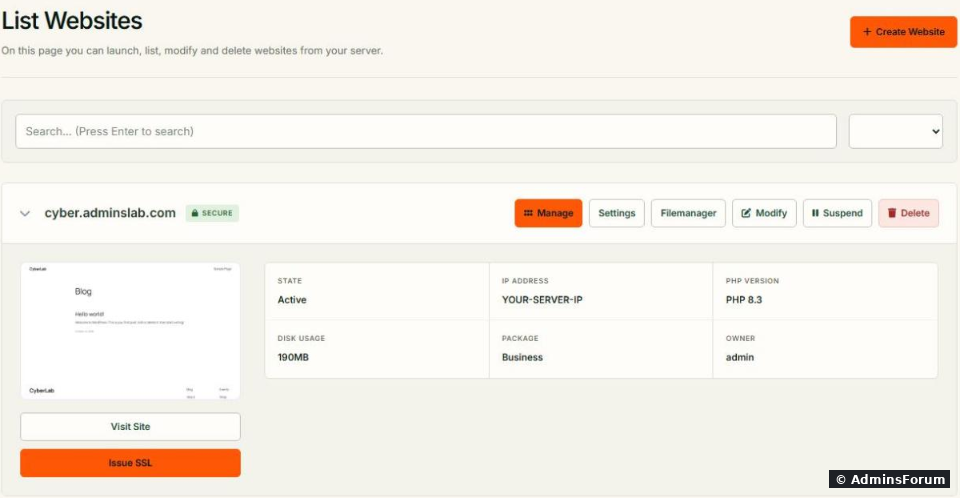
Look at three things:
Where the files live
Every website gets its own Linux user and home folder:
On our server CyberPanel created the user (the start of the domain plus a few digits). The site's files must belong to that user. If you upload files as root over SSH, fix the owner afterwards or PHP can't write to them:
Use your own user name; shows it. Don't change the owner or permissions of the folder itself.
Step 4: Upload your site
Replace the placeholder with your own files. Pick whatever is easiest:
Common problems does the same job; see the CLI cheat sheet.
More CyberPanel guides
Tested on CyberPanel 3.0 (build 8, OpenLiteSpeed edition) on Ubuntu 24.04, October 2026. Menu names can change slightly between versions.
Creating a website is the first real thing you do in CyberPanel. It takes a minute, but doing the steps in the right order saves you from the most common problem: a site that works on http but never gets its SSL certificate.
Watch it: Part 4 of the CyberPanel course, Create Your First Website
This is Part 4 of 10 in our free CyberPanel Full Course. The written steps below go into more detail.
We created cyber.adminslab.com on a fresh CyberPanel 3.0 server for this guide. Replace it with your own domain.
Step 1: Point the domain to your server first
Do this before you create the website. CyberPanel tries to get a free Let's Encrypt certificate the moment the site is created, and that only works if the domain already resolves to your server.
At your DNS provider (Cloudflare, your registrar, wherever the domain's DNS lives) add:
- A record: name (orCode:
cyberfor the main domain), valueCode:@.Code:YOUR-SERVER-IP
- A record for www if you want to work too. We skipped it for a subdomain.Code:
www.yourdomain.com
- On Cloudflare, set the records to DNS only (grey cloud) while you set things up. You can switch the proxy on later.
Code:
dig +short cyber.adminslab.comStep 2: Create the website
Go to Websites > Create Website. Fill in the form. Here is ours, ready to submit:
- Select Package: the limits for this site (disk, bandwidth, number of domains, email accounts, databases). A fresh server only has Default. We made Starter and Business first; see packages, users and ACLs.
- Select Owner: the CyberPanel user who manages the site. admin is fine for your own sites. For a client, create a user for them first so they only see their own sites.
- Domain Name: just the domain, without orCode:
http://.Code:www
- Email: the site owner's contact address.
- Select PHP Version: PHP 8.1 to 8.5 are available. PHP 8.3 is a safe choice for WordPress and most apps today. You can change it later.
- Create Mail Domain: tick it if you want email addresses like on this server. Leave it unticked if your mail is hosted elsewhere (Google Workspace, Microsoft 365).Code:
Click Create Website. A progress log runs while CyberPanel creates the Linux user, the folders, the virtual host and the SSL certificate.
Step 3: Check the result
After a few seconds the site shows up under Websites > List Websites:
Look at three things:
- SECURE next to the domain means the Let's Encrypt certificate was issued. If it says not secure, the DNS wasn't ready; fix DNS and use Issue SSL, see our CyberPanel SSL guide.
- Active status, the PHP version and the package you picked.
- Open the site in a browser. You should see CyberPanel's default placeholder page over https.
Where the files live
Every website gets its own Linux user and home folder:
Code:
/home/cyber.adminslab.com/public_html   <- your website files
/home/cyber.adminslab.com/logs <- access and error logsCode:
cyber2602Code:
chown -R cyber2602:cyber2602 /home/cyber.adminslab.com/public_html/*Code:
ls -la /home/yourdomain.com/public_htmlCode:
public_htmlStep 4: Upload your site
Replace the placeholder
Code:
index.html- File Manager in the site's Files tab: upload a zip and extract it.
- FTP: create an FTP account for the site under Databases & FTP.
- SFTP or rsync over SSH, then fix ownership as shown above.
- For WordPress, use CyberPanel's one-click WordPress install instead of uploading by hand.
Common problems
- Site shows the wrong page or the server's default page: DNS points somewhere else, or you're seeing a cached result. Check with .Code:
dig +short yourdomain.com
- "Domain already exists": the domain is already a website, child domain or alias on this server. Check List Websites and the other sites' Sub/Addon Domains.
- Website creation hangs or fails: usually low disk space or a stopped service. See checking CyberPanel services.
- 403 Forbidden after uploading: wrong file owner. Run the chown command above.
- No SSL: DNS wasn't pointing to the server at creation time. Fix DNS, then issue SSL again.
Code:
cyberpanel createWebsiteMore CyberPanel guides
- Fail2ban brute-force protection
- Change PHP version per website
- Git deployment from GitHub
- SSH key login, passwords off
- Issue SSL and fix failed certificates
- Subdomains, addon domains and aliases
- Rewrite rules, force HTTPS, HSTS
- Install WordPress with LiteSpeed Cache
- Cron jobs and a real WP-Cron
- Redis object cache for WordPress
- Databases and phpMyAdmin
- Email, DKIM, SPF and DMARC
- Email forwarding, catch-all, plus-addressing
- Mail queue, spam senders, blacklists
- CyberPanel DNS vs Cloudflare
- Packages and website limits
- Deploy Laravel on CyberPanel
- WordPress staging (clone) fixes
- Backups: create, restore, schedule
- File Manager and FTP
- Reset the admin password from SSH
- Log files and config locations
- Check and restart services
- First steps after install
- ModSecurity + OWASP rules (fix)
- CLI cheat sheet
- Install CyberPanel on Ubuntu 24.04
- Firewall explained
- Install PHP extensions
- Change PHP settings (php.ini)
- Update CyberPanel safely
- Server Error (500) after a fresh install
- Packages, users and ACLs
- Upgrade CyberPanel safely
- Real visitor IPs behind Cloudflare
- Docker apps on your domain with SSL
- Import a large SQL file over SSH
- Remote MySQL access for one IP
- Move WordPress to CyberPanel by hand
- Fix "Error establishing a database connection"
- Fix PHP2Shell (CVE-2026-109618/109619)
- Run your own nameservers (PowerDNS)
- CyberPanel on a small VPS: RAM tuning
Tested on CyberPanel 3.0 (build 8, OpenLiteSpeed edition) on Ubuntu 24.04, October 2026. Menu names can change slightly between versions.