



Upgrade CyberPanel Safely: What the Upgrade Changed on Our Server (Tested)
Sooner or later CyberPanel shows a yellow note on Version Management: Latest commit does not match, please upgrade CyberPanel. Ours said that even though both sides showed version 3.0, build 8: the code on GitHub had simply moved on. The upgrade itself is one command, but it rebuilds a lot: OpenLiteSpeed, ModSecurity, the panel's Python packages. So we did it properly on our test server (CyberPanel 3.0, Ubuntu 24.04, 4 websites, mail, fail2ban and lots of hand-made config changes from our other guides) and compared everything before and after.
Short version: it took about 4.5 minutes, all sites came back, and none of our own config edits were overwritten. But the upgrade opened a new port (4190) to the whole internet, added two cron jobs and replaced the panel's SSL certificate. Details below.
Step 1: Check what you have
In the panel: (yes, with that spelling) shows current and latest version, build and commit. From SSH:
Ours: branch , commit from October 23. The panel said the latest was ; when we upgraded a day later we got . The stable branch changes often, so "latest" is a moving target. Make sure you have a few GB free on disk; our backup in Step 2 alone was 700 MB.
Step 2: Back up first
The best backup is a snapshot of the whole VPS at your provider, if they offer it. That's the only "undo button" that really covers everything. On top of that (or if you have no snapshots), save the panel, the web server config and all databases:
CyberPanel keeps the MySQL root password in ; the passes it without printing it on screen. We got 701 MB for the files (most of it is the panel's Python environment) and 611 KB for the databases. All our sites worked afterwards, but a fresh website backup doesn't hurt, ideally copied off the server.
Step 3: Take a "before" picture
This is the step most people skip, and the only way to know afterwards what the upgrade changed. Checksums of all config files that matter, plus cron, firewall and running services:
And note the HTTP status of each website and of the panel, for example with . All of ours answered 200.
Step 4: Run the upgrade
The official command, as root:
The end of the output:
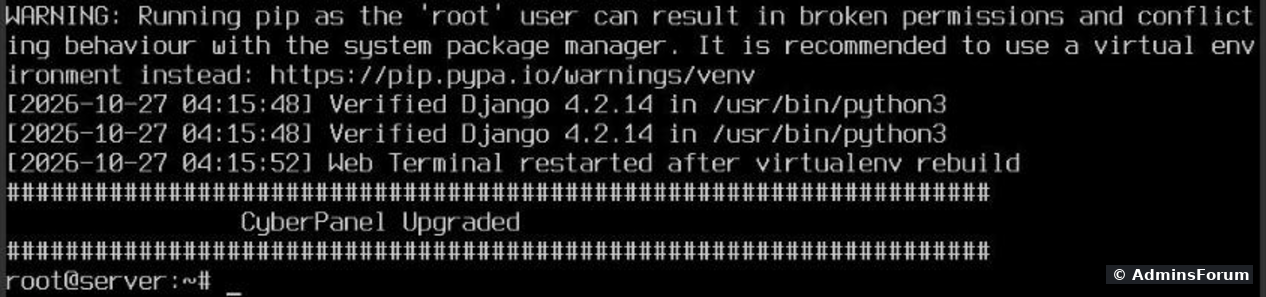
Step 5: Check that everything still works
Right after the upgrade, same check as before:
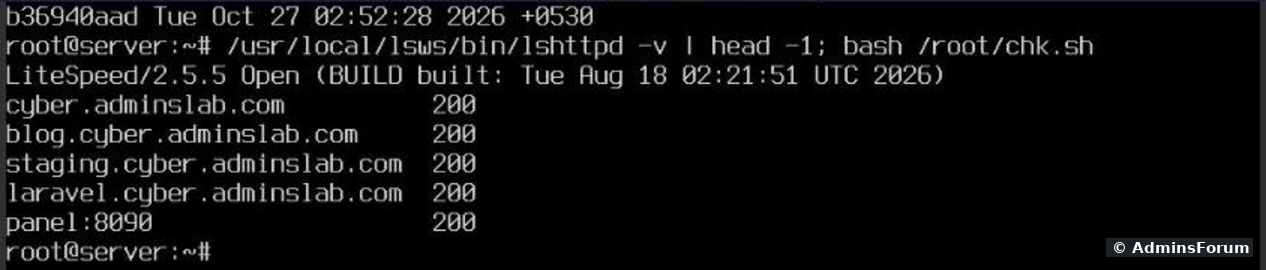
All 4 sites and the panel: 200. still reported LiteSpeed 2.5.5. (apt also updated a package called from 1.9.3 to 1.9.4 during the run, but the server still reported the same 2.5.5 build.) Postfix, Dovecot, OpenLiteSpeed and the panel service () were active, and all four fail2ban jails were still running. Log in to the panel and click through a few pages too.
Step 6: What the upgrade changed
1. Config files: our edits survived.
We compared the checksums of all 599 files:
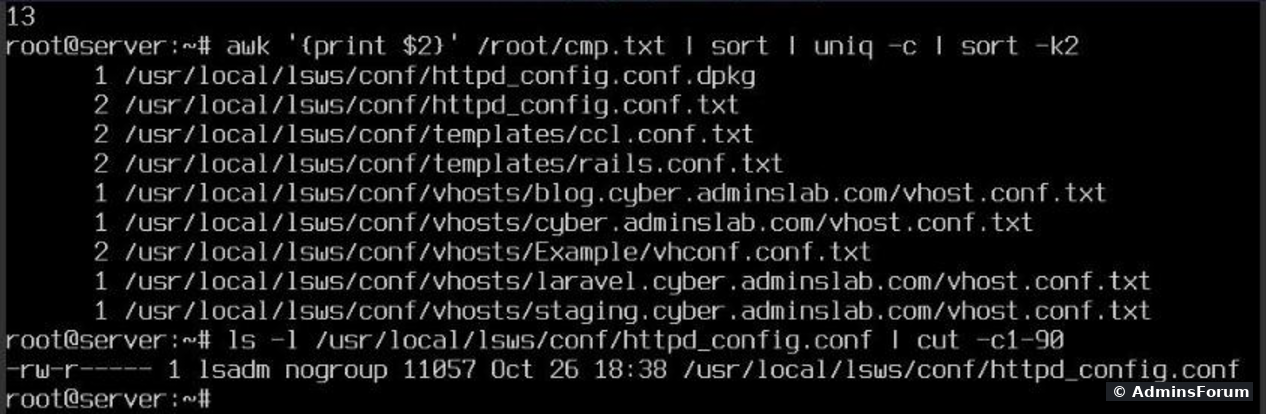
Only side files changed: new copies next to every site's , templates, and (the package's default config, left there by apt instead of overwriting ours). The live was untouched, as were all files with our per-site PHP settings, all php.ini files, Postfix, Dovecot, our fail2ban fixes and our SSH settings. That's one test on one version; the before/after check is how you find out on yours.
2. Services, cron and firewall: three surprises.
Then services, root's crontab and the firewall:
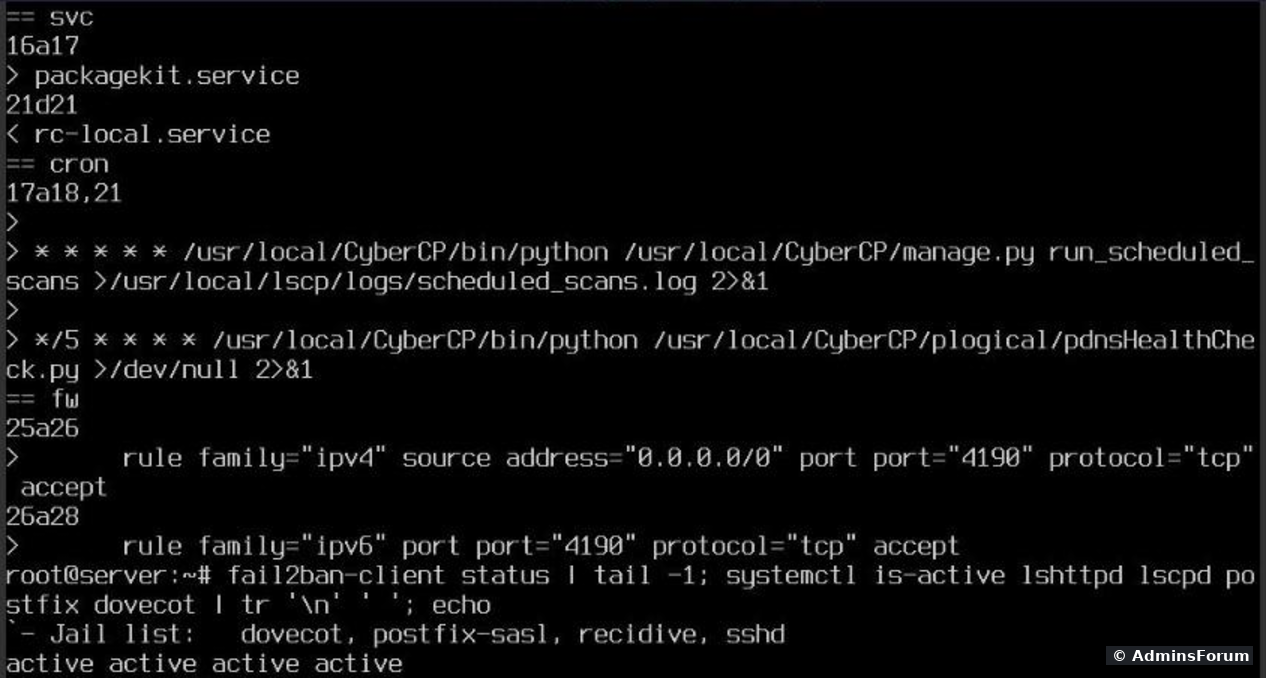
3. Port 4190 (ManageSieve).
Port 4190 is ManageSieve, part of the Dovecot mail server:
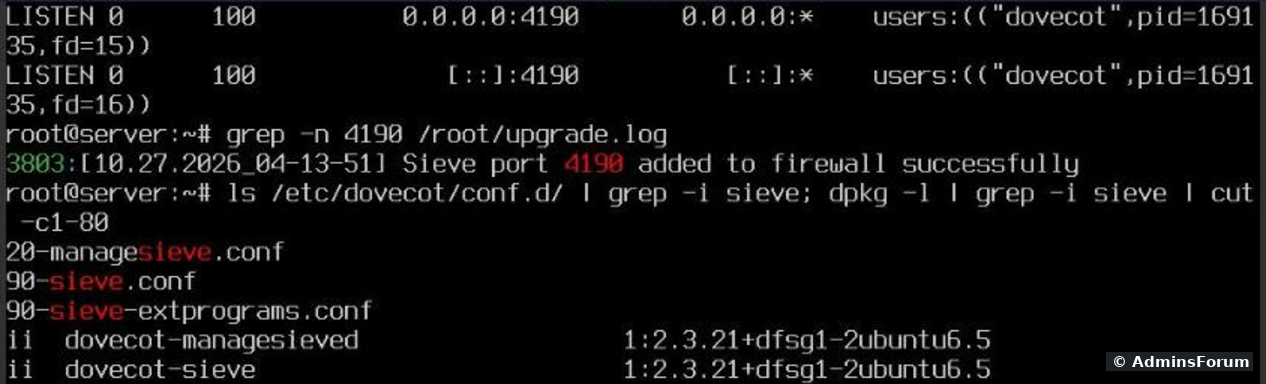
Dovecot listens on all addresses, and the upgrade log says it plainly: Sieve port 4190 added to firewall successfully. ManageSieve lets mail programs (for example Thunderbird with a Sieve add-on) edit server-side filter rules like "move mails from X to folder Y". It's one more login on the internet that bots can guess passwords against. If none of your mail users manage filters from a desktop mail program, close it:
Our result:

means the rule is gone. Dovecot still listens, so webmail on the same server can still use it locally. You can also delete the rule on the panel's firewall page (firewall guide). Check again after the next upgrade, it may add the rule back.
4. A new certificate for the panel.
The panel itself also got a new certificate:

and were written at 04:15, during the upgrade: a new self-signed certificate () valid until 2029. Chrome showed its "Your connection is not private" warning for port 8090 again. Our server only had the default self-signed one, so nothing was lost here. If you put a real certificate on the panel (hostname SSL), check port 8090 in your browser after every upgrade and issue it again if it's gone.
If something breaks
We didn't need it, but this is what the backups from Step 2 are for. A provider snapshot is the fastest way back. Without one: first read the end of for the error. The archive holds the old panel and web server config, and the databases, including the panel's own database, so you can put back exactly what you had. CyberPanel can also install a specific branch instead of the latest; type it at the version prompt from Step 4.
Checklist
More CyberPanel guides
Tested upgrading CyberPanel 3.0 (branch v3.0.8) on Ubuntu 24.04 with OpenLiteSpeed, October 2026. What an upgrade changes depends on the version you come from and the one you get; run the before/after check on yours.
Sooner or later CyberPanel shows a yellow note on Version Management: Latest commit does not match, please upgrade CyberPanel. Ours said that even though both sides showed version 3.0, build 8: the code on GitHub had simply moved on. The upgrade itself is one command, but it rebuilds a lot: OpenLiteSpeed, ModSecurity, the panel's Python packages. So we did it properly on our test server (CyberPanel 3.0, Ubuntu 24.04, 4 websites, mail, fail2ban and lots of hand-made config changes from our other guides) and compared everything before and after.
Short version: it took about 4.5 minutes, all sites came back, and none of our own config edits were overwritten. But the upgrade opened a new port (4190) to the whole internet, added two cron jobs and replaced the panel's SSL certificate. Details below.
Step 1: Check what you have
In the panel:
Code:
https://YOUR-SERVER-IP:8090/base/versionManagmentCode:
git -C /usr/local/CyberCP log -1 --format='%h %cd'
git -C /usr/local/CyberCP branch
df -h /Code:
v3.0.8Code:
324f18adCode:
12a529eeCode:
b36940aadStep 2: Back up first
The best backup is a snapshot of the whole VPS at your provider, if they offer it. That's the only "undo button" that really covers everything. On top of that (or if you have no snapshots), save the panel, the web server config and all databases:
Code:
mkdir -p /root/pre-upgrade && cd /root/pre-upgrade
tar czf cybercp.tgz /usr/local/CyberCP /usr/local/lsws/conf /etc/cyberpanel
mysqldump -uroot -p"$(cat /etc/cyberpanel/mysqlPassword)" --all-databases --single-transaction | gzip > all-db.sql.gz
ls -lhCode:
/etc/cyberpanel/mysqlPasswordCode:
$(cat ...)Step 3: Take a "before" picture
This is the step most people skip, and the only way to know afterwards what the upgrade changed. Checksums of all config files that matter, plus cron, firewall and running services:
Code:
mkdir -p /root/pre
D='/usr/local/lsws/conf /etc/postfix /etc/dovecot /etc/fail2ban /etc/ssh'
find $D -type f -exec md5sum {} + | sort -k2 > /root/pre/conf.md5
md5sum /usr/local/lsws/lsphp*/etc/php/*/litespeed/php.ini >> /root/pre/conf.md5
crontab -l > /root/pre/cron.txt
firewall-cmd --list-all > /root/pre/fw.txt
systemctl list-units --type=service --state=running --no-legend | awk '{print $1}' > /root/pre/svc.txtCode:
curl -s -o /dev/null -w '%{http_code}\n' https://yourdomain.com/Step 4: Run the upgrade
The official command, as root:
Code:
sh <(curl https://raw.githubusercontent.com/usmannasir/cyberpanel/stable/preUpgrade.sh || wget -O - https://raw.githubusercontent.com/usmannasir/cyberpanel/stable/preUpgrade.sh)- Run it in orCode:
screenif you're on SSH, or from your provider's VNC console like we did. If your connection drops halfway, the upgrade dies halfway.Code:tmux
- It asks: Press the Enter key to continue with latest version, or enter specific version. Enter (or waiting 10 seconds) means latest stable.
- To keep a log, add at the end. Ours had 4,369 lines.Code:
2>&1 | tee /root/upgrade.log
The end of the output:
Step 5: Check that everything still works
Right after the upgrade, same check as before:
All 4 sites and the panel: 200.
Code:
lshttpd -vCode:
openlitespeedCode:
lscpdStep 6: What the upgrade changed
1. Config files: our edits survived.
Code:
mkdir -p /root/post
find $D -type f -exec md5sum {} + | sort -k2 > /root/post/conf.md5
md5sum /usr/local/lsws/lsphp*/etc/php/*/litespeed/php.ini >> /root/post/conf.md5
diff <(sort -k2 /root/pre/conf.md5) <(sort -k2 /root/post/conf.md5)Only side files changed: new
Code:
vhost.conf.txtCode:
vhost.confCode:
.txtCode:
httpd_config.conf.dpkgCode:
httpd_config.confCode:
vhost.conf2. Services, cron and firewall: three surprises.
Code:
for f in svc cron fw; do echo "== $f"; diff /root/pre/$f.txt /root/post/$f.txt; done- Two new cron jobs for root: every minute andCode:
run_scheduled_scansevery 5 minutes. Our own cron jobs were still there. If you manage root's crontab yourself, know that the upgrade adds to it.Code:pdnsHealthCheck.py
- A new firewall rule: port 4190 open to everyone, for IPv4 () and IPv6. Nobody asked us about it.Code:
0.0.0.0/0
- Services: was running afterwards (apt starts it); nothing we use went missing.Code:
packagekit
3. Port 4190 (ManageSieve).
Port 4190 is ManageSieve, part of the Dovecot mail server:
Code:
ss -ltnp | grep ':4190 '
grep -n 4190 /root/upgrade.logCode:
P='port port="4190" protocol="tcp" accept'
firewall-cmd --permanent --remove-rich-rule="rule family=ipv4 source address=0.0.0.0/0 $P"
firewall-cmd --permanent --remove-rich-rule="rule family=ipv6 $P"
firewall-cmd --reload
firewall-cmd --list-all | grep -c 4190means the rule is gone. Dovecot still listens, so webmail on the same server can still use it locally. You can also delete the rule on the panel's firewall page (firewall guide). Check again after the next upgrade, it may add the rule back.
4. A new certificate for the panel.
The panel itself also got a new certificate:
Code:
ls -l /usr/local/lscp/conf/*.pem
echo | openssl s_client -connect 127.0.0.1:8090 2>/dev/null | openssl x509 -noout -issuer -dates
Code:
cert.pemCode:
key.pemCode:
CN = www.example.comIf something breaks
We didn't need it, but this is what the backups from Step 2 are for. A provider snapshot is the fastest way back. Without one: first read the end of
Code:
/root/upgrade.logCode:
tarCode:
all-db.sql.gzChecklist
- Provider snapshot, or at least files + database dump, and enough free disk.
- "Before" checksums, cron, firewall, services and site status saved.
- Upgrade run in /Code:
screenor the console, with a log.Code:tmux
- Sites and panel answer, mail and fail2ban running.
- Diff of configs, cron and firewall. Close port 4190 if you don't use ManageSieve.
- Panel certificate: still the one you want?
More CyberPanel guides
- Fail2ban brute-force protection
- Change PHP version per website
- Git deployment from GitHub
- SSH key login, passwords off
- Create a website
- Issue SSL and fix failed certificates
- Subdomains, addon domains and aliases
- Rewrite rules, force HTTPS, HSTS
- Install WordPress with LiteSpeed Cache
- Cron jobs and a real WP-Cron
- Redis object cache for WordPress
- Databases and phpMyAdmin
- Email, DKIM, SPF and DMARC
- Email forwarding, catch-all, plus-addressing
- Mail queue, spam senders, blacklists
- CyberPanel DNS vs Cloudflare
- Packages and website limits
- Deploy Laravel on CyberPanel
- WordPress staging (clone) fixes
- Backups: create, restore, schedule
- File Manager and FTP
- Reset the admin password from SSH
- Log files and config locations
- Check and restart services
- First steps after install
- ModSecurity + OWASP rules (fix)
- CLI cheat sheet
- Install CyberPanel on Ubuntu 24.04
- Firewall explained
- Install PHP extensions
- Change PHP settings (php.ini)
- Update CyberPanel safely
- Server Error (500) after a fresh install
- Packages, users and ACLs
- Real visitor IPs behind Cloudflare
- Docker apps on your domain with SSL
- Import a large SQL file over SSH
- Remote MySQL access for one IP
- Move WordPress to CyberPanel by hand
- Fix "Error establishing a database connection"
- Fix PHP2Shell (CVE-2026-109618/109619)
- Run your own nameservers (PowerDNS)
- CyberPanel on a small VPS: RAM tuning
Tested upgrading CyberPanel 3.0 (branch v3.0.8) on Ubuntu 24.04 with OpenLiteSpeed, October 2026. What an upgrade changes depends on the version you come from and the one you get; run the before/after check on yours.