



CyberPanel Git Deployment: Deploy from GitHub (and the Option That Deleted Our Site)
Deploying from Git means your website's files come from a repository (GitHub, GitLab, Bitbucket) instead of FTP uploads. You push a change, the server pulls it, done. CyberPanel has a Manage Git page for this. We tested it on our test subdomain with a small public demo repo ( on GitHub, three files: , , ). It worked in the end, but one option deleted the whole site folder on the way. Read the warning in Step 2 before you click anything.
Step 1: Open Manage Git
Websites > List Websites > Manage (or List Child Domains > Manage for a subdomain), then Manage Git at the top. The address is.
Pick the folder (for us, the subdomain's document root). Without a repository in it you get two buttons: Init Repo (start a new, empty repo here) and Attach Existing Repo (clone one from GitHub/GitLab). We wanted the second.
Step 2: Attach Existing Repo, and what went wrong
The dialog asks for Git Host, Username (the repo owner) and Repo Name, and shows a Deployment Key (an SSH public key CyberPanel generates for the site user).
In the dialog we filled in github.com, the owner and the repo name, and clicked Attach:
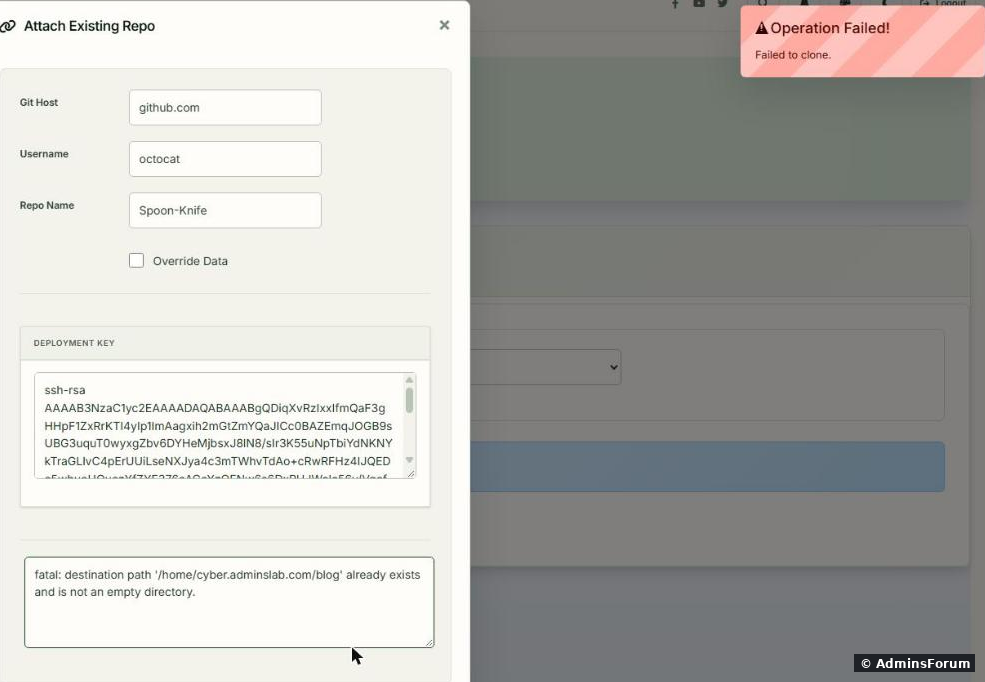
First try: The folder only had CyberPanel's default , but Git can only clone into an empty folder.
With Override Data ticked we tried again:
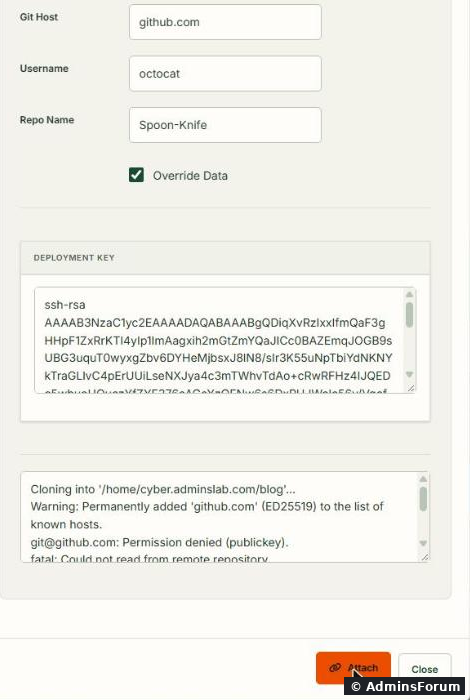
Second try: CyberPanel always clones over SSH (), and GitHub only accepts SSH from a key it knows, even for a public repo. The deployment key in the dialog has to be added to the repository first (see Step 4).
And then we looked at the server:

The folder was gone. Override Data deleted the site's document root before cloning; the clone then failed, and nothing was put back. The subdomain answered 404 until we fixed it.
So, before you use Attach Existing Repo:
Step 3: The simple way that worked: git clone over HTTPS
For a public repo you don't need any key: clone over HTTPS from SSH. The target folder must not exist yet (or be empty), so move the old document root away first:
Run it as the site user (, ours is ), not as root. Then the files belong to the site user and OpenLiteSpeed can serve them without a permission fix.
As the site user, from the parent folder of the document root:
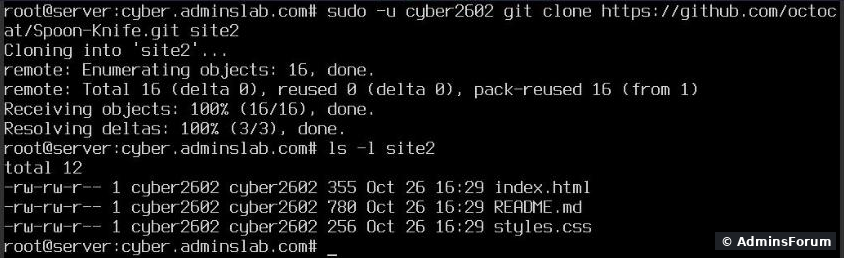
The site came back right away with the repo's ().
Two things we checked afterwards:
Step 4: Private repositories: the deploy key
For a private repo, HTTPS needs a token. The cleaner way is the deploy key CyberPanel already made. It's the site user's SSH key:
(on our server , created the moment we opened the Attach dialog). On GitHub open the repository's Settings > Deploy keys > Add deploy key, paste it, and leave Allow write access off. A deploy key gives access to that one repository only, read-only, which is exactly what a web server needs. After that, Attach Existing Repo or a clone over SSH as the site user works:
(We tested with a public repo and didn't add the key to a GitHub account, so we saw the "Permission denied" side of this, not the success.)
Step 5: Deploy updates
Once the folder is a Git repo, Manage Git recognises it no matter how it was cloned: our HTTPS clone showed up with its 3 commits and the buttons Pull, Push, Commit, Create New Branch, Edit .gitignore, Git Logs and Remove.
To test an update we pushed a new commit with one new file,.
Then Pull in Manage Git:
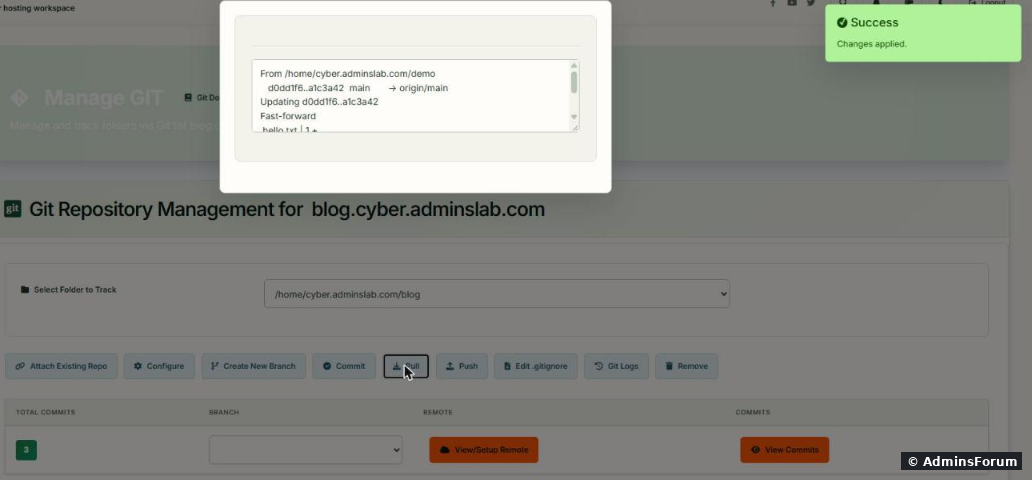
Changes applied: a fast-forward to the new commit. On the server the new file belonged to the site user (), so the panel runs the pull as the site user, not as root. The file was live at once.
One oddity: when there's nothing new, the panel shows it as a failure:
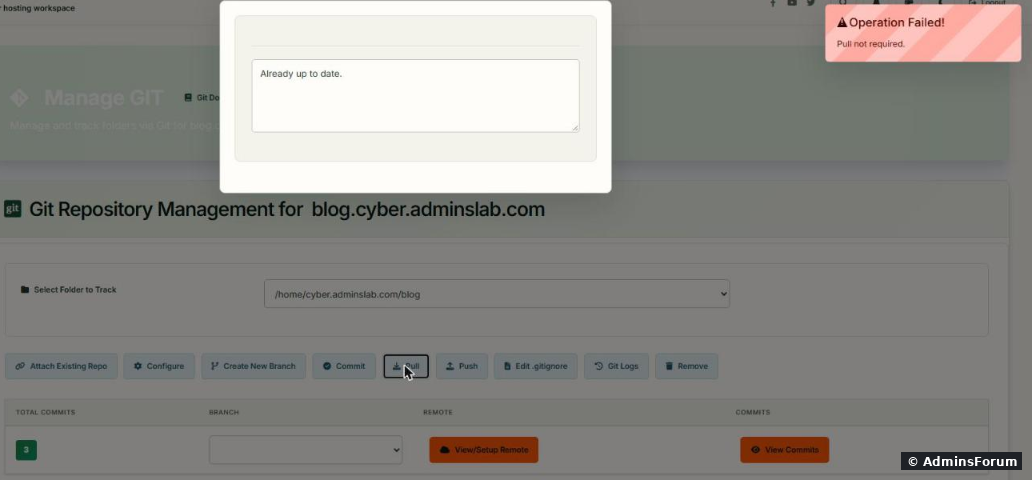
Operation Failed! Pull not required. with underneath. Nothing is wrong; there was just nothing to pull.
From SSH the same update is one line:
refuses to merge if someone edited files on the server, instead of creating a mess. If you want updates to arrive on their own, you can put that line in the site user's crontab (cron guide), for example every 5 minutes. For PHP projects, run your build steps after the pull (, for Laravel).
Good habits
More CyberPanel guides
Tested on CyberPanel 3.0 (build 8, OpenLiteSpeed edition) on Ubuntu 24.04, October 2026. Menu names can change slightly between versions.
Deploying from Git means your website's files come from a repository (GitHub, GitLab, Bitbucket) instead of FTP uploads. You push a change, the server pulls it, done. CyberPanel has a Manage Git page for this. We tested it on our test subdomain
Code:
blog.cyber.adminslab.comCode:
octocat/Spoon-KnifeCode:
index.htmlCode:
styles.cssCode:
README.mdStep 1: Open Manage Git
Websites > List Websites > Manage (or List Child Domains > Manage for a subdomain), then Manage Git at the top. The address is
Code:
https://YOUR-SERVER-IP:8090/websites/yourdomain.com/manageGITPick the folder (for us
Code:
/home/cyber.adminslab.com/blogStep 2: Attach Existing Repo, and what went wrong
The dialog asks for Git Host, Username (the repo owner) and Repo Name, and shows a Deployment Key (an SSH public key CyberPanel generates for the site user).
In the dialog we filled in github.com, the owner and the repo name, and clicked Attach:
First try:
Code:
fatal: destination path '/home/cyber.adminslab.com/blog' already exists and is not an empty directory.Code:
index.htmlWith Override Data ticked we tried again:
Second try:
Code:
[email protected]: Permission denied (publickey).Code:
[email protected]:owner/repo.gitAnd then we looked at the server:
The folder was gone. Override Data deleted the site's document root before cloning; the clone then failed, and nothing was put back. The subdomain answered 404 until we fixed it.
So, before you use Attach Existing Repo:
- Add the deployment key to the repo first (Step 4), so the clone actually succeeds.
- Take a backup of the folder, or better, don't tick Override Data at all. Move the old files away yourself.
- Never try this on the main document root of a live site without a backup (CyberPanel backups).
Step 3: The simple way that worked: git clone over HTTPS
For a public repo you don't need any key: clone over HTTPS from SSH. The target folder must not exist yet (or be empty), so move the old document root away first:
Code:
cd /home/yourdomain.com
mv public_html public_html.old
sudo -u SITEUSER git clone https://github.com/owner/repo.git public_htmlCode:
sudo -u SITEUSERCode:
cyber2602As the site user, from the parent folder of the document root:
The site came back right away with the repo's
Code:
index.htmlCode:
<title>Spoon-Knife</title>Two things we checked afterwards:
- Is reachable from the web? No:Code:
.gitandCode:/.git/configanswered 403,Code:/.git/HEAD200. The 403 came from OpenLiteSpeed itself, not from our ModSecurity rules (nothing in the audit log). Test your own site anyway:Code:/README.mdmust not return 200. An exposedCode:curl -I https://yourdomain.com/.git/configfolder gives away your whole source code.Code:.git
- Root can't use the repo. Running as root in the site user's repo gaveCode:
git log. That's a Git safety check. Don't "fix" it withCode:fatal: detected dubious ownership in repository; just always run Git as the site user.Code:safe.directory
Step 4: Private repositories: the deploy key
For a private repo, HTTPS needs a token. The cleaner way is the deploy key CyberPanel already made. It's the site user's SSH key:
Code:
cat /home/yourdomain.com/.ssh/SITEUSER.pubCode:
/home/cyber.adminslab.com/.ssh/cyber2602.pubCode:
sudo -u SITEUSER git clone [email protected]:owner/private-repo.git public_htmlStep 5: Deploy updates
Once the folder is a Git repo, Manage Git recognises it no matter how it was cloned: our HTTPS clone showed up with its 3 commits and the buttons Pull, Push, Commit, Create New Branch, Edit .gitignore, Git Logs and Remove.
To test an update we pushed a new commit with one new file,
Code:
hello.txtThen Pull in Manage Git:
Changes applied: a fast-forward to the new commit. On the server the new file belonged to the site user (
Code:
-rw-r--r-- cyber2602 cyber2602 hello.txtOne oddity: when there's nothing new, the panel shows it as a failure:
Operation Failed! Pull not required. with
Code:
Already up to date.From SSH the same update is one line:
Code:
cd /home/yourdomain.com/public_html && sudo -u SITEUSER git pull --ff-onlyCode:
--ff-onlyCode:
composer install --no-devCode:
php artisan migrate --forceGood habits
- Keep secrets out of the repo: ,Code:
.envand uploads belong inCode:wp-config.php, and stay only on the server.Code:.gitignore
- Don't edit files on the server in a deployed folder. The next pull will refuse or overwrite them. Change the repo instead.
- For a framework with a folder, clone the repo one level up and point the document root atCode:
public/, like in our Laravel guide. ThenCode:public,Code:.gitand the source code are outside the web root anyway.Code:.env
- Test a deployment on a subdomain or a staging copy first.
More CyberPanel guides
- Fail2ban brute-force protection
- Change PHP version per website
- SSH key login, passwords off
- Create a website
- Issue SSL and fix failed certificates
- Subdomains, addon domains and aliases
- Rewrite rules, force HTTPS, HSTS
- Install WordPress with LiteSpeed Cache
- Cron jobs and a real WP-Cron
- Redis object cache for WordPress
- Databases and phpMyAdmin
- Email, DKIM, SPF and DMARC
- Email forwarding, catch-all, plus-addressing
- Mail queue, spam senders, blacklists
- CyberPanel DNS vs Cloudflare
- Packages and website limits
- Deploy Laravel on CyberPanel
- WordPress staging (clone) fixes
- Backups: create, restore, schedule
- File Manager and FTP
- Reset the admin password from SSH
- Log files and config locations
- Check and restart services
- First steps after install
- ModSecurity + OWASP rules (fix)
- CLI cheat sheet
- Install CyberPanel on Ubuntu 24.04
- Firewall explained
- Install PHP extensions
- Change PHP settings (php.ini)
- Update CyberPanel safely
- Server Error (500) after a fresh install
- Packages, users and ACLs
- Upgrade CyberPanel safely
- Real visitor IPs behind Cloudflare
- Docker apps on your domain with SSL
- Import a large SQL file over SSH
- Remote MySQL access for one IP
- Move WordPress to CyberPanel by hand
- Fix "Error establishing a database connection"
- Fix PHP2Shell (CVE-2026-109618/109619)
- Run your own nameservers (PowerDNS)
- CyberPanel on a small VPS: RAM tuning
Tested on CyberPanel 3.0 (build 8, OpenLiteSpeed edition) on Ubuntu 24.04, October 2026. Menu names can change slightly between versions.