



CyberPanel Docker Manager: Run an App on Your Domain With SSL (and a Firewall Trap)
CyberPanel 3.0 has a built-in Docker Manager, so you can run apps that don't fit in a normal PHP website: monitoring, n8n, a small API, anything that ships as a Docker image. We tested the whole path on our lab server (CyberPanel 3.0, Ubuntu 24.04, OpenLiteSpeed): install Docker, run Uptime Kuma in a container, and put it on its own domain with a real SSL certificate.
It works, but three things are not obvious from the screens:
Step 1: Install Docker
In the left menu open Server and then Docker (or go straight to). On a fresh server it says Docker is not installed and shows an Install Docker button. Click it and wait; the log scrolls in the same box. It took about a minute on our VPS.
It installs Ubuntu's own packages: (Docker 29.1.3 for us) and the old Python 1.29.2. The newer (with a space) is not installed, so commands from tutorials that use it won't work until you add the package.
The Docker page after the install:

You get three buttons: Manage Containers, New Container and Manage Images.
Step 2: Pull the image
Open Manage Images, type the app name in Search Docker Hub and press Enter. Pick the right publisher: for Uptime Kuma the official image is (the one above it is a third-party copy). Type a tag in Exact tag; we used . If you leave it empty you get , which can jump to a new major version the next time you pull.
Search, choose the tag, Pull:
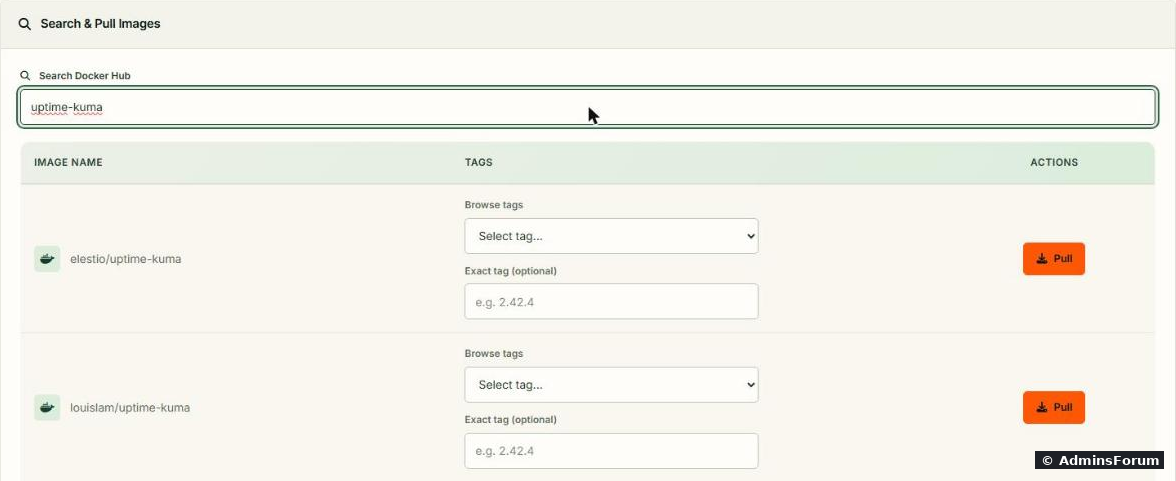
Click Pull. When it's done the image shows under Local Images.
Step 3: Create the container
Click Create Container, choose the image and tag, and click Create Container again. The form has four parts:
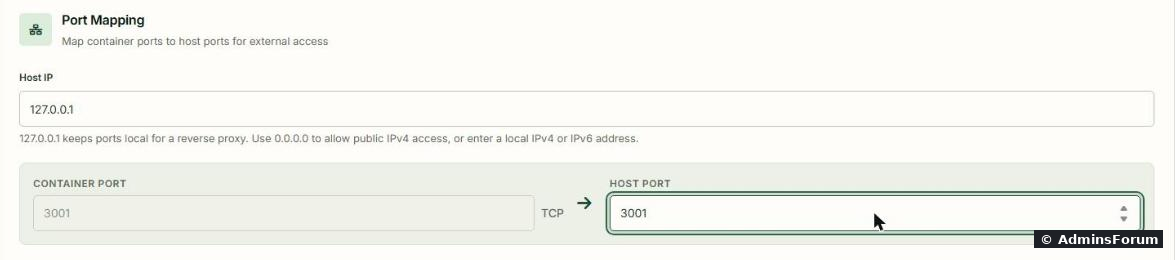
Add a volume. Click Add Volume. Host path: a folder on the server, for example (it's created for you). Container path: where the app keeps its data. For Uptime Kuma that's ; for other apps look for "volumes" or "persistent data" in their docs.
Volume mapping, filled in:
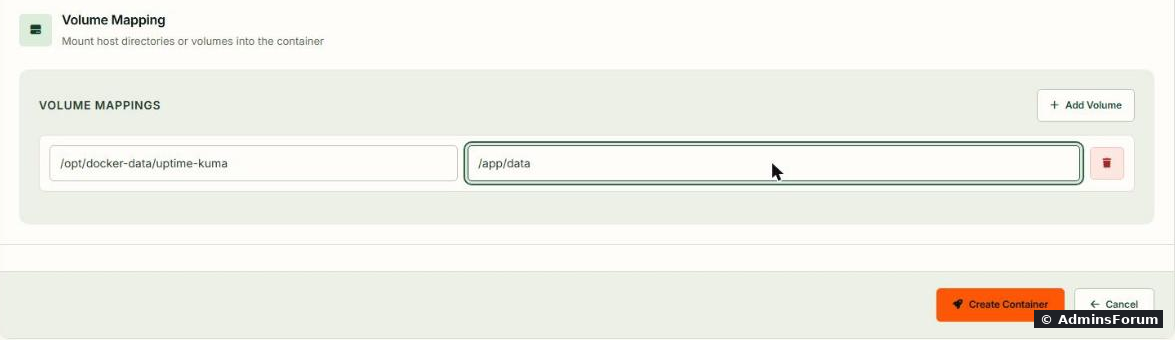
Without this, the data sits inside the container. When you delete or re-create it (which is also how you update to a newer image), the new container starts empty.
Step 4: Start it, and make it survive a reboot
After Create Container the status said created, CPU and memory 0%, Restart Policy: No and Start on boot: Disabled. The container existed but wasn't running.
What we got right after clicking Create Container:
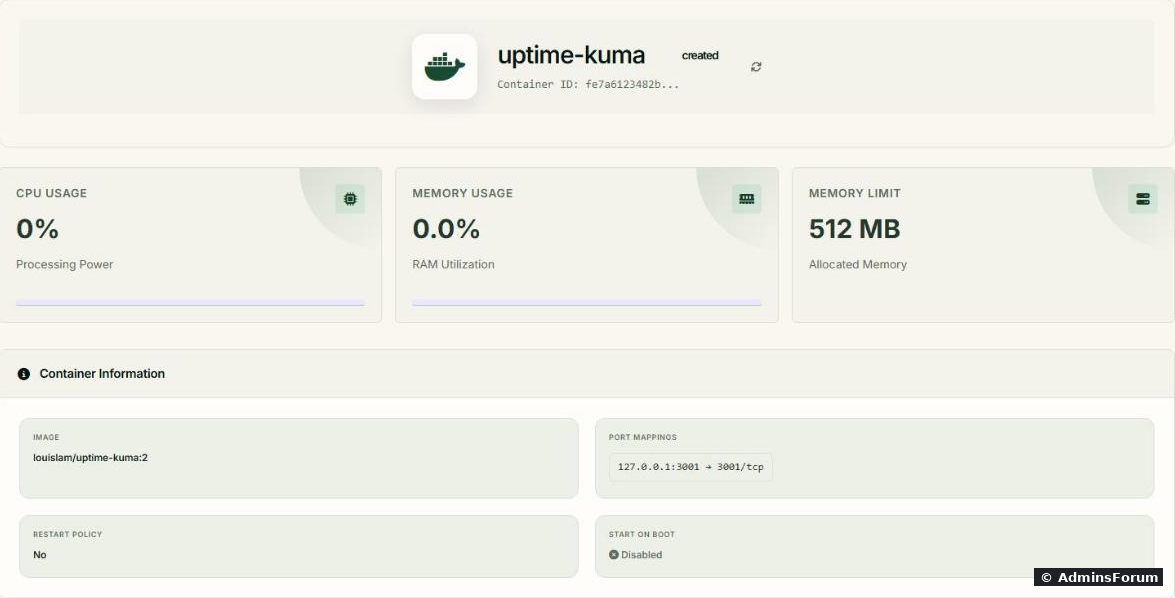
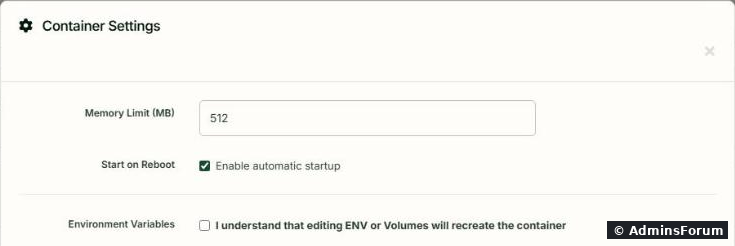
Scroll down to Container Actions and click Start. Then open Settings, tick Enable automatic startup and Save Settings. Leave the box "I understand that editing ENV or Volumes will recreate the container" unticked; you don't need it for this.
Container Settings with automatic startup ticked (Restart Policy changed to Yes in the background):
Check from SSH:
Ours: and restart policy . answered with a redirect to , so the app was running.
Step 5: Don't publish container ports to the internet
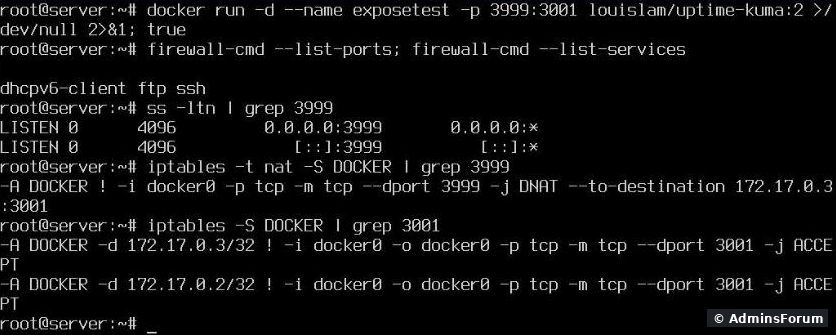
The Host IP field says you can use for public access. Before you do that, know this: Docker adds its own iptables rules and does not go through CyberPanel's firewall (firewalld). We started a test container on port 3999 with the default . The firewall only allowed ssh, ftp and a few mail and web ports, and 3999 was not in the list. The port was still open from the internet.
Our test, with a throwaway container on port 3999:
And this is what anyone on the internet saw on port 3999:
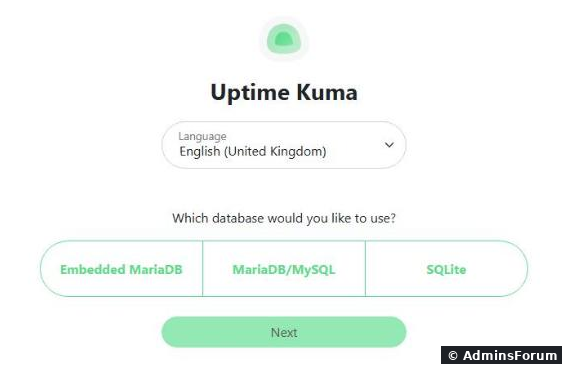
That was a brand-new Uptime Kuma waiting for someone to create the admin account. Anyone who found it first could have taken it. We removed the test container right away.
So: keep Host IP at and let the web server in front of it (next step) handle the public side, with SSL. If an app really must be reachable on its own port, limit it in Docker itself, not only in the CyberPanel firewall.
Step 6: Put the app on a domain with SSL
OpenLiteSpeed passes the requests on to the container. You need a normal CyberPanel website for the domain:
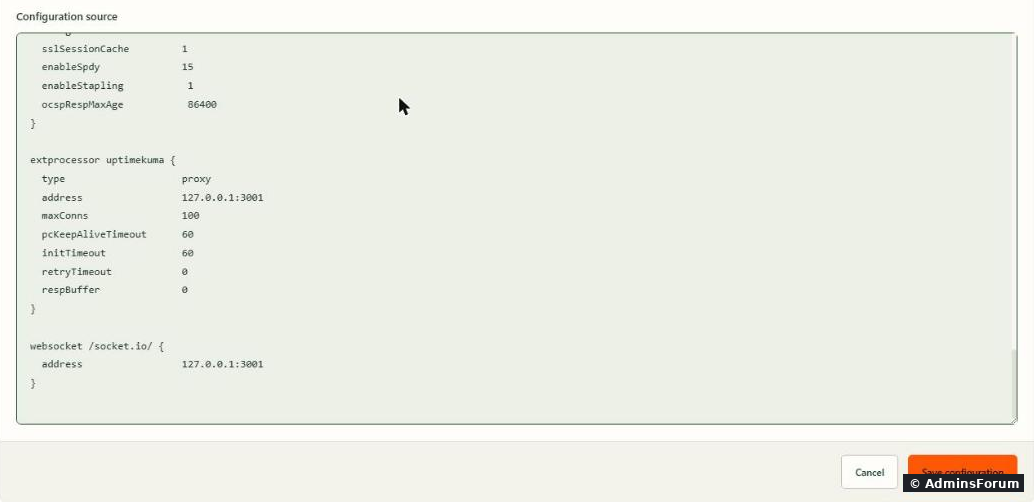
a) vHost Conf. Click vHost Conf, scroll to the very bottom and add:
is just a name you pick; you use it again in the rewrite rule. is the Host IP and Host Port from Step 3. Click Save configuration.
The end of our vHost Conf:
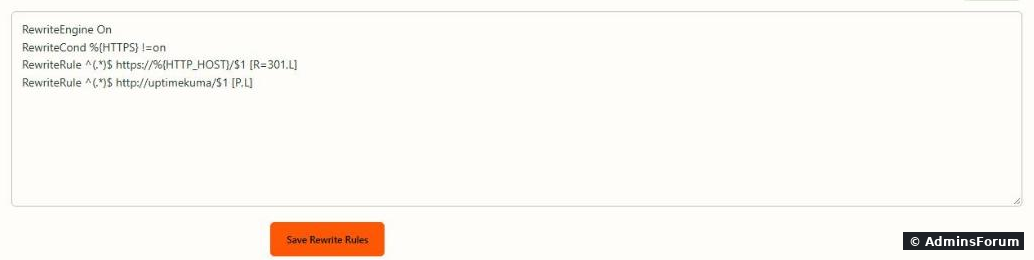
b) Rewrite Rules. Click Rewrite Rules. On a new website the box wasn't empty: it showed an error text,. Delete that text first, or it ends up in your .htaccess file. Then paste:
The first rule sends visitors from http to https. The last one passes everything to the proxy from the vHost Conf. Click Save Rewrite Rules.
Our rewrite rules:
Test from SSH:
We got a to https, then with . That redirect comes from Uptime Kuma itself, so the proxy works.
Why the websocket block matters
Many apps (Uptime Kuma, n8n, chat apps, anything "live") use WebSockets. The rewrite rule above does not pass them on; only the block in the vHost Conf does. Without it the page loads, but the dashboard stays empty or keeps "reconnecting". We tested a WebSocket connection to with and without the block (our is a tiny Node.js script that opens the connection and prints the first message):
With and without the websocket block:
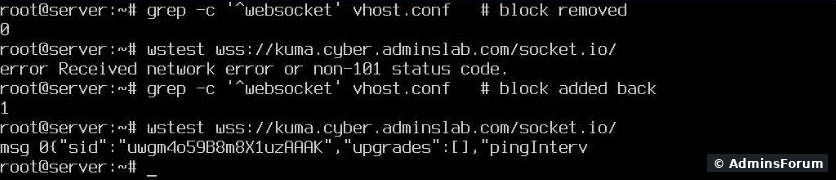
Without the block: (refused). With it: the app's first WebSocket message. If your app uses a different WebSocket path, use that path instead of , or for all of them.
Step 7: Finish the app's setup right away
As soon as the domain works, the app's setup page is public. Open your domain and create the admin account immediately. For Uptime Kuma: choose the database (SQLite is fine for small setups), then create the admin user.
Updating the app without losing data
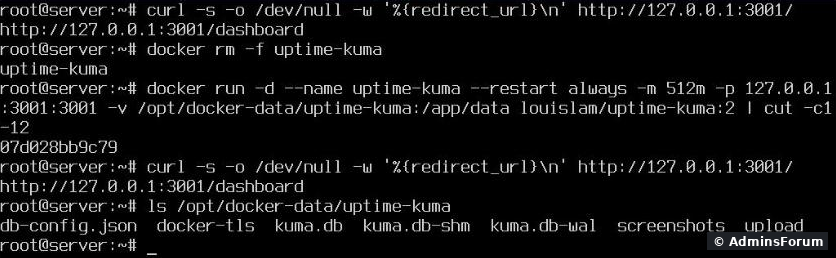
Pull the new tag in Manage Images, then re-create the container with the same settings and the same volume. The data lives in the host folder, not in the container. We tested exactly that from SSH: deleted the container and ran a new one with the same volume. Uptime Kuma went straight to its dashboard instead of the setup page, and the database files were still there:
Delete and re-create, data still there:
The equivalent command, if you prefer SSH:
Back up the host folder () like any other data. CyberPanel's website backups don't include it.
Troubleshooting
More CyberPanel guides
CyberPanel 3.0 has a built-in Docker Manager, so you can run apps that don't fit in a normal PHP website: monitoring, n8n, a small API, anything that ships as a Docker image. We tested the whole path on our lab server (CyberPanel 3.0, Ubuntu 24.04, OpenLiteSpeed): install Docker, run Uptime Kuma in a container, and put it on its own domain with a real SSL certificate.
It works, but three things are not obvious from the screens:
- A new container is not started and does not come back after a reboot until you change a setting.
- Without a volume, your app's data lives only inside the container.
- If you publish a port to the internet, Docker opens it even though CyberPanel's firewall doesn't list it.
Step 1: Install Docker
In the left menu open Server and then Docker (or go straight to
Code:
https://YOUR-SERVER-IP:8090/docker/It installs Ubuntu's own packages:
Code:
docker.ioCode:
docker-composeCode:
docker composeCode:
docker-compose-v2The Docker page after the install:
You get three buttons: Manage Containers, New Container and Manage Images.
Step 2: Pull the image
Open Manage Images, type the app name in Search Docker Hub and press Enter. Pick the right publisher: for Uptime Kuma the official image is
Code:
louislam/uptime-kumaCode:
2Code:
latestSearch, choose the tag, Pull:
Click Pull. When it's done the image shows under Local Images.
Step 3: Create the container
Click Create Container, choose the image and tag, and click Create Container again. The form has four parts:
- Container Name: short and simple, we used . Owner:Code:
uptime-kuma. Memory Limit: required; 512 MB is plenty for Uptime Kuma.Code:admin
- Port Mapping: the container port (3001) is filled in from the image. Type the Host Port (we used 3001 too). Leave Host IP at ; see Step 5 for why.Code:
127.0.0.1
- Environment Variables: also filled in from the image. Leave them unless the app's docs say otherwise.
- Volume Mapping: empty by default. Add one (below).
Add a volume. Click Add Volume. Host path: a folder on the server, for example
Code:
/opt/docker-data/uptime-kumaCode:
/app/dataVolume mapping, filled in:
Without this, the data sits inside the container. When you delete or re-create it (which is also how you update to a newer image), the new container starts empty.
Step 4: Start it, and make it survive a reboot
After Create Container the status said created, CPU and memory 0%, Restart Policy: No and Start on boot: Disabled. The container existed but wasn't running.
What we got right after clicking Create Container:
Scroll down to Container Actions and click Start. Then open Settings, tick Enable automatic startup and Save Settings. Leave the box "I understand that editing ENV or Volumes will recreate the container" unticked; you don't need it for this.
Container Settings with automatic startup ticked (Restart Policy changed to Yes in the background):
Check from SSH:
Code:
docker ps --format '{{.Names}} {{.Status}} {{.Ports}}'
docker inspect -f '{{.HostConfig.RestartPolicy.Name}}' uptime-kumaCode:
uptime-kuma Up About a minute (healthy) 127.0.0.1:3001->3001/tcpCode:
alwaysCode:
curl -sI http://127.0.0.1:3001Code:
/setup-databaseStep 5: Don't publish container ports to the internet
The Host IP field says you can use
Code:
0.0.0.0Code:
0.0.0.0Our test, with a throwaway container on port 3999:
And this is what anyone on the internet saw on port 3999:
That was a brand-new Uptime Kuma waiting for someone to create the admin account. Anyone who found it first could have taken it. We removed the test container right away.
So: keep Host IP at
Code:
127.0.0.1Step 6: Put the app on a domain with SSL
OpenLiteSpeed passes the requests on to the container. You need a normal CyberPanel website for the domain:
- Add a DNS A record for the name (ours: ) pointing to your server. If you use Cloudflare, set it to DNS only (grey cloud) until the certificate is issued.Code:
kuma.cyber.adminslab.com
- Websites > Create Website with that domain (any PHP version, it isn't used).
- Issue SSL for it. Ours was issued on the first try.
a) vHost Conf. Click vHost Conf, scroll to the very bottom and add:
Code:
extprocessor uptimekuma {
  type                    proxy
  address                 127.0.0.1:3001
  maxConns                100
  pcKeepAliveTimeout      60
  initTimeout             60
  retryTimeout            0
  respBuffer              0
}

websocket /socket.io/ {
  address                 127.0.0.1:3001
}
Code:
uptimekumaCode:
127.0.0.1:3001The end of our vHost Conf:
b) Rewrite Rules. Click Rewrite Rules. On a new website the box wasn't empty: it showed an error text,
Code:
cat: /home/kuma.cyber.adminslab.com/public_html/.htaccess: No such file or directoryCode:
RewriteEngine On
RewriteCond %{HTTPS} !=on
RewriteRule ^(.*)$ https://%{HTTP_HOST}/$1 [R=301,L]
RewriteRule ^(.*)$ http://uptimekuma/$1 [P,L]Code:
uptimekumaOur rewrite rules:
Test from SSH:
Code:
curl -sI http://kuma.cyber.adminslab.com/ | head -3
curl -sI https://kuma.cyber.adminslab.com/ | head -3Code:
301Code:
HTTP/2 302Code:
location: /setup-databaseWhy the websocket block matters
Many apps (Uptime Kuma, n8n, chat apps, anything "live") use WebSockets. The rewrite rule above does not pass them on; only the
Code:
websocketCode:
wss://kuma.cyber.adminslab.com/socket.io/Code:
wstestWith and without the websocket block:
Without the block:
Code:
non-101 status codeCode:
/socket.io/Code:
/Step 7: Finish the app's setup right away
As soon as the domain works, the app's setup page is public. Open your domain and create the admin account immediately. For Uptime Kuma: choose the database (SQLite is fine for small setups), then create the admin user.
Updating the app without losing data
Pull the new tag in Manage Images, then re-create the container with the same settings and the same volume. The data lives in the host folder, not in the container. We tested exactly that from SSH: deleted the container and ran a new one with the same volume. Uptime Kuma went straight to its dashboard instead of the setup page, and the database files were still there:
Delete and re-create, data still there:
The equivalent command, if you prefer SSH:
Code:
docker run -d --name uptime-kuma --restart always -m 512m \
  -p 127.0.0.1:3001:3001 -v /opt/docker-data/uptime-kuma:/app/data \
louislam/uptime-kuma:2Code:
/opt/docker-data/...Troubleshooting
- 503 on the domain: the container isn't running (we got exactly that after ). Start it, and check Enable automatic startup.Code:
docker stop
- Status "created", nothing happens: you didn't press Start (Step 4).
- Page loads but the dashboard is empty or keeps reconnecting: the block is missing or has the wrong path.Code:
websocket
- Data gone after an update: no volume mapping. Check with .Code:
docker inspect -f '{{json .Mounts}}' NAME
- SSL won't issue: the A record must point to your server and, with Cloudflare, be DNS only during issuing.
- docker compose: command not found: CyberPanel installs the old (with a dash). InstallCode:
docker-composefor the new syntax.Code:docker-compose-v2
More CyberPanel guides
- Fail2ban brute-force protection
- Change PHP version per website
- Git deployment from GitHub
- SSH key login, passwords off
- Create a website
- Issue SSL and fix failed certificates
- Subdomains, addon domains and aliases
- Rewrite rules, force HTTPS, HSTS
- Install WordPress with LiteSpeed Cache
- Cron jobs and a real WP-Cron
- Redis object cache for WordPress
- Databases and phpMyAdmin
- Email, DKIM, SPF and DMARC
- Email forwarding, catch-all, plus-addressing
- Mail queue, spam senders, blacklists
- CyberPanel DNS vs Cloudflare
- Packages and website limits
- Deploy Laravel on CyberPanel
- WordPress staging (clone) fixes
- Backups: create, restore, schedule
- File Manager and FTP
- Reset the admin password from SSH
- Log files and config locations
- Check and restart services
- First steps after install
- ModSecurity + OWASP rules (fix)
- CLI cheat sheet
- Install CyberPanel on Ubuntu 24.04
- Firewall explained
- Install PHP extensions
- Change PHP settings (php.ini)
- Update CyberPanel safely
- Server Error (500) after a fresh install
- Packages, users and ACLs
- Upgrade CyberPanel safely
- Real visitor IPs behind Cloudflare
- Import a large SQL file over SSH
- Remote MySQL access for one IP
- Move WordPress to CyberPanel by hand
- Fix "Error establishing a database connection"
- Fix PHP2Shell (CVE-2026-109618/109619)
- Run your own nameservers (PowerDNS)
- CyberPanel on a small VPS: RAM tuning