



Yesterday, 06:34 AM
A Flask app can work on localhost while still being unavailable through its domain. This guide connects a running Gunicorn project to Nginx, points a hostname at the VPS and enables HTTPS with a trusted certificate.
Tested lab: Ubuntu 22.04.5, aaPanel Free 8.0.7, Nginx 1.30.5, Flask 3.1.3 and Gunicorn 26.2.0. The public test hostname is flask.adminslab.com. Replace the hostname and VPS address with your own values. Menu wording can vary by panel version.
Before you startPort 3200 is the private application port. Visitors use 80 or 443 through Nginx; you do not need to open 3200 to the Internet.
1. Check the application before changing DNS
In aaPanel, open Website → Python Project. Check that your project is running. Our project is af_flask_lab. If it does not start, open Project logs and fix the startup error first.
From the VPS terminal, test:
Our test returned HTTP 200 and the body AdminsForum Flask lab. If this fails, a certificate or DNS change will not repair the application itself.
2. Add the domain to the Python project
Click the project name to open its management window. Select Domain Manager, enter your full hostname (for example, flask.example.com) without https:// or a path, and add it on port 80. Confirm that the domain appears in the project's domain list.
Do not create a separate PHP website with the same hostname. The Python project should own the hostname so Nginx sends requests to the correct application.
3. Point the DNS record at the VPS
If the domain uses Cloudflare nameservers, open the domain in Cloudflare and choose DNS → Records → Add record. For our subdomain we used:
DNS only makes the hostname resolve directly to the VPS. This guide tests Nginx and its certificate at the origin; Cloudflare proxy configuration is a separate step. Allow DNS propagation before requesting the certificate.
4. Enable external network mapping
Return to the project's Mapping section. Turn on External network mapping and confirm the panel's prompt. The panel should detect the running application port. In our lab it detected 3200 and showed Proxy routing is enabled: /.
The Python project's mapping routes website traffic through Nginx to the local application port.
The Firewall Status: Not configured entry for 3200 does not mean you must expose that port. The browser reaches Nginx on 80/443, and Nginx reaches Gunicorn on 127.0.0.1:3200.
Open http://your-hostname/ and check that it displays your Flask response. Our public HTTP check returned HTTP 200. If you see another website, check domain ownership and DNS. If you see 502, check the running process, its bind address and the mapping port.
5. Apply a Let's Encrypt certificate
In the project's management window, open SSL → Let's Encrypt. Choose File Verification, select the exact hostname and click Apply. File verification requires the certificate authority to reach the hostname on port 80.
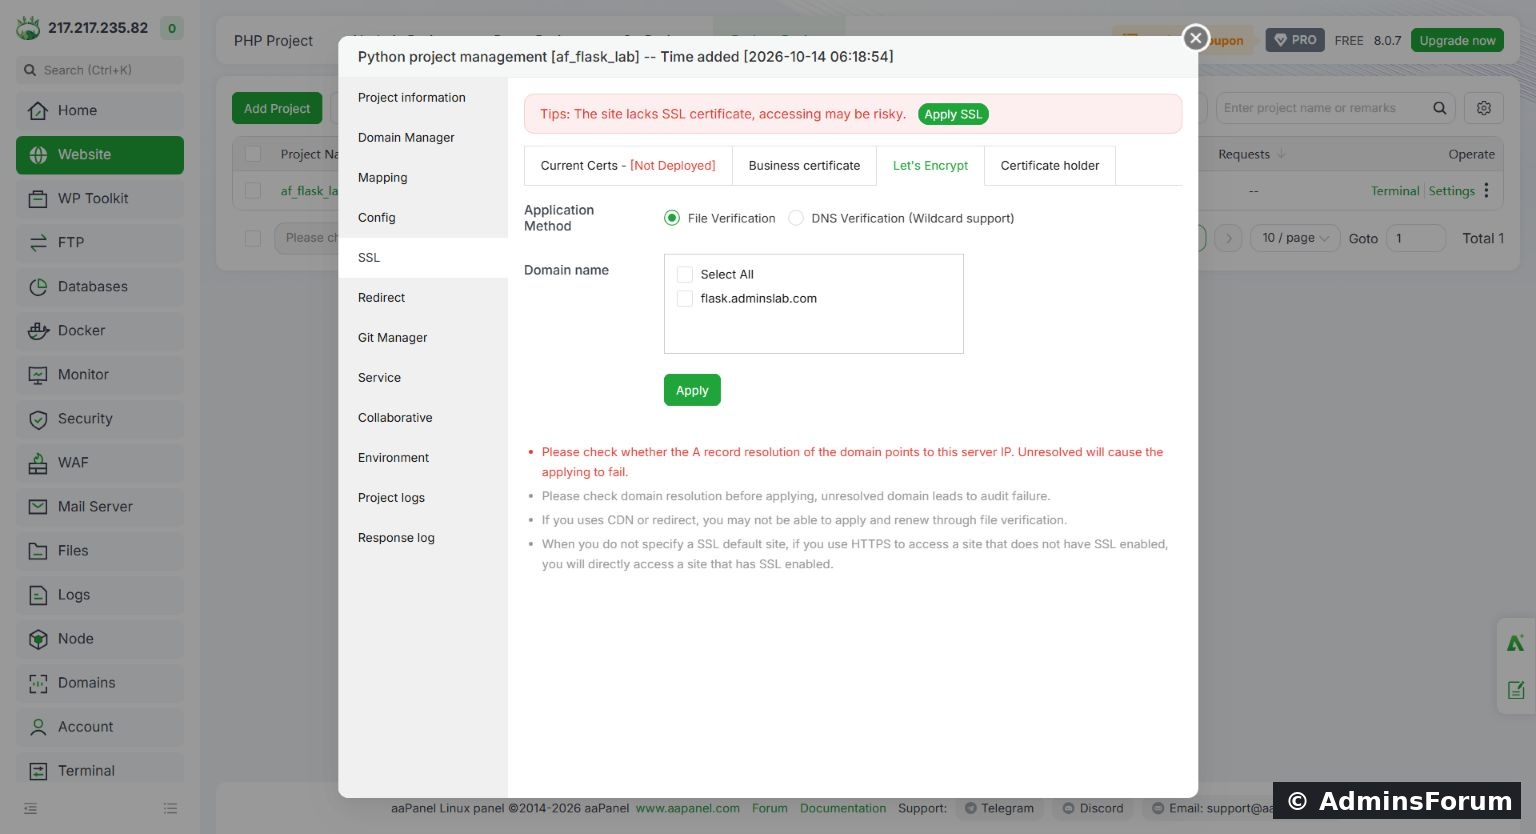
Select only the hostname that resolves to this project before applying for its certificate.
Some panel versions display Not connected to the Domain Management Center and a Connect action. Review that integration before connecting your domain, then return to the certificate request. Wait for issuance to finish; a pending request is not an installed certificate.
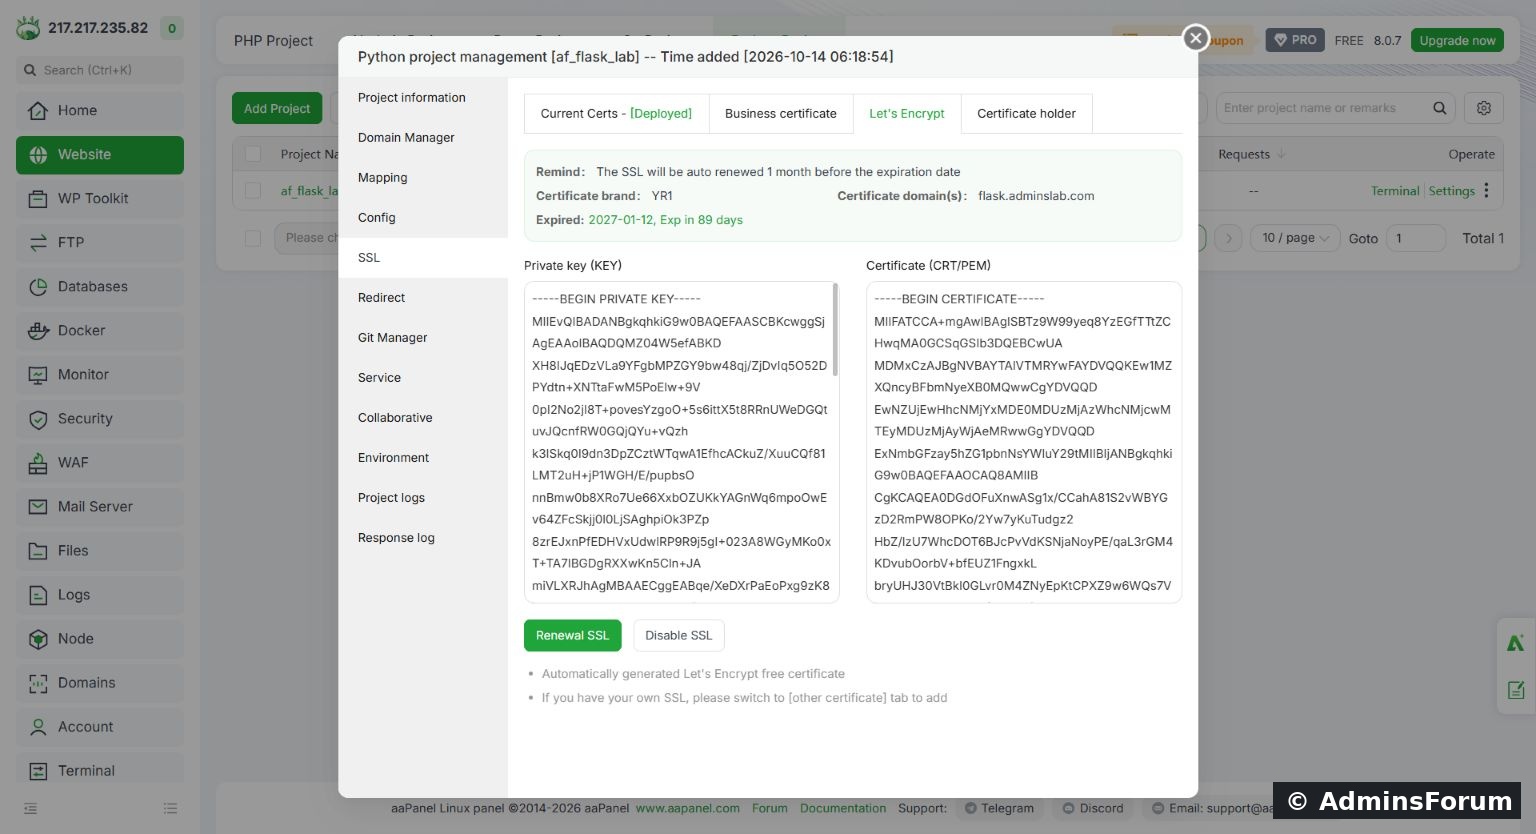
In this lab, the SSL section changed to Current Certs — Deployed, listed flask.adminslab.com and showed an expiry date of 12 January 2027. We also validated the live certificate independently. Do not copy or share the private-key field from the certificate screen.
6. Verify HTTPS from outside the VPS
Open https://your-hostname/ in a browser. The page must display the expected application without a certificate warning. From a terminal, you can also test:
Do not use curl -k for this check: it skips certificate validation and can hide a broken certificate.

The public HTTPS hostname serves the expected Flask lab response.
Our result: https://flask.adminslab.com/ returned HTTP 200 with AdminsForum Flask lab, and certificate validation passed. This confirms DNS, Nginx mapping, the running application and HTTPS worked together at the time of testing.
Troubleshooting
Completion checklist
Related: Create a Python Virtual Environment · Run Flask with Gunicorn
Tested and illustrated by AdminsForum. Screenshots show our own lab; use your own domain and application values.
Tested lab: Ubuntu 22.04.5, aaPanel Free 8.0.7, Nginx 1.30.5, Flask 3.1.3 and Gunicorn 26.2.0. The public test hostname is flask.adminslab.com. Replace the hostname and VPS address with your own values. Menu wording can vary by panel version.
Before you start
- Complete Run a Flask App with Gunicorn in aaPanel. This lesson assumes the Python project is already running.
- Have control of the domain's DNS. Nginx must be installed and the VPS must accept incoming TCP 80 and 443 through both its server firewall and any provider firewall.
- The application should listen on localhost, not a public interface. Our Gunicorn command is:
Code:
gunicorn --workers 1 --bind 127.0.0.1:3200 app:app1. Check the application before changing DNS
In aaPanel, open Website → Python Project. Check that your project is running. Our project is af_flask_lab. If it does not start, open Project logs and fix the startup error first.
From the VPS terminal, test:
Code:
curl -i http://127.0.0.1:3200/2. Add the domain to the Python project
Click the project name to open its management window. Select Domain Manager, enter your full hostname (for example, flask.example.com) without https:// or a path, and add it on port 80. Confirm that the domain appears in the project's domain list.
Do not create a separate PHP website with the same hostname. The Python project should own the hostname so Nginx sends requests to the correct application.
3. Point the DNS record at the VPS
If the domain uses Cloudflare nameservers, open the domain in Cloudflare and choose DNS → Records → Add record. For our subdomain we used:
- Type: A
- Name: flask
- IPv4 address: the lab VPS public IPv4 address
- Proxy status: DNS only for this direct-origin certificate test
- TTL: Auto
DNS only makes the hostname resolve directly to the VPS. This guide tests Nginx and its certificate at the origin; Cloudflare proxy configuration is a separate step. Allow DNS propagation before requesting the certificate.
4. Enable external network mapping
Return to the project's Mapping section. Turn on External network mapping and confirm the panel's prompt. The panel should detect the running application port. In our lab it detected 3200 and showed Proxy routing is enabled: /.
The Python project's mapping routes website traffic through Nginx to the local application port.
The Firewall Status: Not configured entry for 3200 does not mean you must expose that port. The browser reaches Nginx on 80/443, and Nginx reaches Gunicorn on 127.0.0.1:3200.
Open http://your-hostname/ and check that it displays your Flask response. Our public HTTP check returned HTTP 200. If you see another website, check domain ownership and DNS. If you see 502, check the running process, its bind address and the mapping port.
5. Apply a Let's Encrypt certificate
In the project's management window, open SSL → Let's Encrypt. Choose File Verification, select the exact hostname and click Apply. File verification requires the certificate authority to reach the hostname on port 80.
Select only the hostname that resolves to this project before applying for its certificate.
Some panel versions display Not connected to the Domain Management Center and a Connect action. Review that integration before connecting your domain, then return to the certificate request. Wait for issuance to finish; a pending request is not an installed certificate.
In this lab, the SSL section changed to Current Certs — Deployed, listed flask.adminslab.com and showed an expiry date of 12 January 2027. We also validated the live certificate independently. Do not copy or share the private-key field from the certificate screen.
6. Verify HTTPS from outside the VPS
Open https://your-hostname/ in a browser. The page must display the expected application without a certificate warning. From a terminal, you can also test:
Code:
curl -i https://your-hostname/The public HTTPS hostname serves the expected Flask lab response.
Our result: https://flask.adminslab.com/ returned HTTP 200 with AdminsForum Flask lab, and certificate validation passed. This confirms DNS, Nginx mapping, the running application and HTTPS worked together at the time of testing.
Troubleshooting
- DNS points to the wrong server: correct the A record and any conflicting AAAA record, then allow caches to expire.
- HTTP works but certificate verification fails: check port 80, redirects, proxy rules and whether the selected hostname is the one attached to this project. Read the issuance error rather than repeatedly submitting requests.
- HTTPS shows another site's certificate: confirm this hostname has its own deployed certificate and is served by the expected Nginx project.
- 502 Bad Gateway: verify localhost responds, then compare the Gunicorn port with the mapping port and inspect Project logs.
- App stops after reboot: this guide does not verify Python reboot recovery. Test and document autostart separately before treating the deployment as production-ready.
Completion checklist
- Domain is listed under the correct Python project.
- DNS resolves to the intended VPS.
- Local Gunicorn and public HTTP both return the expected content.
- Mapping uses the application's local port.
- SSL is deployed for the exact hostname.
- Public HTTPS passes normal certificate validation and returns the expected app.
Related: Create a Python Virtual Environment · Run Flask with Gunicorn
Tested and illustrated by AdminsForum. Screenshots show our own lab; use your own domain and application values.