



10-13-2026, 05:17 AM
After installing aaPanel, secure management access before adding production websites. This checklist separates settings verified on our lab from account changes you must complete yourself. It does not claim that enabling one option makes a server fully secure.
1. Save a recovery route first
Confirm you can open the VPS provider console. Keep a working SSH session while changing management settings. Store the actual panel address and security entrance in a private password manager. Create an off-server backup of website files, databases and the configuration needed to restore them. A backup that has never been restored is not a verified recovery plan.
2. Use a hostname with trusted HTTPS
Create a DNS-only record such as cp.example.com pointing to the panel server. aaPanel's port may not be supported by a CDN proxy; our lab uses 18443 with DNS-only resolution. In Settings → Panel SSL, request and install a certificate for the hostname. Open the panel using that exact name, not the IP address. Check the browser's certificate information and expiration date.
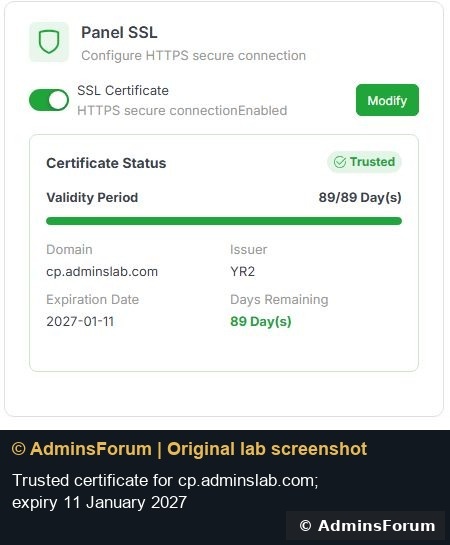
The lab panel uses a trusted certificate for cp.adminslab.com. The private login entrance is intentionally omitted.
Follow the complete panel SSL tutorial. Monitor renewal before expiry. A currently valid certificate does not prove that a future renewal has succeeded.
3. Review the firewall
Open Security → Firewall and preserve your actual SSH and panel ports. Keep only the services required for websites, mail and file transfers. Review TCP and UDP separately and check IPv6. Databases and internal web-server backends should not be generally accessible from the Internet. Our lab retains management access while denying direct database and backend ports; Redis also binds to localhost.
Use the tested firewall walkthrough. Do not run a firewall reset or remove a management rule before confirming a recovery route.
4. Strengthen the panel account
Use a unique, strong password stored in your password manager. If your installed panel offers multi-factor authentication, enroll it and keep recovery information privately. Check the account or security settings for session controls and notifications. Sign in successfully from a second session before ending the first. Password rotation and MFA enrollment were not performed during this lab walkthrough; these require the owner to complete the credential and recovery steps.
5. Review SSH authentication
Prepare a non-root administrator account and a tested SSH key before considering removal of password authentication. Confirm that the new account can sign in and use the administration privileges it needs. Keep the provider console available. Validate the SSH configuration before reloading it, and test another connection afterward. Do not disable root/password access based only on a screenshot or an untested key. The lab's SSH authentication method has not been changed in this article.
6. Use encrypted file transfer
Use SFTP over SSH or explicitly encrypted FTPS. Restrict FTP users to the folder they need, deny anonymous access, validate the FTPS certificate and encrypt the data channel as well as the login. Our restricted lab account passed a protected upload/download check, and access outside its assigned folder was refused.
FTPS configuration and certificate guide. The lab FTPS certificate bundle was manually deployed: renewal must also update that service's bundle and be verified.
7. Keep runtime versions and plugins maintainable
Review panel, operating-system and installed app updates. Back up first and check compatibility before a major runtime change. The App Store may still list old PHP versions; availability does not mean security support. Remove unused plugins through the supported uninstall workflow after checking dependencies. Avoid installing every optional service on a small VPS.
8. Verify backups without overwriting the live site
Check archive integrity, extract into an isolated private folder, import the database under a separate name and verify the staged application. Keep staged credentials and files out of the public web root. Our lab restore rehearsal checked 3,935 file hashes, imported 12 tables and bootstrapped WordPress in an isolated copy. It did not overwrite the live site or prove every browser workflow.
Full restore verification walkthrough.
9. Monitor and repeat the checks
Review panel/SSH login events, service failures, disk space, backup results and certificate expiry. Investigate unexpected open ports after installing apps. Test website access, mail and file transfers after changes. Store logs privately and redact credentials, tokens and personal details before posting a support question.
Lab verification summary
Trusted panel HTTPS, reviewed IPv4/IPv6 firewall rules, protected FTPS, localhost Redis and an isolated WordPress restore were checked. Owner password rotation, MFA enrollment and SSH-key migration remain separate owner actions. These checks are useful evidence, not a security audit of every installed application.
Reference: aaPanel Settings documentation. Original lab image: © AdminsForum.
1. Save a recovery route first
Confirm you can open the VPS provider console. Keep a working SSH session while changing management settings. Store the actual panel address and security entrance in a private password manager. Create an off-server backup of website files, databases and the configuration needed to restore them. A backup that has never been restored is not a verified recovery plan.
2. Use a hostname with trusted HTTPS
Create a DNS-only record such as cp.example.com pointing to the panel server. aaPanel's port may not be supported by a CDN proxy; our lab uses 18443 with DNS-only resolution. In Settings → Panel SSL, request and install a certificate for the hostname. Open the panel using that exact name, not the IP address. Check the browser's certificate information and expiration date.
The lab panel uses a trusted certificate for cp.adminslab.com. The private login entrance is intentionally omitted.
Follow the complete panel SSL tutorial. Monitor renewal before expiry. A currently valid certificate does not prove that a future renewal has succeeded.
3. Review the firewall
Open Security → Firewall and preserve your actual SSH and panel ports. Keep only the services required for websites, mail and file transfers. Review TCP and UDP separately and check IPv6. Databases and internal web-server backends should not be generally accessible from the Internet. Our lab retains management access while denying direct database and backend ports; Redis also binds to localhost.
Use the tested firewall walkthrough. Do not run a firewall reset or remove a management rule before confirming a recovery route.
4. Strengthen the panel account
Use a unique, strong password stored in your password manager. If your installed panel offers multi-factor authentication, enroll it and keep recovery information privately. Check the account or security settings for session controls and notifications. Sign in successfully from a second session before ending the first. Password rotation and MFA enrollment were not performed during this lab walkthrough; these require the owner to complete the credential and recovery steps.
5. Review SSH authentication
Prepare a non-root administrator account and a tested SSH key before considering removal of password authentication. Confirm that the new account can sign in and use the administration privileges it needs. Keep the provider console available. Validate the SSH configuration before reloading it, and test another connection afterward. Do not disable root/password access based only on a screenshot or an untested key. The lab's SSH authentication method has not been changed in this article.
6. Use encrypted file transfer
Use SFTP over SSH or explicitly encrypted FTPS. Restrict FTP users to the folder they need, deny anonymous access, validate the FTPS certificate and encrypt the data channel as well as the login. Our restricted lab account passed a protected upload/download check, and access outside its assigned folder was refused.
FTPS configuration and certificate guide. The lab FTPS certificate bundle was manually deployed: renewal must also update that service's bundle and be verified.
7. Keep runtime versions and plugins maintainable
Review panel, operating-system and installed app updates. Back up first and check compatibility before a major runtime change. The App Store may still list old PHP versions; availability does not mean security support. Remove unused plugins through the supported uninstall workflow after checking dependencies. Avoid installing every optional service on a small VPS.
8. Verify backups without overwriting the live site
Check archive integrity, extract into an isolated private folder, import the database under a separate name and verify the staged application. Keep staged credentials and files out of the public web root. Our lab restore rehearsal checked 3,935 file hashes, imported 12 tables and bootstrapped WordPress in an isolated copy. It did not overwrite the live site or prove every browser workflow.
Full restore verification walkthrough.
9. Monitor and repeat the checks
Review panel/SSH login events, service failures, disk space, backup results and certificate expiry. Investigate unexpected open ports after installing apps. Test website access, mail and file transfers after changes. Store logs privately and redact credentials, tokens and personal details before posting a support question.
Lab verification summary
Trusted panel HTTPS, reviewed IPv4/IPv6 firewall rules, protected FTPS, localhost Redis and an isolated WordPress restore were checked. Owner password rotation, MFA enrollment and SSH-key migration remain separate owner actions. These checks are useful evidence, not a security audit of every installed application.
Reference: aaPanel Settings documentation. Original lab image: © AdminsForum.