



To import a MySQL or MariaDB database in aaPanel, open Databases, choose Import beside the correct database, upload your SQL file and confirm the import. Back up first, then verify the imported tables and data.
This walkthrough uses aaPanel's built-in importer. You do not need to expose phpMyAdmin publicly or open MySQL port 3306 to the internet.
Tested lab
Ubuntu 22.04 and aaPanel 8.0.7, tested on 13 October 2026. The database startup log reports MariaDB 10.11.10; the panel software button still displays the mariadb_10.11.6 label. The destination was our isolated adminsforum_lab tutorial database. We created a fresh backup, imported one sample table and verified that the panel lists it with a Row number of 2. The existing af_backup_check table remained present with one row. We did not import into the WordPress or webmail databases.
Before you begin
1. Choose the destination and create a backup
Open Databases → MySQL. The MySQL tab also manages our installed MariaDB service. Read the database name carefully; it is not always the same as the website domain.
If the database does not exist, follow Create a Database and User in aaPanel first. Use a separate database rather than importing over another site's tables.
In the destination row, click its Backup value, such as Exists(1), to open the backup details. Click Backup, wait for the background task to finish and confirm that a new dated archive appears with a non-zero size. Keep a private copy off the VPS for important data. Do not post a real SQL dump or its passwords in a support thread.
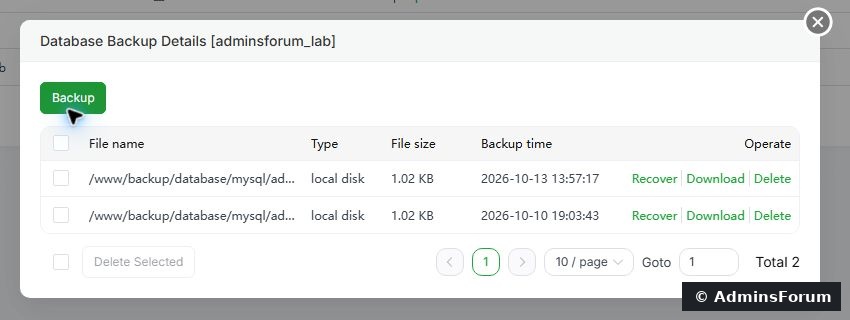
Our pre-import backup appeared in the list before we continued. Backup creation alone is not a tested restore.
2. Check the file before uploading
Use the SQL export from the source database or a harmless sample for practice. A renamed spreadsheet, HTML error page or ZIP without a SQL file is not a database export.
For this rehearsal, our file was plain SQL. It created a uniquely named training table and inserted two rows:
Save this as a UTF-8 file ending in .sql if you want to practise in your own empty lab database. This is demonstration data, not a WordPress migration file. It contains no DROP, DELETE or USE statement.
3. Open Import beside the correct database
Return to the database list and click Import in your destination row. Check the database name in the dialog title before selecting a file.
The dialog lists database archives stored on the server. Do not choose an unrelated backup simply because it appears in the list. The list can contain backups from other databases, including WordPress.
Click Upload from local → Select file, choose your .sql file and click Upload. Wait for the upload to finish. Uploading only transfers the file; it does not yet execute the SQL.
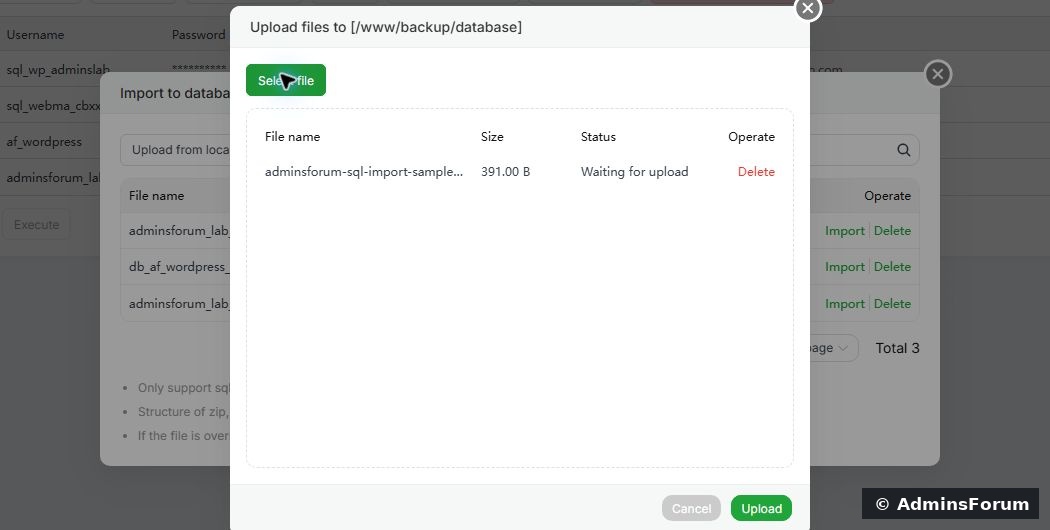
The sample file is selected in the upload dialog. Complete the upload before starting Import.
The tested panel lists .sql, .zip, .gz, .tar.gz and .tgz support. When using an archive, check that it actually contains the intended SQL dump. For a file too large for browser upload, aaPanel's dialog suggests SFTP upload to /www/backup/database. Keep database backups outside the public website directory.
4. Start the import and read the warning
After upload, find the exact filename in the import list and click Import on that row. aaPanel asks: Database will be overwritten, continue?
Only confirm after checking the destination database, selected file and backup. Wait while aaPanel runs the background import. Avoid repeated clicks or starting several imports into the same database.
Closing the progress window is not evidence of success. The panel says the task continues in the background; use the log to check its result.
5. Read the import log
In the import dialog, click Show Logs and refresh if necessary. Read the output for the correct database and for errors. Our log reported Import status: Successful and Database recovery successful!
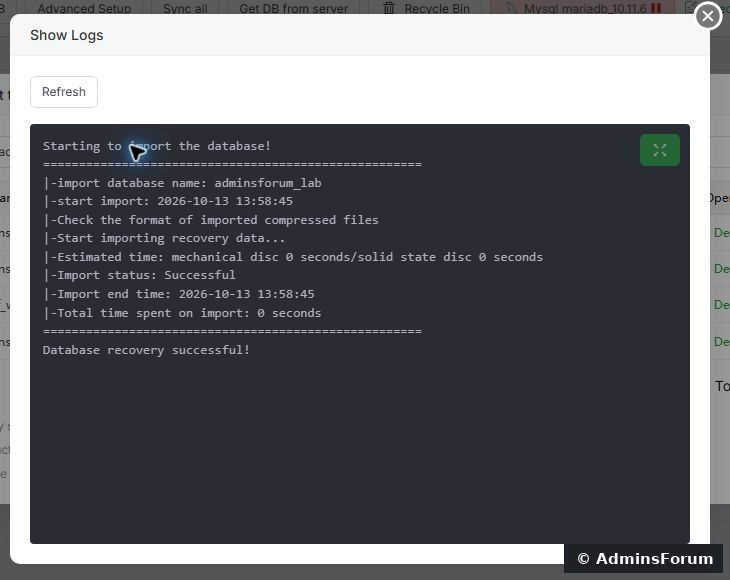
Actual log from the two-row lab import. A tiny sample completing quickly is not a speed estimate for large website databases.
If the log reports a SQL error, the database may already contain partially imported tables. Investigate that error before repeating the import. Do not assume a retry automatically undoes earlier statements.
6. Verify the tables and rows
Close the import dialog and open Tools in the destination database row. Confirm that the expected table names appear. Our new af_import_lesson_20261013 table showed two rows, and the old backup-test table was still present.
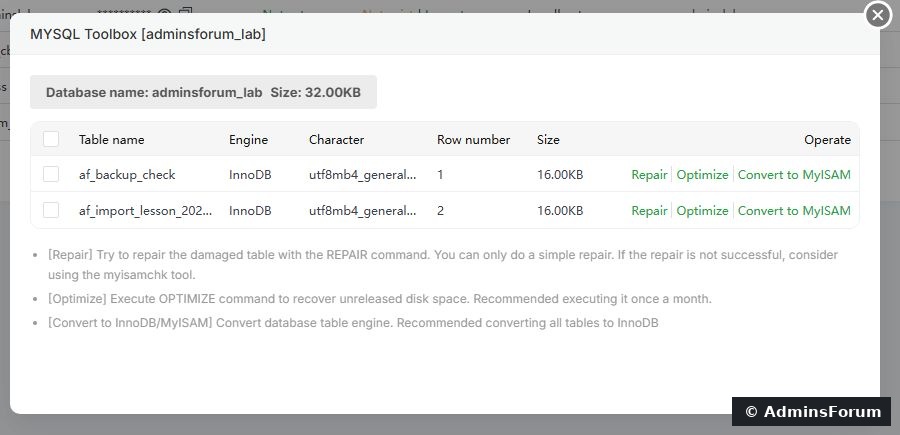
The new training table and the original test table are both visible. We only inspected this screen; Repair, Optimize and engine conversion were not needed.
For an exact data check, use your private database client or phpMyAdmin to run:
For this sample, expect two rows and the two titles above. The screenshot's table row number is a useful panel check; use SELECT to verify exact counts for a real migration.
For a website migration, also update the application's database settings to the new database, check a real page and test any login or form that depends on it. Imported tables alone do not prove that the application is configured correctly.
Troubleshooting
Rollback and next steps
If an import damages existing data, stop changes and restore the correct pre-import backup through the database backup controls. Validate a restore in an isolated database before making a live application depend on it. See Back Up and Restore a Database in aaPanel for the recovery workflow.
aaPanel MySQL database documentation
Check MySQL Status and Error Logs in aaPanel
This walkthrough uses aaPanel's built-in importer. You do not need to expose phpMyAdmin publicly or open MySQL port 3306 to the internet.
Tested lab
Ubuntu 22.04 and aaPanel 8.0.7, tested on 13 October 2026. The database startup log reports MariaDB 10.11.10; the panel software button still displays the mariadb_10.11.6 label. The destination was our isolated adminsforum_lab tutorial database. We created a fresh backup, imported one sample table and verified that the panel lists it with a Row number of 2. The existing af_backup_check table remained present with one row. We did not import into the WordPress or webmail databases.
Before you begin
- A running MySQL or MariaDB service and a database created in aaPanel.
- A trusted .sql export containing database structure and/or data, not website files.
- Enough free disk space for the upload, extracted archive and database.
- A current backup of anything already in the destination database.
1. Choose the destination and create a backup
Open Databases → MySQL. The MySQL tab also manages our installed MariaDB service. Read the database name carefully; it is not always the same as the website domain.
If the database does not exist, follow Create a Database and User in aaPanel first. Use a separate database rather than importing over another site's tables.
In the destination row, click its Backup value, such as Exists(1), to open the backup details. Click Backup, wait for the background task to finish and confirm that a new dated archive appears with a non-zero size. Keep a private copy off the VPS for important data. Do not post a real SQL dump or its passwords in a support thread.
Our pre-import backup appeared in the list before we continued. Backup creation alone is not a tested restore.
2. Check the file before uploading
Use the SQL export from the source database or a harmless sample for practice. A renamed spreadsheet, HTML error page or ZIP without a SQL file is not a database export.
For this rehearsal, our file was plain SQL. It created a uniquely named training table and inserted two rows:
Code:
CREATE TABLE IF NOT EXISTS af_import_lesson_20261013 (
  id INT NOT NULL PRIMARY KEY,
  title VARCHAR(120) NOT NULL
) ENGINE=InnoDB DEFAULT CHARSET=utf8mb4;

INSERT INTO af_import_lesson_20261013 (id, title) VALUES
  (1, 'Welcome to AdminsForum'),
  (2, 'SQL import verified')
ON DUPLICATE KEY UPDATE title=VALUES(title);3. Open Import beside the correct database
Return to the database list and click Import in your destination row. Check the database name in the dialog title before selecting a file.
The dialog lists database archives stored on the server. Do not choose an unrelated backup simply because it appears in the list. The list can contain backups from other databases, including WordPress.
Click Upload from local → Select file, choose your .sql file and click Upload. Wait for the upload to finish. Uploading only transfers the file; it does not yet execute the SQL.
The sample file is selected in the upload dialog. Complete the upload before starting Import.
The tested panel lists .sql, .zip, .gz, .tar.gz and .tgz support. When using an archive, check that it actually contains the intended SQL dump. For a file too large for browser upload, aaPanel's dialog suggests SFTP upload to /www/backup/database. Keep database backups outside the public website directory.
4. Start the import and read the warning
After upload, find the exact filename in the import list and click Import on that row. aaPanel asks: Database will be overwritten, continue?
Only confirm after checking the destination database, selected file and backup. Wait while aaPanel runs the background import. Avoid repeated clicks or starting several imports into the same database.
Closing the progress window is not evidence of success. The panel says the task continues in the background; use the log to check its result.
5. Read the import log
In the import dialog, click Show Logs and refresh if necessary. Read the output for the correct database and for errors. Our log reported Import status: Successful and Database recovery successful!
Actual log from the two-row lab import. A tiny sample completing quickly is not a speed estimate for large website databases.
If the log reports a SQL error, the database may already contain partially imported tables. Investigate that error before repeating the import. Do not assume a retry automatically undoes earlier statements.
6. Verify the tables and rows
Close the import dialog and open Tools in the destination database row. Confirm that the expected table names appear. Our new af_import_lesson_20261013 table showed two rows, and the old backup-test table was still present.
The new training table and the original test table are both visible. We only inspected this screen; Repair, Optimize and engine conversion were not needed.
For an exact data check, use your private database client or phpMyAdmin to run:
Code:
SELECT COUNT(*) AS imported_rows
FROM af_import_lesson_20261013;

SELECT id, title
FROM af_import_lesson_20261013
ORDER BY id;
For a website migration, also update the application's database settings to the new database, check a real page and test any login or form that depends on it. Imported tables alone do not prove that the application is configured correctly.
Troubleshooting
- The file is missing from the list: finish the upload, reopen Import and check the filename. An uploaded file and an imported database are separate steps.
- Unknown collation or SQL syntax error: compare the source and destination database versions. Request a compatible export or review the failing SQL. Do not blindly replace every collation name in a production dump.
- Access denied: check the database service and aaPanel's stored database credentials. Opening port 3306 to everyone does not fix a local importer authentication error.
- Table already exists or duplicate entry: check whether you selected a populated destination or already ran the file. For a migration, use a separate empty database and retain the original backup.
- Success message but missing data: check the selected database, expected table prefix and actual row contents. A structure-only export can create tables without restoring records.
- Large import stalls or fails: inspect the log, available disk space and archive contents. Do not change PHP upload limits at random; browser upload and the panel's background database import are different stages.
Rollback and next steps
If an import damages existing data, stop changes and restore the correct pre-import backup through the database backup controls. Validate a restore in an isolated database before making a live application depend on it. See Back Up and Restore a Database in aaPanel for the recovery workflow.
aaPanel MySQL database documentation
Check MySQL Status and Error Logs in aaPanel